Toyota Sienna Service Manual: Inspection
1. INSPECT BRAKE CYLINDER AND PISTON
(a) Check the brake cylinder bore and front disc brake piston for rust or scoring.
2. INSPECT PAD LINING THICKNESS
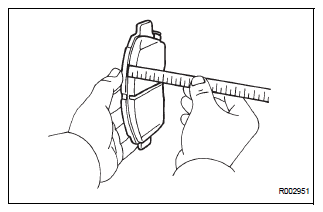
(a) Using a ruler, measure the pad lining thickness.
Standard thickness: 12.0 mm (0.472 in.) Minimum thickness: 1.0 mm (0.039 in.)
3. INSPECT FRONT DISC BRAKE PAD SUPPORT PLATE
(a) Inspect the front disc brake pad support plate (No.
1) and front disc brake pad support plate (No. 2).
Make sure that they have sufficient rebound, no deformation, cracks or wear, and have had all rust and dirt cleaned off
4. INSPECT DISC THICKNESS
(a) Using a micrometer, measure the disc thickness.
Standard thickness: 28.0 mm (1.102 in.) Minimum thickness: 26.0 mm (1.024 in.)
 Disassembly
1. REMOVE FRONT DISC BRAKE BUSH DUST BOOT
(a) Using soft jaws on the vise, hold the front disc brake
cylinder mounting LH in the vise through aluminum
plates.
(b) Using a screwdriver and ham ...
 Reassembly
1. INSTALL FRONT DISC
(a) Aligning the matchmarks, install the front disc.
HINT:
Select the installation position where the disc has
the minimum runout.
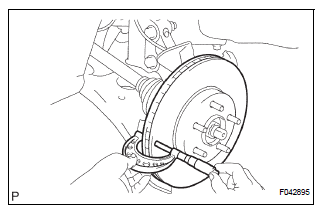
2. INSPECT DISC RUNOUT
(a) Temporaril ...
Other materials:
Removal
1. DISCONNECT CABLE FROM NEGATIVE BATTERY
TERMINAL
CAUTION:
Wait for 90 seconds after disconnecting the cable to prevent the airbag working
2. REMOVE FRONT SEAT ASSEMBLY
HINT:
Refer to the instructions for removal of the front seat assembly (for
flat type).
Refer to the ins ...
Park / Neutral Position Switch Circuit
DESCRIPTION
The fold seat control ECU receives signals from the Park/Neutral position
switch and controls the seat
stowing and return operations. If the shift lever is in any position other than
P the seat cannot be operated.
If the ignition switch is in ACC or IG the seat cannot be operate ...
Removal
1. REMOVE REAR BUMPER COVER
Put protective tape under the quarter panel.
Partially the fender liner.
HINT:
Do not remove the fender liner completely but
partially so that the bumper cover can be removed.
Remove the 2 screws and 8 clips.
Using a screwdriver, disengage the claws an ...
