Toyota Sienna Service Manual: Inspection
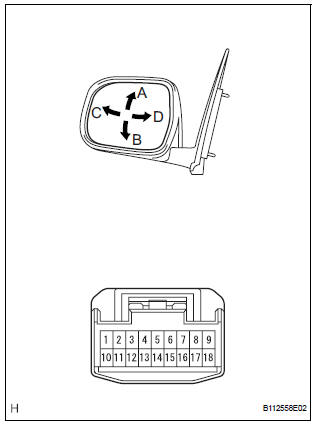
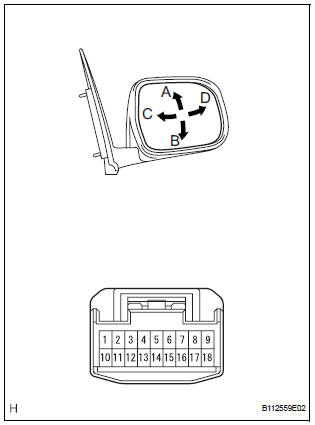
1. INSPECT OUTER REAR VIEW MIRROR ASSEMBLY LH (w/o Memory)
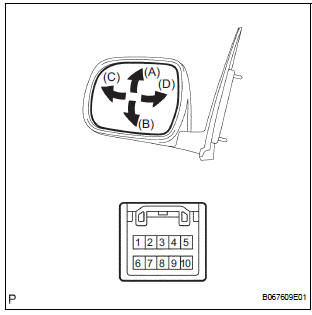
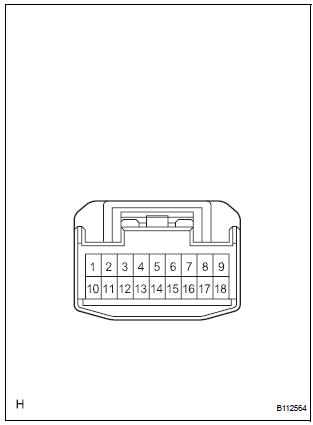
- Disconnect the mirror connector.
- Check operation of the outer mirror.
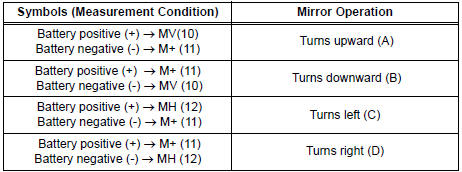
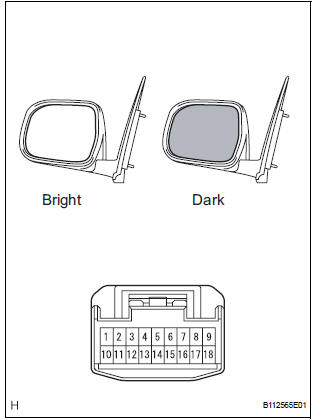
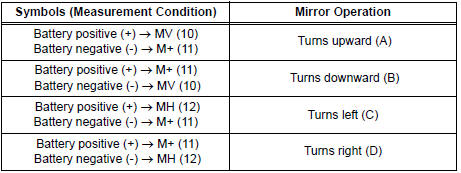
- Apply battery voltage and inspect operation of the mirror face, as shown in the table and illustration.
Standard (LH)
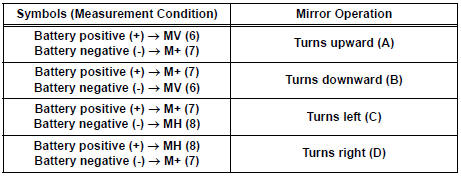
If the result is not as specified, replace the mirror assembly.
2. INSPECT OUTER REAR VIEW MIRROR ASSEMBLY RH (w/o Memory)
- Disconnect the mirror connector.
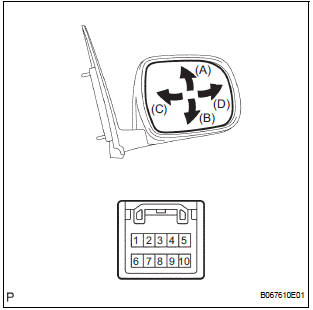
- Check operation of the outer mirror.
- Apply battery voltage and inspect operation of the mirror face, as shown in the table and illustration.
Standard (RH)
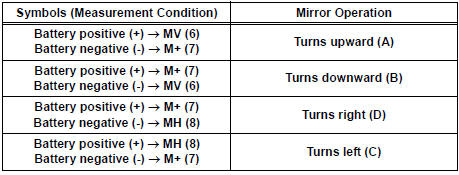
If the result is not as specified, replace the mirror assembly.
3. INSPECT OUTER REAR VIEW MIRROR ASSEMBLY LH (w/ Memory)
- Disconnect the mirror connector.
- Check operation of the outer mirror.
- Apply battery voltage and inspect operation of the mirror face, as shown in the table and illustration.
Standard (LH)
If the result is not as specified, replace the mirror assembly.
- Check operation of the EC mirror.
- Apply battery voltage and inspect operation of the mirror face, as shown in the table and illustration.
Standard (LH)

If the result is not as specified, replace the mirror assembly.
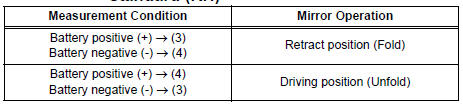
- Check of the retract function.
- Apply battery voltage and inspect operation of the mirror, as shown in the table and illustration.
Standard (LH)

If the result is not as specified, replace the mirror assembly.
4. INSPECT OUTER REAR VIEW MIRROR ASSEMBLY RH (w/ Memory)
- Disconnect the mirror connector.
- Check operation of the outer mirror.
- Apply battery voltage and inspect operation of the mirror face, as shown in the table and illustration.
Standard (RH)
If the result is not as specified, replace the mirror assembly.
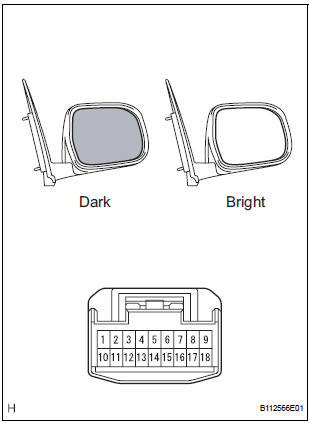
- Check operation of the EC mirror.
- Apply battery voltage and inspect operation of the mirror face, as shown in the table and illustration.
Standard (RH)

If the result is not as specified, replace the mirror assembly.
- Check of the retract function.
- Apply battery voltage and inspect operation of the mirror, as shown in the table and illustration.
Standard (RH)
If the result is not as specified, replace the mirror assembly.
 Removal
HINT:
On the RH side, use the same procedures as on the LH side.
1. REMOVE FRONT DOOR SERVICE HOLE COVER LH
Remove the front lower frame bracket garnish LH.
Remove the front door i ...
 Installation
1. INSTALL OUTER REAR VIEW MIRROR ASSEMBLY LH
Install the mirror with the 3 nuts.
Torque: 8.0 N*m (82 kgf*cm, 71 in.*lbf)
Connect the connector.
...
Other materials:
Selecting the audio
source
Switching between audio sources such as radio and CD are
explained in this section.
Changing audio source
Press the “AUDIO” button to display the audio source selection
screen.
If the audio source selection screen is not displayed, press the “AUDIO”
button again.
Select the des ...
Open in Stop Light Switch Circuit
DTC C1249/49 Open in Stop Light Switch Circuit
DESCRIPTION
WIRING DIAGRAM
INSPECTION PROCEDURE
1 CHECK STOP LIGHT SWITCH OPERATION
(a) Check that the stop light comes on when the brake pedal
is depressed and goes off when the brake pedal is
released.
OK
HINT:
Check the stop li ...
SFR Solenoid Circuit
DESCRIPTION
The solenoid comes on when signals are received from the ECU and controls the
pressure acting on the
wheel cylinders, thus controlling brake force.
WIRING DIAGRAM
INSPECTION PROCEDURE
1 RECONFIRM DTC
HINT:
These codes are detected when a problem is identified in the
...
