Toyota Sienna Service Manual: Installation
1. INSTALL 3 POINT TYPE NO. 2 REAR SEAT BELT ASSEMBLY
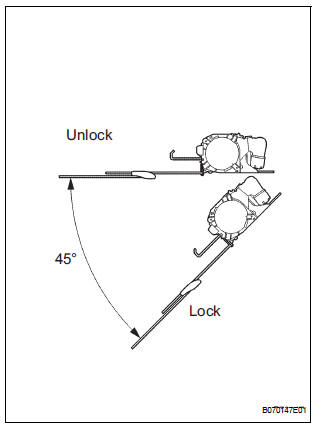
- Check the degree of tilt when the belt begins to lock the ELR.
- Check that the belt does not lock within 15 of
tilt in all directions but that the belt locks with
over 45 of tilt, when gently moving the
retractor.
If operation is not as specified, replace the 3 point type No. 2 rear seat belt assembly.
- Install the 3 point type No. 2 rear seat belt assembly
with the 3 bolts and 2 nuts.
Torque: 42 N*m (430 kgf*cm, 31 ft.*lbf)
- Check the ELR lock.
NOTICE: The check should be performed with the assembly installed.
- Check that the belt locks when pulling out the
belt quickly when the belt is installed.
If operation is not as specified, replace the 3 point type No. 2 rear seat belt assembly.
- Check the fastening function of the child restraint system.
NOTICE: The check should be performed with the assembly installed.
- Check that the belt cannot be pulled out any more but can be rewound after the belt is fully pulled out.
- Check that the belt can be pulled out and
rewound after the belt is fully rewound.
If operation is not as specified, replace the 3 point type No. 2 rear seat belt assembly.
- Install the roof headlining.
HINT: Refer to the instructions for installation of the roof headlining.
2. INSTALL NO. 1 REAR SEAT OUTER BELT ASSEMBLY (for 8-Passenger)
HINT: Refer to the instructions for reassembly of the rear No .1 seat assembly (for center seat).
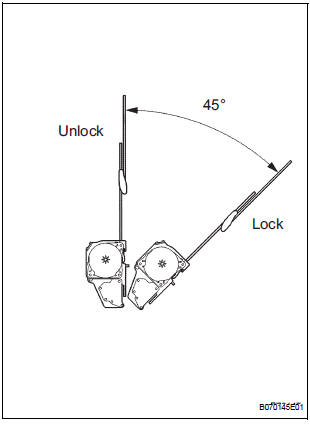
- Check the degree of tilt when the belt begins to lock the ELR.
- Check that the belt does not lock within 15 of
tilt in all directions but that the belt locks with
over 45 of tilt, when gently moving the
retractor.
If operation is not as specified, replace the No.
1 rear seat outer belt assembly.
- Install the No. 1 rear seat outer belt assembly with
the 2 bolts and 2 nuts.
Torque: 42 N*m (430 kgf*cm, 31 ft.*lbf)
- Check the ELR lock.
NOTICE: The check should be performed with the assembly installed.
- Check that the belt locks when pulling out the belt quickly when the belt is installed.
HINT: The seat belt does not lock when the pull out amount of the belt is 955 mm (37.60 in.) or less.
If operation is not as specified, replace the No.
1 rear seat outer belt assembly.
- Check the fastening function of the child restraint system.
NOTICE: The check should be performed with the assembly installed.
- Check that the belt cannot be pulled out any more but can be rewound after it is fully pulled out.
- Check that the belt can be pulled out and
rewound after the belt is fully rewound.
If operation is not as specified, replace the No.
1 rear seat outer belt assembly.
- Install the rear seat shoulder belt cover.
- Install the rear seatback board.
 Removal
1. REMOVE NO. 1 REAR SEAT OUTER BELT
ASSEMBLY (for 8-Passenger)
HINT:
Refer to the instructions for disassembly of the rear No .1 seat assembly (for
center seat).
Remove the rear seatba ...
 Theft deterrent
...
Other materials:
ON / OFF Indication Parameter Error
DTC 01-E2 ON / OFF Indication Parameter Error
DESCRIPTION
DTC No.
DTC Detection Condition
Trouble Area
01-E2
The signal for ON/OFF control from the master device
has a problem
Radio and navigation assembly
INSPECTION PROCEDURE
HINT:
After the insp ...
How to proceed with
troubleshooting
HINT:
Use this procedure to troubleshoot the engine immobiliser
system.
The intelligent tester should be used in steps 4, 5 and 7.
1 VEHICLE BROUGHT TO WORKSHOP
2 CUSTOMER PROBLEM ANALYSIS CHECK AND SYMPTOM CHECK
3 CRANK ENGINE FOR MORE THAN 10 SECONDS
4 CHECK FOR DTC
C ...
Diagnostic trouble code chart
HINT:
The parameters listed in the chart may not confirm exactly to
those read during the DTC check due to the type of
instrument or other factors.
If a trouble code is displayed during the DTC check in the
check mode, check the circuit for the code listed in the table
below. For details of ...
