Toyota Sienna Service Manual: Installation
1. INSTALL REAR DOOR WINDOW FRAME MOULDING
- Remove the tape from the rear door window frame moulding.
- Clean the contact surface of the vehicle body with white gasoline.
- Clean the outer circumference of the rear door window frame moulding with white gasoline.
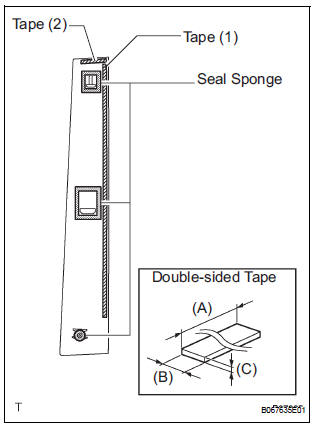
- Apply new double-sided tape to the rear door window frame moulding, as shown in the illustration.
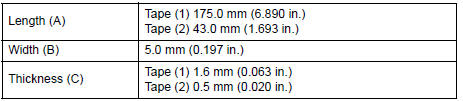
Dimensions:

- Using a heat light, heat the vehicle body and rear door window frame moulding.
Heating temperature:

NOTICE: Do not heat the body and rear door window frame moulding excessively.
- Remove the peeling paper from the face of the rear
door window frame moulding face.
HINT: Be careful that dirt or foreign objects do not stick to the adhesive part when removing the peeling paper.
- Engage the 2 claws and install the rear door window frame moulding with the screw.
NOTICE: Do not apply excessive force onto the rear door window frame moulding, but steady pressure with your thumbs.
2. INSTALL REAR DOOR WINDOW REAR FRAME MOULDING
- Remove the tape from the rear door window rear frame moulding.
- Clean the contact surface of the vehicle body with white gasoline.
- Clean the outer circumference of the rear door window rear frame moulding with white gasoline.
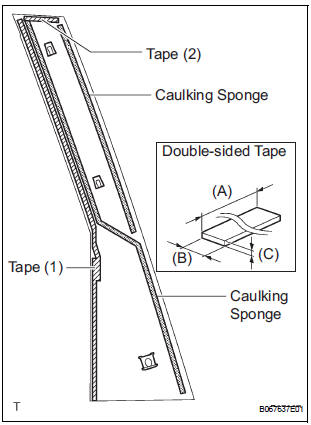
- Apply new double-sided tape to the rear door window rear frame moulding, as shown in the illustration.
Dimensions:
- Using a heat light, heat the vehicle body and rear door window rear frame moulding.
Heating temperature:

NOTICE: Do not heat the body and rear door window rear frame moulding excessively.
- Remove the peeling paper from the face of the rear
door window rear frame moulding face.
HINT: Be careful that dirt or foreign objects do not stick to the adhesive part when removing the peeling paper.
- Engage the 2 claws and install the rear door window rear frame moulding with the screw.
NOTICE: Do not apply excessive force onto the rear door window rear frame moulding, but steady pressure with your thumbs.
 Removal
1. REMOVE REAR DOOR WINDOW FRAME MOULDING
Remove the screw.
Using a heat light, heat the rear door window frame
moulding between 40 to 60 C (104 to 140 F).
NOTICE:
Do not heat the rear ...
 Front fender garnish
COMPONENTS
...
Other materials:
Air outlet control servo motor (for rear air conditioning system)
ON-VEHICLE INSPECTION
1. INSPECT REAR AIR OUTLET CONTROL SERVO
MOTOR
(a) Inspect servo motor operation.
(1) Connect the positive (+) lead from the battery
to terminal 4 and negative (-) lead to terminal 5,
then check that the arm turns to "FOOT" side
smoothly.
(2) Connect t ...
Assist grips
Type A
An assist grip installed on the ceiling
can be used to support your
body while sitting on the seat.
Type B
An assist grip installed on the pillar
can be used when getting in
or out of the vehicle and others.
WARNING
Type A: Do not use the assist grip when g ...
Disassembly
1. REMOVE COOLER THERMISTOR NO.1 (for Automatic Air Conditioning System)
(a) Disengage the 2 claw fittings and the clamp and
remove the cooler thermistor No. 1.
2. REMOVE COOLING UNIT MOTOR SUB-ASSEMBLY WITH FAN
(a) Remove the 3 screws and the cooling unit motor
sub-assembly w/ fan.
3. ...
