Toyota Sienna 2010-2024 Owners Manual: Installation with LATCH system (third seat)
- Manual seat
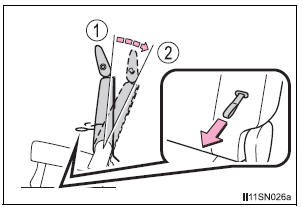
- Fold the seatback while pulling
the strap. Return the seatback
and secure it at the 1st lock
position (most upright position).
Adjust the seatback to the 11th lock position.
- 1st lock position
- 11th lock position
- Power seat
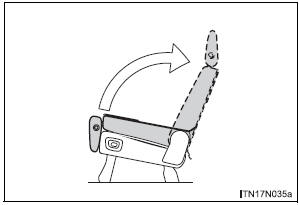
- Fold down the seatback by
pressing the folding/returning
switch . Raise the
seatback by pressing the same
switch, the returning switch or the seatback angle
adjustment switch .
(The seatback will automatically stop.) Do not touch the switch while the seatback is moving, because the operation will stop.
- Widen the gap between the seat cushion and seatback slightly.
- Type A
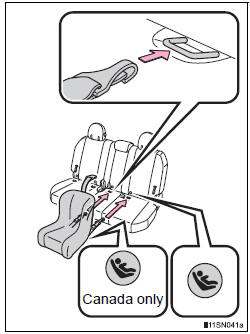
- Latch the hooks of the lower
straps onto the LATCH
anchors. If the child restraint
has a top tether strap, the top
tether strap should be latched
onto the top tether strap anchor.
For owners in Canada: The symbol on a child restraint system indicates the presence of a lower connector system.
- Type B
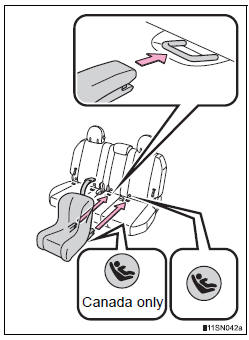
- Latch the buckles onto the
LATCH anchors. If the child
restraint has a top tether strap,
the top tether strap should be
latched onto the top tether strap
anchor.
For owners in Canada: The symbol on a child restraint system indicates the presence of a lower connector system.
 Installation with LATCH system (second seat)
Fold the seatback while pulling
the lever and move to the rearmost
recline position.
Widen the gap between the seat cushion and seatback slightly.
Type A
Latch the hooks o ...
 Installing child restraints using a seat belt (child restraint lock
function belt)
Installing child restraints using a seat belt (child restraint lock
function belt)
Rear facing - Infant seat/convertible seat
Place the child restraint system
on the rear seat facing
the rear of the vehicle.
Run the seat belt through the
child restraint syste ...
Other materials:
Diagnostic trouble code chart
If a trouble code is displayed during the DTC check, check
the circuit listed for that code. For details of each code, turn
the page mentioned below the "DTC No" in the DTC chart.
the "DTC No" in the DTC chart.
1. TRANSPONDER KEY ECU DIAGNOSTIC TROUBLE
CODE CHART
TRANSPON ...
Installation
1. INSTALL WINDSHIELD WIPER MOTOR ASSEMBLY
Apply MP grease to the crank arm pivot of the
windshield wiper motor assembly.
Install the windshield wiper motor assembly with the
3 bolts to the windshield wiper link assembly.
Torque: 7.5 N*m (76 kgf*cm, 66 in.*lbf)
2. INST ...
Reassembly
1. INSTALL REAR DIFFERENTIAL PINION SHAFT
(a) Install the 2 thrust washers to the 2 side gears.
(b) Install the 2 side gears, 2 differential pinion gears, 2
differential pinion thrust washers and differential
pinion shaft to the differential case.
HINT:
Align the holes of the differentia ...
