Toyota Sienna Service Manual: Readiness monitor drive pattern
1. PURPOSE OF READINESS TESTS
- The On-Board Diagnostic (OBD II) system is
designed to monitor the performance of emissionrelated
components, and indicate any detected
abnormalities with DTCs (Diagnostic Trouble Codes).
Since various components need to be monitored in different driving conditions, the OBD II system is designed to run separate monitoring programs called Readiness Monitors.
- The intelligent tester's software must be version 9.0 or newer to view the Readiness Monitor status. To view the status, select the following menu items: DIAGNOSIS / ENHANCED OBD II / MONITOR INFO / MONITOR STATUS.
- When the Readiness Monitor status reads COMPL (complete), the necessary conditions have been met for running the performance tests for that Readiness Monitor.
- A generic OBD II scan tool can also be used to view the Readiness Monitor status.
HINT: Many Inspection and Maintenance (I/M) programs require a vehicle's Readiness Monitor status to show COMPL before beginning emission tests.
The Readiness Monitor will be reset to INCMPL (incomplete) if:
- The ECM has lost battery power or broken a fuse.
- DTCs have been cleared.
- The conditions for running the Readiness Monitor have not been met.
If the Readiness Monitor status shows INCMPL, follow the appropriate Readiness Monitor Drive Pattern to change the status to COMPL.
CAUTION: Strictly observe posted speed limits, traffic laws, and road conditions when performing these drive patterns.
NOTICE: These drive patterns represent the fastest method of satisfying all conditions necessary to achieve complete status for each specific Readiness Monitor.
In the event of a drive pattern being interrupted (possibly due to factors such as traffic conditions), the drive pattern can be resumed. In most cases, the Readiness Monitor will still achieve complete status upon completion of the drive pattern.
To ensure completion of the Readiness Monitors, avoid sudden changes in vehicle load and speed (driving up and down hills and/or sudden acceleration).
Contents:

2. CATALYST MONITOR (ACTIVE AIR-FUEL RATIO CONTROL TYPE)
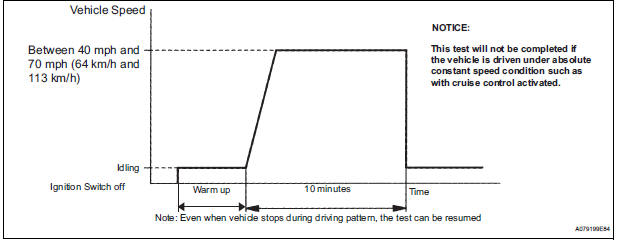
- Preconditions
The monitor will not run unless: The MIL is OFF. - Drive Pattern
- Connect an intelligent tester.
- Turn the ignition switch to the ON position.
- Turn the tester or scan tool ON.
- Clear the DTCs.
- Start the engine and warm it up.
- Drive the vehicle at between 40 mph and 70 mph (64 km/h and 113 km/h) for at least 10 minutes.
- Monitor Status
- Check the Readiness Monitor status displayed on the tester.
- If the status does not switch to COMPL (complete), extend the driving time.
3. EVAP MONITOR (KEY-OFF TYPE)
- Preconditions
The monitor will not run unless:
- The fuel tank is less than 90% full.
- The altitude is less than 8000 ft (2450 m).
- The vehicle is stationary.
- The engine coolant temperature is between 4.4C and 35C (40F and 95F).
- The intake air temperature is between 4.4C and 35C (40F and 95F).
- Vehicle was driven in the city area (or on freeway) for 10 minutes or more.
- Monitor Conditions
- Turn the ignition switch off and wait for 6 hours.
HINT: Do not start the engine until checking Readiness Monitor status. If the engine is started, the step described above must be repeated.
- Monitor Status
- Connect an intelligent tester to the DLC3.
- Turn the ignition switch to the ON position.
- Turn the tester or scan tool ON.
- Check the Readiness Monitor status displayed
on the tester or scan tool.
If the status does not switch to COMPL (complete), restart the engine, make sure that the preconditions have been met, and then perform the Monitor Conditions again.
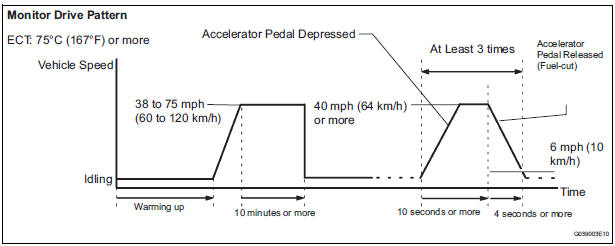
4. A/F SENSOR AND HO2S MONITORS
- Preconditions
The monitor will not run unless:
- 2 minutes or more have elapsed since the engine was started.
- The Engine Coolant Temperature (ECT) is 75C (167F) or more.
- Cumulative driving time at a vehicle speed of 30 mph (48 km/h) or more exceeds 6 minutes.
- Air-fuel ratio feedback control is performed.
- Fuel-cut control is performed for 8 seconds or more (for the Rear HO2 Sensor Monitor).
- Drive Pattern for front A/F sensor and HO2 sensor.
- Connect an intelligent tester to the DLC3.
- Turn the ignition switch to the ON position.
- Turn the tester ON.
- Clear the DTCs.
- Start the engine, and warm it up until the ECT reaches 75C (167F) or higher.
- Drive the vehicle at 38 mph (60 km/h) or more for at least 10 minutes.
- Change the transmission to the 2nd gear.
- Accelerate the vehicle to 40 mph (64 km/h) or more by depressing the accelerator pedal for at least 10 seconds (Procedure "A").
- Soon after performing procedure "A" above, release the accelerator pedal for at least 4 seconds without depressing the brake pedal, in order to execute fuel-cut control (Procedure "B").
- Allow the vehicle to decelerate until the vehicle speed declines to less than 6 mph (10 km/h) (Procedure "C").
- Repeat procedures from "A" through "C" above at least 3 times in one driving cycle.
- Monitor Status
- Check the Readiness Monitor status displayed on the tester.
- If the status does not switch to COMPL (complete), make sure that the preconditions have been met and then perform the Drive Pattern again.
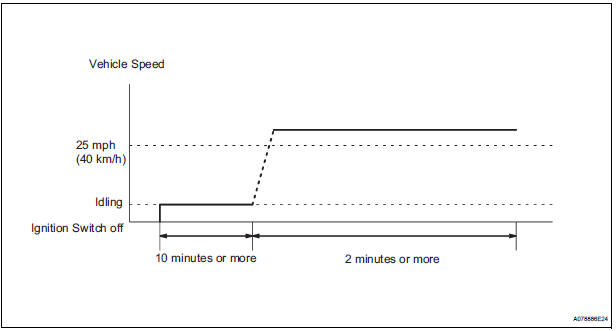
5. AIR-FUEL RATIO (A/F) AND HEATED OXYGEN (HO2) SENSOR HEATER MONITORS (FRONT A/F AND REAR HO2 SENSOR TYPE)
- Preconditions
The monitor will not run unless: The MIL is OFF. - Drive Pattern
- Connect an intelligent tester to the DLC3.
- Turn the ignition switch to the ON position.
- Clear the DTCs.
- Start the engine.
- Allow the engine to idle for 10 minutes or more.
- Drive the vehicle at 25 mph (40 km/h) or more for at least 2 minutes.
- Monitor Status
- Check the Readiness Monitor status displayed
on the tester or scan tool.
If the status does not switch to COMPL (complete), make sure that the preconditions have been met, and repeat the Drive Pattern
 Checking monitor status
The purpose of the monitor result (mode 06) is to allow
access to the results for on-board diagnostic monitoring tests
of specific components/systems that are not continuously
monitored. Examples a ...
 Problem symptoms table
HINT:
When a malfunction is not confirmed by a DTC (Diagnostic
Trouble Code) check and the cause of problem cannot be
identified through a basic inspection, troubleshoot according
to the priority ...
Other materials:
Installation
1. INSTALL SPARK PLUG
(a) Install the 6 spark plugs.
Torque: 18 N*m (183 kgf*cm, 13 ft.*lbf)
2. INSTALL IGNITION COIL ASSEMBLY
(a) Install the 6 ignition coils with the 6 bolts.
Torque: 10 N*m (102 kgf*cm, 7 ft.*lbf)
(b) Connect the 6 ignition coil connectors.
3. INSTALL NO. 1 SUR ...
Cooling system
On-vehicle inspection
1. INSPECT FOR COOLANT LEAK
CAUTION:
Do not remove the radiator cap while the engine and
radiator are still hot. Pressurized, hot engine coolant
and steam may be released and cause serious
burns.
NOTICE:
Before performing each inspection, turn the A/ ...
Installation
1. INSTALL STEERING COLUMN ASSEMBLY
(a) Install the steering column assembly with the 3
bolts.
Torque: 25 N*m (255 kgf*cm, 18 ft.*lbf)
(b) Connect the connectors.
(c) Connect the wire harness clamps to the steering
column tube.
2. CONNECT STEERING INTERMEDIATE SHAFT ASSEMBLY
(a) ...
