Toyota Sienna Service Manual: Reassembly
1. INSTALL REAR SEAT STAY SUB-ASSEMBLY
- Install the rear seat stay sub-assembly with the nut.
Torque: 5.5 N*m (56 kgf*cm, 49 in.*lbf)
2. INSTALL NO. 2 SEAT CUSHION SPRING ASSEMBLY LH
3. INSTALL LOCUS CABLE LH
- Install the locus cable LH with the nut.
Torque: 5.5 N*m (56 kgf*cm, 49 in.*lbf)
4. INSTALL NO. 2 SEAT CUSHION COVER SUBASSEMBLY LH
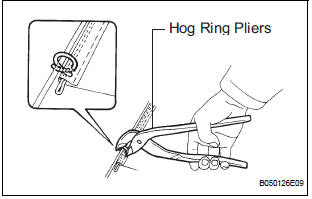
- Using hog ring pliers, install the No. 2 seat cushion cover sub-assembly LH to the seat cushion pad with new hog rings.
NOTICE:
- Be careful not to damage the cover.
- When installing the hog rings, take care to prevent wrinkles as much as possible.
5. INSTALL REAR NO. 2 SEAT INNER BELT ASSEMBLY LH
- Install the rear No. 2 seat inner belt assembly with
the bolt.
Torque: 42 N*m (428 kgf*cm, 31 ft.*lbf)
6. INSTALL REAR SEAT INNER BELT ASSEMBLY LH
- Install the rear seat inner belt assembly with the
bolt.
Torque: 42 N*m (428 kgf*cm, 31 ft.*lbf)
7. INSTALL NO. 2 RECLINING ADJUSTER RELEASE HANDLE LH
- Install the reclining adjuster release handle No. 2 LH
with the nut.
Torque: 5.5 N*m (56 kgf*cm, 49 in.*lbf)
8. INSTALL RECLINING RELEASE HANDLE SUBASSEMBLY LH
- Install the reclining release handle sub-assembly LH
with the nut.
Torque: 5.5 N*m (56 kgf*cm, 49 in.*lbf)
9. INSTALL REAR SEATBACK CONNECTING LH WIRE
- Install the rear seatback connecting LH wire.
10. INSTALL REAR SEAT LOCK RELEASE STRAP ASSEMBLY
- Install the rear seat lock release strap assembly with
the nut.
Torque: 5.5 N*m (56 kgf*cm, 49 in.*lbf)
11. INSTALL NO. 2 SEATBACK COVER LH
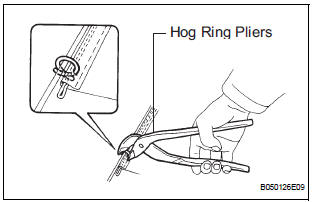
- Using hog ring pliers, install the No. 2 seatback cover LH to the seatback pad with new hog rings.
NOTICE:
- Be careful not to damage the cover.
- When installing the hog rings, take care to prevent wrinkles as much as possible.
- Install the 4 headrest supports.
12. INSTALL NO. 2 SEATBACK LOCK CONTROL BEZEL
- Install the No. 2 seatback lock control bezel with the screw.
13. INSTALL NO. 2 REAR SEAT COVER BEZEL
- Install the No. 2 rear seat cover bezel with 5 screws.
14. INSTALL REAR NO. 2 SEAT LAP BELT ASSEMBLY CENTER WITH INNER LH
- Install the rear No. 2 seat lap belt assembly center
with inner LH with the bolt.
Torque: 42 N*m (428 kgf*cm, 31 ft.*lbf)
15. INSTALL REAR SEATBACK ASSEMBLY LH
- Install the seatback with the 4 bolts.
Torque: 44 N*m (449 kgf*cm, 32 ft.*lbf)
- Connect the rear seat lock release strap cable.
- Connect the reclining remote control cable.
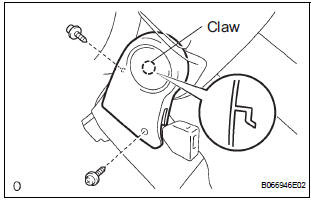
16. INSTALL LH SEAT REAR SEAT RECLINING COVER
- Engage the claw to Install the LH seat rear seat reclining cover with 2 screws.
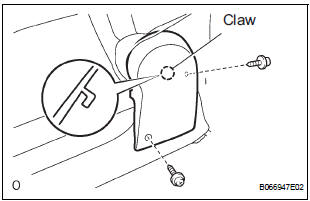
17. INSTALL RH SEAT REAR SEAT RECLINING COVER
- Engage the claw to Install the RH seat rear seat reclining cover with 2 screws.
 Disassembly
1. REMOVE RH SEAT REAR SEAT RECLINING COVER
Remove the 2 screws.
Remove the RH seat rear seat reclining cover by
pulling it out in the arrow mark direction shown in
the illus ...
 Installation
1. INSTALL REAR NO. 2 SEAT ASSEMBLY LH
Place the rear No. 2 seat assembly LH in the cabin.
NOTICE:
Be careful not to damage the body.
Install the rear No. 2 seat assembly LH wi ...
Other materials:
Removal
1. Disconnect cable from negative battery
terminal
2. REMOVE HEATED OXYGEN SENSOR (for Bank 1
Sensor 2) (See page EC-32)
3. REMOVE TAIL EXHAUST PIPE ASSEMBLY
(a) Remove the 2 bolts.
(b) Disconnect the 3 exhaust pipe supports and remove
the tail exhaust pipe assembly.
(c) Remove the gas ...
Rear Air Outlet Damper Control Servo Motor Circuit
DESCRIPTION
This circuit turns the servo motor and changes each damper position by
receiving the signals from the A/
C amplifier.
The rear air outlet damper servo motor switches the air outlet mode by rotating
(normal, reverse) with
electrical power from the A/C amplifier.
WIRING DIAGRAM
...
Initialization
1. RESET SLIDING ROOF MOTOR
If the AUTO operation function does not operate,
reset the sliding roof motor using any of the
following methods.
Press the sliding roof switch on the TILT UP side
and hold it until the sliding roof motor stops.
Then release the switch and leave it untou ...
