Toyota Sienna Service Manual: Register transmitter id (using intelligent tester)
(a) Connect the intelligent tester to DLC3 (Procedure "A").
(b) Turn the ignition switch to the ON position (Procedure "B").
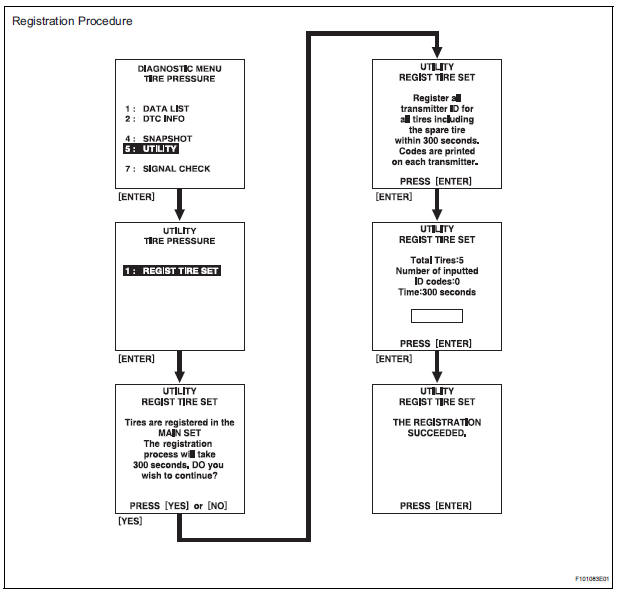
(c) Select the REGIST TIRE following the intelligent tester screen (UTILITY - REGIST TIRE) (Procedure "C").
(d) Input the IDs (ID1 to ID4) using the intelligent tester and transmit them to the tire pressure warning ECU (Procedure "D").
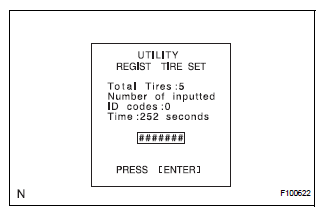
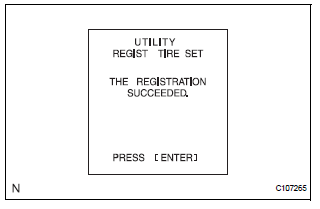
(e) Set the ID transmission condition to "ID Registration is complete" (Procedure "E").
HINT:
- The previously registered IDs will be deleted from the memory when the registration is completed.
- If the procedures "C" to "D" are not completed within 5 min., the mode will return to the normal operation mode.
- If the registration cannot be completed with error, connect TC to GND of DLC3, then retry
- When the system is in initialization mode after the tire pressure warning reset switch has been operated, the registration is disabled until the initialization process is canceled or completed.
 Description of code registration
It is necessary to register the transmitter ID in the tire
pressure warning ECU when replacing the tire pressure
warning valve and transmitter and/or tire pressure
warning ECU.
(a) Before regist ...
 Confirmation of transmitter id registration
(a) Make sure that the ignition switch is off.
(b) Connect the intelligent tester to DLC3.
(c) Turn the ignition switch to the ON position.
(d) Select "TIREPRESS" by following the p ...
Other materials:
Removal
1. REMOVE REAR SEAT 3 POINT TYPE BELT
ASSEMBLY (for 8-Passenger)
HINT:
Refer to the instructions for disassembly of the rear No. 1 seat assembly (for
center seat).
Remove the bolt and rear seat 3 point type belt
assembly.
2. REMOVE REAR SEAT 3 POINT TYPE BELT
ASSEMBLY (for 7-Pas ...
Power Seat Motor Circuit
DESCRIPTION
When the power seat control switch is operated, a command signal is sent to
the position control ECU
and switch assembly (power seat control switch and ECU). The front power seat
switch then controls the
appropriate seat motor as needed. This memory system does not use a seat
po ...
Wiper Signal Circuit
DESCRIPTION
The distance control ECU detects wiper operation. If the windshield wipers
operate in the HI or LO mode,
the cruise control is canceled and the warning sound "pong" is emitted once. In
addition, the following
warnings will continue until the cruise control main switch is ...
