Toyota Sienna Service Manual: Removal
HINT: Remove the RH side by the same procedure as the LH side.
1. REMOVE REAR WHEEL
2. DRAIN BRAKE FLUID
NOTICE: Wash the brake fluid off immediately if it attaches to any painted surface.
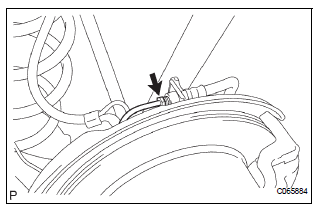
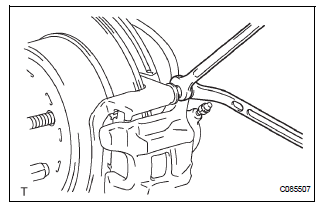
3. SEPARATE REAR BRAKE TUBE NO.4

(a) Remove the clip and a disconnect, the rear brake flexible hose.
(b) Using SST and spanner loosen the rear brake tube No. 4.
SST 09023-00101
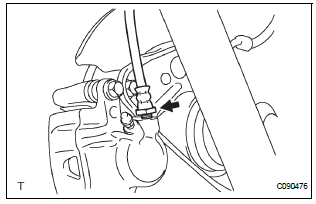
4. SEPARATE REAR LH FLEXIBLE HOSE

(a) Using SST, remove the rear brake flexible hose.
SST 09023-12701
5. REMOVE DISC BRAKE CYLINDER ASSEMBLY REAR LH

(a) Hold the rear disc brake cylinder slide pin and remove the 2 bolts.
(b) Remove the disc brake cylinder assembly rear LH from the rear disc brake cylinder mounting LH.
6. REMOVE REAR DISC BRAKE CYLINDER SLIDE PIN
(a) Remove the 2 rear disc brake cylinder slide pins from the rear disc brake cylinder mounting LH.
7. REMOVE REAR DISC BRAKE BUSH DUST BOOT
(a) Remove the 2 rear disc brake bush dust boots.
8. REMOVE DISC BRAKE PAD KIT REAR (PAD ONLY)
(a) Remove the disc brake pad kit rear.
9. REMOVE REAR DISC BRAKE ANTI SQUEAL SHIM KIT
(a) Remove the anti squeal shim No. 1 and anti squeal shim No. 2 from each pad.
10. REMOVE REAR DISC BRAKE PAD SUPPORT PLATE
(a) Remove the rear disc brake pad support plate (No.
1) and rear disc brake pad support plate (No. 2) from the rear disc brake cylinder mounting LH.
11. REMOVE REAR DISC BRAKE CYLINDER MOUNTING LH
(a) Remove the bolts and rear disc brake cylinder mounting LH.
 Rear disc brake
COMPONENTS
...
 Disassembly
1. REMOVE CYLINDER BOOT
(a) Using a screwdriver, remove the set ring and
cylinder boot.
2. REMOVE REAR DISC BRAKE PISTON
(a) Place a shop rug, between the rear disc brake
piston and the disc ...
Other materials:
Driving assist systems
To help enhance driving safety and performance, the following
systems operate automatically in response to various driving
situations. Be aware, however, that these systems are supplementary
and should not be relied upon too heavily when operating
the vehicle.
ABS (Anti-lock Brake System)
Help ...
Moving a second seat for third seat access
Getting in the vehicle
Tip-up seats
Pull the seatback angle adjustment
lever and fold down the
seatback. The cushion will tip
up. The seat can slide forward.
Move the seat to the frontmost
position.
Ottoman seats
Pull the seatback angle adjustment
lever and fold down th ...
Removal
1. PRECAUTION
HINT:
See page RS-1
2. SEPARATE BATTERY NEGATIVE TERMINAL
3. PLACE FRONT WHEELS FACING STRAIGHT AHEAD
4. REMOVE HORN BUTTON ASSEMBLY (See page RS-
424)
5. REMOVE STEERING WHEEL ASSEMBLY (See page
SR-6)
6. REMOVE STEERING COLUMN COVER LWR (See
page RS-434)
7. REMOVE SPIRAL CA ...
