Toyota Sienna Service Manual: Removal
1. PRECAUTION
CAUTION: Be sure to read "PRECAUTION" thoroughly before servicing.
2. DISCONNECT CABLE FROM NEGATIVE BATTERY TERMINAL
CAUTION: Wait for 90 seconds after disconnecting the cable to prevent the airbag working.
3. PLACE FRONT WHEELS FACING STRAIGHT AHEAD
4. REMOVE STEERING WHEEL NO.3 COVER LOWER (24)
5. REMOVE STEERING WHEEL NO.2 COVER LOWER (24)
6. REMOVE STEERING PAD (24)
7. REMOVE STEERING WHEEL ASSEMBLY
8. REMOVE STEERING COLUMN COVER
9. REMOVE GLOVE COMPARTMENT DOOR ASSEMBLY
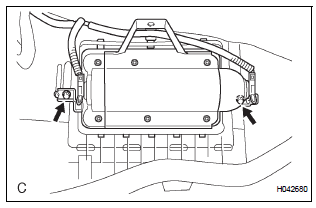
10. REMOVE INSTRUMENT PANEL BOX NO.2
11. DISCONNECT FRONT PASSENGER AIRBAG ASSEMBLY CONNECTOR
- Disconnect the connector from the front passenger airbag assembly.
NOTICE: When handling the airbag connector, take care not to damage the airbag wire harness.
12. REMOVE INSTRUMENT PANEL SUB-ASSEMBLY

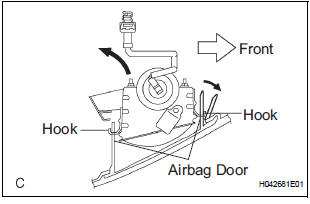
13. REMOVE FRONT PASSENGER AIRBAG ASSEMBLY
- Remove the 2 screws.
- Release the front side wall of the airbag door from the hook by slightly deflecting it and roll the front passenger airbag assembly rearward.
- Release the rear side wall of the airbag door from the other hook and remove the front passenger airbag assembly.
 On-vehicle inspection
1. INSPECT FRONT PASSENGER AIRBAG ASSEMBLY
(VEHICLE NOT INVOLVED IN COLLISION)
Perform a diagnostic system check.
With the front passenger airbag assembly installed
on the veh ...
 Installation
1. INSTALL FRONT PASSENGER AIRBAG ASSEMBLY
Install the front passenger airbag assembly with the
2 screws.
2. INSTALL INSTRUMENT PANEL SUB-ASSEMBLY
3. CONNECT FRONT PASSENGER AIRBAG ...
Other materials:
Capacity and distribution
Cargo capacity depends on the total weight of the occupants.
(Cargo capacity) = (Total load capacity) - (Total weight of occupants)
Steps for Determining Correct Load Limit
Locate the statement “The combined weight of occupants and
cargo should never exceed XXX kg or XXX lbs.” on your ...
Сamshaft timing oil control valve assembly
COMPONENTS
ON-VEHICLE INSPECTION
1. INSPECT CAMSHAFT TIMING CONTROL VALVE ASSEMBLY
(a) Connect the intelligent tester to the DLC3.
(b) Turn the ignition switch to the ON position.
(c) Start the engine and warm it up.
(d) Select the intelligent tester from the ACTIVE TEST
...
Removal
1. DISCONNECT CABLE FROM NEGATIVE BATTERY
TERMINAL
2. REMOVE REAR NO. 2 SEAT LEG SIDE GARNISH SUB-ASSEMBLY
Disengage the 9 clips and remove the rear No. 2
seat leg side garnish sub-assembly.
Remove the 9 clips from the rear No. 2 seat leg side
garnish sub-assembly.
3. ...
