Toyota Sienna Service Manual: Removal
1. REMOVE TRANSFER CASE NO.1 PLUG (See page TF-8)
2. REMOVE TRANSFER DRAIN PLUG
(a) Remove the transfer drain plug, drain gasket and bleed transfer oil.
3. REMOVE EXHAUST PIPE ASSEMBLY
HINT: (See page EX-8)
4. REMOVE PROPELLER WITH CENTER BEARING SHAFT ASSEMBLY
HINT: (See page PR-3)
5. REMOVE TRANSFER EXTENSION HOUSING TYPE T OIL SEAL
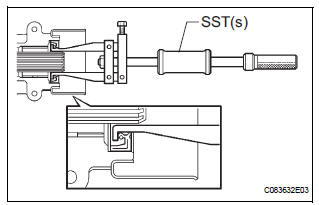
(a) Using SST(s), remove the transfer extension housing type T oil seal from the transfer extension housing sub- assembly.
SST 09308-00010
NOTICE: Be careful not to damage the oil-seal-fitted surface and the inside surface of the bush.
 Extension housing oil seal
COMPONENTS
...
 Installation
1. INSTALL TRANSFER EXTENSION HOUSING TYPE T OIL SEAL
(a) Using SST(s), install anew transfer extension
housing type T oil seal to he transfer extension
housing sub-assembly at the position sho ...
Other materials:
Installation
1. INSTALL CENTER REAR SEAT LAP TYPE BELT
ASSEMBLY (for 8-Passenger)
HINT:
Refer to the instructions for reassembly of the rear No. 1
seat assembly (for center seat).
Install the center rear seat lap type belt assembly
with the bolt.
Torque: 42 N*m (430 kgf*cm, 31 ft.*lbf)
2. IN ...
Before driving
Floor mat
Use only floor mats designed specifically for vehicles of the same
model and model year as your vehicle. Fix them securely in place
onto the carpet.
Insert the retaining hooks (clips)
into the floor mat eyelets.
Turn the upper knob of each
retaining hook (clip) to secu ...
Basic inspection
When a malfunction is not confirmed by the DTC check,
troubleshooting should be carried out in all circuits
considered to be possible causes of the problem. In many
cases, by carrying out the basic engine check shown in the
following flowchart, the location of the problem can be found
quickly a ...
