Toyota Sienna 2010-2024 Owners Manual: “Contact/Call History Settings” screen
- Display the “Phone/Message Settings” screen.
- Select “Contact/Call History Settings”.
- Select the desired item to be set.
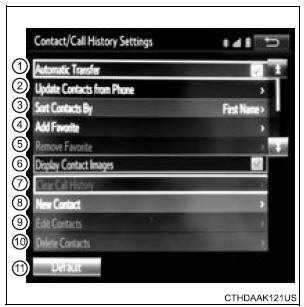
- For PBAP compatible Bluetooth® phones, select to set “Automatic Transfer” on/ off. When set to on, the phone’s contact data and history are automatically transferred.
- Select to update contacts
from the connected phone.
- Select to sort contacts by the first name or last name field.
- Select to add contacts to the favorites list.
- Select to delete contacts from the favorites list.
- Select to display contact images.
- Select to clear contacts from the call history.*
- Select to add new contacts to the contact list.*
- Select to edit contacts in the contact list.*
- Select to delete contacts from the contact list.*
- Select to reset all setup items.
*: For PBAP compatible Bluetooth® phones only, this function is available when “Automatic Transfer” is set to off.
 Contact/Call History
Settings
Contact/Call History
Settings
The contact can be transferred from a Bluetooth® phone to the system.
The contact also can be added, edited and deleted.
The call history can be deleted and contact and favorites can be
change ...
 Update contacts from phone
Operation methods differ between PBAP compatible and PBAP
incompatible but OPP compatible Bluetooth® phones.
If your cellular phone is neither PBAP nor OPP compatible, the contacts
cannot be tra ...
Other materials:
Stereo Component Amplifier Power Source Circuit
DESCRIPTION
This circuit provides power to the stereo component amplifier.
WIRING DIAGRAM
INSPECTION PROCEDURE
1 INSPECT STEREO COMPONENT AMPLIFIER
Disconnect the stereo component amplifier connectors.
Measure the resistance according to the values in the
table below.
Standard ...
Problem symptoms table
HINT:
Inspect the fuse and relay before confirming the suspected
areas in the table below.
Inspect each suspected area in numerical order for the
corresponding symptom.
If the malfunction still exists after checking and confirming
that all circuits and components are normal ...
Disassembly
1. REMOVE FUEL TANK TO FILLER PIPE HOSE (See
page FU-43)
2. REMOVE FUEL TANK MAIN TUBE SUB-ASSEMBLY
(a) Remove the tube joint clip, and pull out the fuel main
tube.
NOTICE:
Check if there is any dirt or mud around the
connector before this operation and remove
the dirt as ...
