Toyota Sienna Service Manual: Adjustment
HINT:
- On the RH side, use the same procedures as on the LH side.
- Since a centering bolt is used as door hinge mounting bolts on the body side and the door side, the door cannot be adjusted with them on. Substitute a bolt with a washer for the centering bolt.
1. INSPECT BACK DOOR PANEL SUB-ASSEMBLY
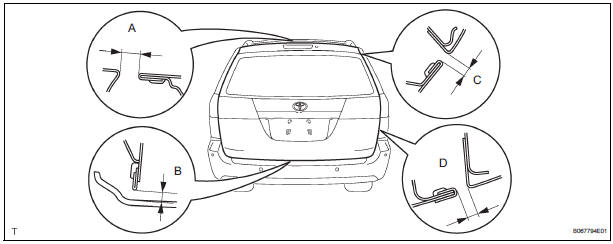
- Check that the clearance is within the standard range.
Standard

2. ADJUST BACK DOOR PANEL SUB-ASSEMBLY
- Adjust the door forward / rearward and vertically by loosening the body side hinge nuts and bolt.
- Tighten the body side hinge nuts and bolt after the
adjustment.
Torque: 19.5 N*m (200 kgf*cm, 14 ft.*lbf)
- Horizontally and vertically adjust the door by loosening the door side hinge bolts.
- Tighten the body side hinge bolts after the
adjustment.
Torque: 19.5 N*m (200 kgf*cm, 14 ft.*lbf)
- Using a screwdriver, remove the back door scuff plate.
HINT: Tape the screwdriver tip before use.
- Adjust the striker position by slightly loosening the striker mounting screws and hitting the striker with a plastic-faced hammer.
- Tighten the striker mounting screws after the
adjustment.
Torque: 27 N*m (275 kgf*cm, 20 ft.*lbf)
 Disassembly
1. REMOVE BACK DOOR GARNISH CENTER
Using a clip remover, disengage the 5 clips and
remove the garnish center.
2. REMOVE BACK DOOR SIDE GARNISH LH
Using a clip remover, disengage the 3 ...
 Reassembly
1. INSTALL BACK DOOR STOPPER LOWER
Install the 2 stoppers with the 4 bolts.
Torque: 7.0 N*m (71 kgf*cm, 62 in.*lbf)
2. INSTALL BACK DOOR BASE STOPPER BRACKET
Install the 2 stopper bracket ...
Other materials:
On-vehicle inspection
1. INSPECT CENTER AIRBAG SENSOR ASSEMBLY
(VEHICLE NOT INVOLVED IN COLLISION)
Perform a diagnosis system check.
2. INSPECT CENTER AIRBAG SENSOR ASSEMBLY
(VEHICLE INVOLVED IN COLLISION AND AIRBAG
HAS NOT DEPLOYED)
Perform a diagnosis system check.
3. INSPECT CENTER AIRBAG ...
Terminals of ECU
1. CHECK DRIVER SIDE J/B ASSEMBLY (MULTIPLEX NETWORK BODY ECU)
Disconnect the B6, 1C, 1K and 1L J/B connectors.
Measure the voltage and resistance according to
the value(s) in the table below.
HINT:
If the result is not as specified, there may be a
malfunction on the w ...
Differential oil
Adjustment
1. INSPECT DIFFERENTIAL OIL
(a) Stop the vehicle on the level place.
(b) Remove the differential filler plug and gasket.
(c) Check that the oil surface is within 5 mm (0.20 in.)
from the lowest position of the inner surface of the
differential filler plug opening.
NOTICE:
...
