Toyota Sienna Service Manual: Adjustment
HINT: On the RH side, use the same procedures as on the LH side.
1. INSPECT SLIDE DOOR PANEL SUB-ASSEMBLY LH
- Check that the clearance is within the standard range.
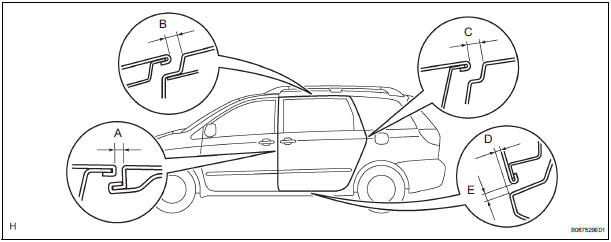
Standard

2. ADJUST SLIDE DOOR PANEL SUB-ASSEMBLY LH
- Using the SST, horizontally and vertically adjust the
door by loosening the hinge center bolts.
SST 09812-00010, 09812-00020
- Tighten the hinge center bolts after the adjustment.
Torque: 31 N*m (306 kgf*cm, 23 ft.*lbf)
- Vertically adjust the front side of the door by loosening the roller lower bolts.
- Tighten the roller lower bolts after the adjustment.
Torque: 31 N*m (306 kgf*cm, 23 ft.*lbf)
- Horizontally adjust the front lower side of the door by loosening the roller lower bolts.
- Tighten the roller lower bolts after the adjustment.
Torque: 31 N*m (306 kgf*cm, 23 ft.*lbf)
- Horizontally adjust the front upper side of the door by loosening the roller upper bolts.
- Tighten the roller lower bolts after the adjustment.
Torque: 8.5 N*m (82 kgf*cm, 73 in.*lbf)
- Adjust the position the door lock striker by slightly loosening the striker mounting screws and hitting the striker with a plastic-faced hammer.
- Tighten the striker mounting screws after the
adjustment.
Torque: 23 N*m (235 kgf*cm, 17 ft.*lbf)
- Adjust the position the front lock striker by slightly loosening the striker mounting screws and hitting the striker with a plastic-faced hammer.
- Tighten the striker mounting screws after the
adjustment.
Torque: 23 N*m (235 kgf*cm, 17 ft.*lbf)
- Adjust the position of the down stopper by moving the male stopper, so that the male stopper can enter smoothly.
- Tighten the female stopper mounting bolts after the
adjustment.
Torque: 5.5 N*m (58 kgf*cm, 49 in.*lbf)
 Disassembly
1. REMOVE REAR DOOR WINDOW FRAME MOULDING
REAR LH (See page ET-31)
2. REMOVE REAR DOOR WINDOW FRAME MOULDING
SUB-ASSEMBLY LH (See page ET-32)
3. REMOVE SLIDE DOOR WINDOW GARNISH LH
Fully o ...
 Reassembly
1. INSTALL POWER SLIDE DOOR TOUCH SENSOR LH
Install the touch sensor with the 4 screws.
Connect the connector.
Fix the wire harness inside the door panel with the
clip.
2. INSTALL REA ...
Other materials:
Reassembly
1. INSTALL INSTR PNL PASS L/DOOR AIR BAG
ASSEMBLY
2. INSTALL INSTRUMENT PANEL WIRE NO.2
3. INSTALL NAVIGATION ANTENNA ASSEMBLY
4. INSTALL ANTENNA CORD SUB-ASSEMBLY
5. INSTALL INSTRUMENT PANEL BOX DOOR SUBASSEMBLY
NO.2
6. INSTALL INSTRUMENT PANEL FINISH PANEL
RETAINER NO.1
7. INSTALL INSTRUM ...
Fold Seat Switch Circuit
DESCRIPTION
When the fold seat switch is operated, a switch operation signal is sent to
the fold seat control ECU. The
ECU receives switch operation signals from each switch and activates the folding
motor, reclining motor,
and release actuator.
WIRING DIAGRAM
INSPECTION PROCEDURE
1 IN ...
On-vehicle inspection
1. CONNECT INTELLIGENT TESTER
(a) Connect the intelligent tester to the DLC3.
(b) Start the engine and run at idle.
(c) Select the ACTIVE TEST mode on the intelligent
tester.
HINT:
Please refer to the intelligent tester operator's
manual for further details.
2. INSPECT ACTUATOR MOTOR ...
