
Toyota Sienna 2010-2026 Owners Manual: Bluetooth® Audio
Listening to Bluetooth® Audio
The Bluetooth® audio system enables the user to enjoy music played on a portable player from the vehicle speakers via wireless communication.
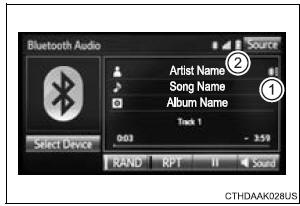
When a Bluetooth® device cannot be connected, check the connection status on the “Bluetooth* Audio� screen. If the device is not connected, either register or reconnect the device. *: Bluetooth is a registered trademark of Bluetooth SIG, Inc.
Status display
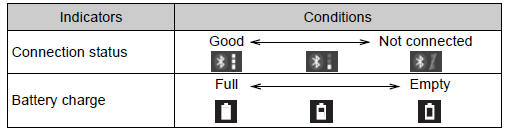
You can check such indicators as signal strength and battery charge on the screen.
- Connection status
- Battery charge
The battery charge indicator may not be displayed depending on the connected device.
The screen may look different from the illustrations shown in this manual.
Playing Bluetooth® audio
Select  or
or
to Play/Pause.
For details on “Bluetooth* Audio� screen operation methods, refer to Basic Audio Operations. For details on how to select a track or album, refer to selecting, fastforwarding and reversing tracks/files/songs. *: Bluetooth is a registered trademark of Bluetooth SIG, Inc.
 Detailed Bluetooth®
system settings
Detailed Bluetooth®
system settings
You can confirm and change the detailed Bluetooth® settings.
How to check and change detailed Bluetooth® settings
Display the “Bluetooth* Setup� screen.
Select “System Settings�.
T ...

Other materials:
Removal
NOTICE:
Before removing the tire pressure warning ECU, read the
registered transmitter IDs of all wheels and write them
down to use for re-registration of transmitter IDs (See
page TW-20).
1. DISCONNECT CABLE FROM NEGATIVE BATTERY
TERMINAL
CAUTION:
Wait at least 90 seconds after dis ...
Terminals of ECU
1. COMBINATION METER ASSEMBLY
*1: with Power Rear No. 2 Seat with Stowing Function
*2: with Theft Deterrent System
Waveform 1 (Reference) : Using an oscilloscope:
OK:
HINT:
As vehicle speed increases, the cycle of the signal
waveform narrows.
Wavefor ...
Brake Warning Light does not Come ON
WIRING DIAGRAM
See page BC-52.
INSPECTION PROCEDURE
1 INSPECT BRAKE WARNING LIGHT
(a) Disconnect the skid control ECU connector.
(b) Turn the ignition switch to the on position.
(c) Check that the BRAKE warning light comes on.
OK:
BRAKE warning light comes on.
HINT:
If troubleshooting ...
