Toyota Sienna Service Manual: Disassembly
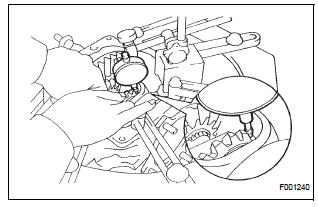
1. REMOVE REAR DIFFERENTIAL CARRIER COVER
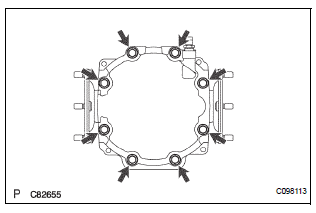
(a) Remove the 8 bolts from the carrier cover.
(b) Using a brass bar and a hammer, separate the carrier cover from rear differential carrier assembly.
(c) Remove the breather plug from the rear differential carrier cover.
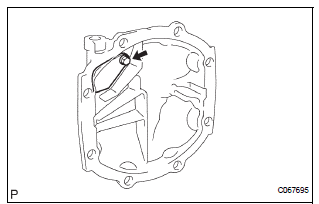
(d) Remove the bolt and oil deflector from the carrier cover.
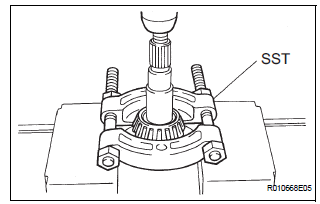
2. FIX REAR DIFFERENTIAL CARRIER ASSEMBLY
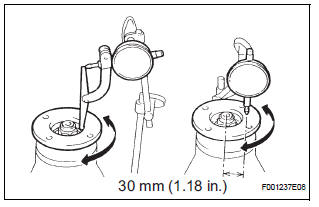
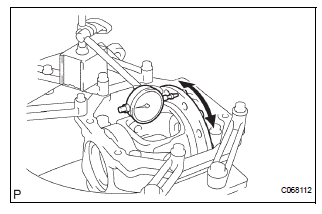
3. INSPECT RUNOUT OF DIFFERENTIAL RING GEAR
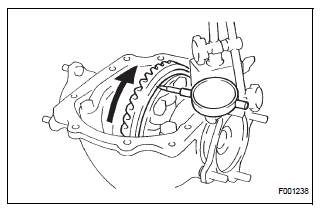
(a) Using a dial gauge, check the runout of the ring gear
Maximum runout: 0.07 mm (0.0028 in.)
If the runout is greater than the maximum, replace the ring gear with a new one.
4. INSPECT DIFFERENTIAL RING GEAR BACKLASH
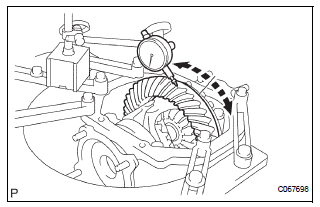
(a) Using a dial gauge, check the backlash of the ring gear.
Backlash: 0.13 to 0.18 mm (0.0051 to 0.0071 in.)
If the backlash is not within the specification, adjust the side bearing preload or repair as necessary.
5. INSPECT TOOTH CONTACT BETWEEN RING GEAR AND DRIVE PINION (See page DF-28)
6. INSPECT DIFFERENTIAL PINION AND SIDE GEAR BACKLASH
(a) Using a dial gauge, check the backlash of the side gear while holding 1 pinion gear toward the differential case.
Backlash: 0.05 to 0.20 mm (0.0020 to 0.0079 in.)
If the backlash is not within the specification, install the 2 side gear thrust washers of differential thickness (See page DF-26).
HINT: Measure the backlash of the side gear with the side gear shaft installed.
7. INSPECT RUNOUT OF REAR DRIVE PINION COMPANION FLANGE SUB-ASSEMBLY
(a) Using a dial gauge, measure the runout of the companion flange vertically and horizontally.
Maximum runout: 0.10 mm (0.0039 in.)
8. INSPECT DIFFERENTIAL DRIVE PINION PRELOAD
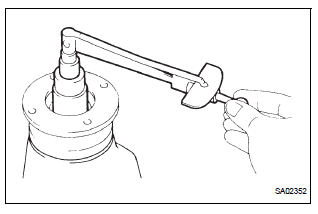
(a) Using a torque wrench, measure the preload of the drive pinion.
Torque: 0.6 to 0.9 N*m (6 to 9 kgf*cm, 5.2 to 7.8 in.*lbf)
9. INSPECT TOTAL PRELOAD
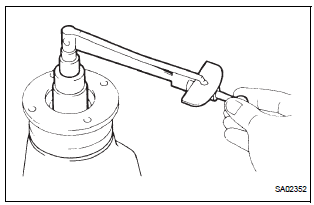
(a) Using a torque wrench, measure the total preload.
Torque: 0.3 to 0.5 N*m (3 to 5 kgf*cm, 2.6 to 4.3 in.*lbf)
10. REMOVE REAR DIFFERENTIAL SIDE GEAR SHAFT SUB-ASSEMBLY
(a) Using needle nose pliers, remove the 2 snap rings from the 2 side gear shafts.
(b) Remove the 2 side gear shafts.
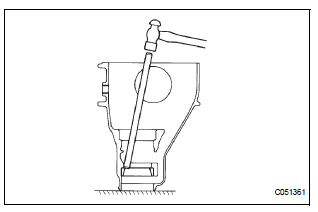
11. REMOVE REAR DIFFERENTIAL SIDE GEAR SHAFT DUST COVER
(a) Using a screwdriver and a hammer, remove the side gear shaft dust cover.
12. REMOVE REAR DIFFERENTIAL SIDE GEAR SHAFT SEAL OIL
(a) Using SST, remove the 2 oil seals from the housing.
SST 09308-00010
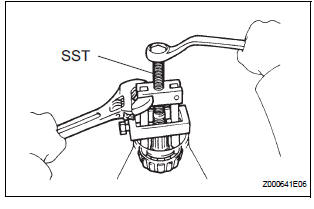
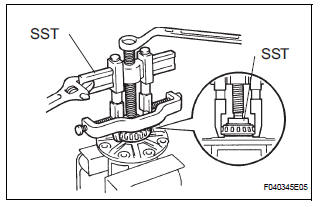
13. REMOVE REAR DRIVE PINION NUT
(a) Using SST and a hammer, unstake the staked part of the nut.
SST 09930-00010
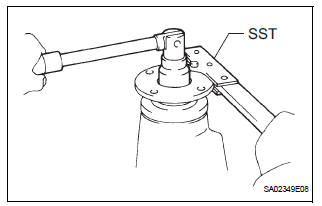
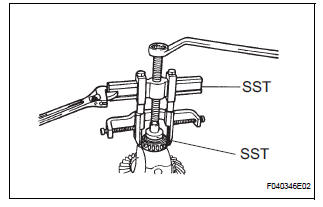
(b) Using SST to hold the flange, remove the nut.
SST 09330-00021
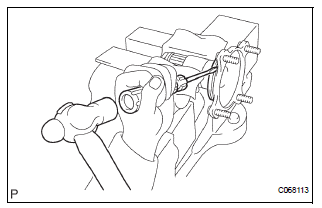
14. REMOVE REAR DRIVE PINION COMPANION FLANGE SUB-ASSEMBLY
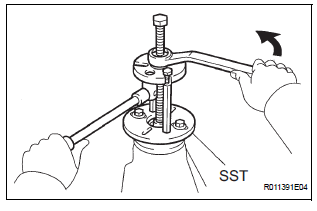
(a) Using SST, remove the companion flange.
SST 09950-30012 (09951-03010, 09953-03010, 09954-03010, 09955-03030, 09956-03020)
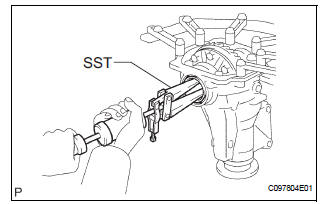
15. REMOVE REAR DIFFERENTIAL DUST DEFLECTOR
(a) Using SST and a press, remove the dust deflector.
SST 09950-60010 (09951-00360), 09950-70010 (09951-07150), 09950-00020
16. REMOVE REAR DIFFERENTIAL CARRIER OIL SEAL
(a) Using SST, remove the oil seal from the differential carrier.
SST 09308-10010
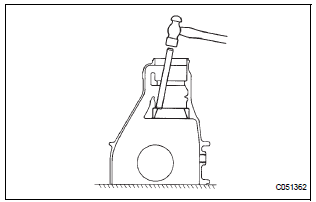
17. REMOVE REAR DIFFERENTIAL DRIVE PINION OIL SLINGER
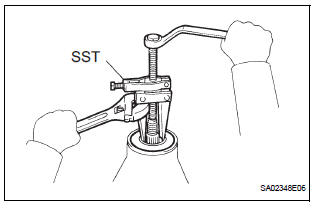
18. REMOVE REAR DRIVE PINION FRONT TAPERED ROLLER BEARING
(a) Using SST, remove the front tapered roller bearing from the drive pinion.
SST 09556-22010
19. REMOVE REAR DIFFERENTIAL DRIVE PINION BEARING SPACER
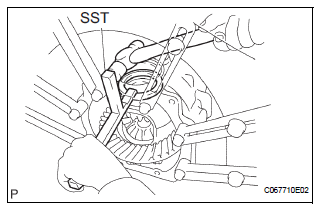
20. REMOVE DIFFERENTIAL CASE ASSEMBLY
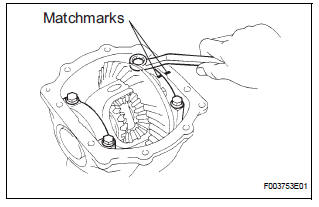
(a) Align matchmarks on the bearing cap and differential carrier.
(b) Remove the 4bolts and 2 bearing caps.
(c) Using SST and a hammer, remove the 2 plate washers.
SST 09504-22011
HINT: Measure the thickness of the plate washers and note it down.
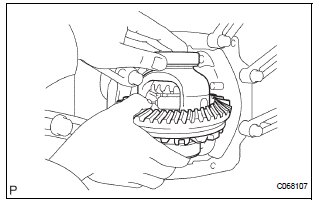
(d) Remove the differential case assembly and the 2 bearing outer races from the differential carrier.
HINT: Tag the 2 bearing outer races races to show the location for reassembly.
21. REMOVE DIFFERENTIAL DRIVE PINION
(a) Remove the differential drive pinion.
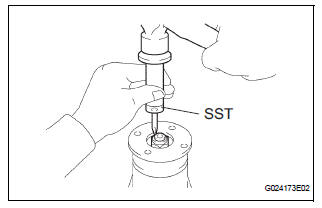
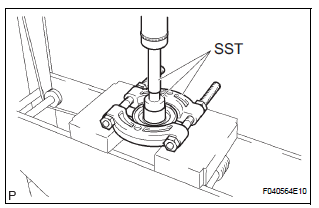
22. REMOVE REAR DRIVE PINION REAR TAPERED ROLLER BEARING
(a) Using SST and a press, remove the rear bearing from the drive pinion.
SST 09950-00020
HINT: If either the drive pinion or ring gear is damaged, replace both as a set.
(b) Remove the plate washer.
23. REMOVE REAR DRIVE PINION FRONT TAPERED ROLLER BEARING
(a) Using a brass bar and a hammer, remove the front bearing (outer race) from the carrier.
24. REMOVE REAR DRIVE PINION REAR TAPERED ROLLER BEARING
(a) Using a brass bar and a hammer, remove the rear bearing (outer race) from the carrier.
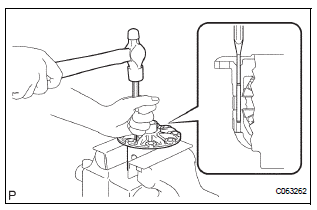
25. REMOVE DIFFERENTIAL RING GEAR
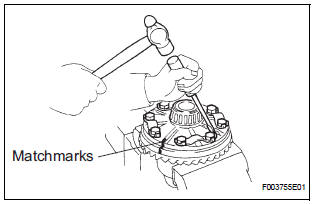
(a) Align matchmarks on the ring gear and differential case.
(b) Using a screwdriver and a hammer, unstake the 4 lock plates.
(c) Remove the 8 ring gear set bolts and 4 lock plates.
(d) Using a plastic hammer, tap on the ring gear to separate it from the differential case.
26. INSPECT DIFFERENTIAL CASE ASSEMBLY
(a) Install the differential case to the differential carrier.
(b) Install the right and left bearing caps with the 4 bolts.
Torque: 79 N*m (800 kgf*cm, 58 ft.*lbf) (c) Using a dial gauge, measure the differential case runout.
Maximum case runout: 0.07 mm (0.0028 in.) (d) Remove the differential case.
27. REMOVE REAR DIFFERENTIAL CASE BEARING LH
(a) Using SST, remove the case bearing (LH) from the differential case.
SST 09950-40011 (09951-00240, 09951-04020, 09952-04010, 09953-04030, 09954-04010, 09955-04061, 09957-04010, 09958-04011), 09950-60010 (09951-00360)
28. REMOVE REAR DIFFERENTIAL CASE BEARING RH
(a) Using SST, remove the case bearing (RH) from the differential case.
SST 09950-40011 (09951-04020, 09952-04010, 09953-04030, 09954-04010, 09955-04061, 09957-04010, 09958-04011), 09950-60010 (09951-00360)
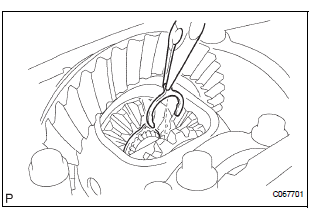
29. REMOVE REAR DIFFERENTIAL PINION SHAFT
(a) Using a pin punch (5 mm) and a hammer, remove the straight pin.
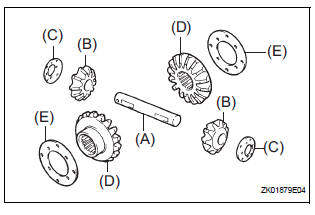
(b) Remove the differential pinion shaft. (A) (c) Remove the 2 differential pinion gears. (B) (d) Remove the 2 differential pinion thrust washers. (C) (e) Remove the 2 side gears. (D) (f) Remove the 2 side gear thrust washers. (E)
 Rear differential carrier
COMPONENTS
...
 Inspection
1. INSPECT RUNOUT OF DIFFERENTIAL RING GEAR
(a) Using a dial gauge , check the runout of the ring
gear.
Maximum runout:
0.07 mm (0.0028 in.)
If the runout is greater than the maximum, replace ...
Other materials:
Installation
1. INSTALL FRONT SHOULDER BELT ANCHOR
ADJUSTER ASSEMBLY
Install the front shoulder belt anchor adjuster
assembly with the bolt.
Torque: 42 N*m (430 kgf*cm, 31 ft.*lbf)
2. INSTALL CENTER PILLAR UPPER GARNISH
3. INSTALL FRONT SEAT OUTER BELT ASSEMBLY
NOTICE:
Do not disassemble ...
Jam Protection Function Activates During Power Back Door Operation
DESCRIPTION
It may be caused by ill-fitting back door, faulty touch sensor or
faulty pulse sensor.
The power back door ECU activates the back motor to open / close
the power back door, thus
controlling the power back door operation. For jam and foreign object
detection, the power ba ...
Stop light switch
ON-VEHICLE INSPECTION
1. STOP LIGHT SWITCH ASSEMBLY
Check the resistance between the terminals at each
switch position as shown ion the chart.
Resistance
...
