Toyota Sienna Service Manual: Disassembly
1. REMOVE FRONT DISC BRAKE BUSH DUST BOOT
(a) Using soft jaws on the vise, hold the front disc brake cylinder mounting LH in the vise through aluminum plates.
(b) Using a screwdriver and hammer, remove the 2 front disc brake bush dust boots from the front disc brake cylinder mounting LH.
2. REMOVE CYLINDER BOOT
(a) Using a screwdriver, remove the set ring and cylinder boot.
3. REMOVE FRONT DISC BRAKE PISTON
(a) Place a shop rug, between the front disc brake piston and the disc brake cylinder sub-assembly.
(b) Use compressed air to remove the front disc brake piston from the disc brake cylinder sub-assembly.
| CAUTION: Do not place your fingers in front of the piston when using compressed air. |
NOTICE: Do not spatter the brake fluid.
4. REMOVE PISTON SEAL
(a) Using a screwdriver, remove the piston seal from the front disc brake cylinder sub-assembly.
NOTICE: Do not damage the inner cylinder and cylinder groove.
5. REMOVE FRONT DISC BRAKE BLEEDER PLUG
(a) Remove the front disc brake bleeder plug from the front disc brake cylinder sub-assembly.
6. REMOVE FRONT DISC BRAKE BLEEDER PLUG CAP
7. REMOVE FRONT DISC
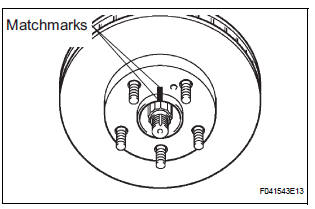
(a) Place matchmarks on the front disc and the axle hub.
(b) Remove the front disc.
 Removal
HINT:
Remove the RH side by the same procedure as the LH side.
1. REMOVE FRONT WHEEL
2. DRAIN BRAKE FLUID
NOTICE:
Wash the brake fluid off immediately if it attaches to
any painted surface.
3. ...
 Inspection
1. INSPECT BRAKE CYLINDER AND PISTON
(a) Check the brake cylinder bore and front disc brake
piston for rust or scoring.
2. INSPECT PAD LINING THICKNESS
(a) Using a ruler, measure the pad linin ...
Other materials:
Towing with a wheel-lift type truck
From the front (2WD models)
Release the parking brake.
From the front (AWD models)
Use a towing dolly under the rear
wheels.
From the rear
Use a towing dolly under the front
wheels. ...
Installation
1. INSTALL HIGH MOUNTED STOP LIGHT ASSEMBLY
2. INSTALL REAR SPOILER
Install the rear spoiler with the 3 nuts and 2 clips.
Connect the center stop light connector.
3. INSTALL BACK DOOR CENTER GARNISH
Engage the 5 clips to install the back door center
garnish.
...
Short in Side Squib LH Circuit
DTC B0115/47 Short in Side Squib LH Circuit
DESCRIPTION
The side squib LH circuit consists of the center airbag sensor assembly and
the front seat side airbag
assembly LH.
This circuit instructs the SRS to deploy when deployment conditions are met.
DTC B0115/47 is recorded when a short ci ...
