Toyota Sienna Service Manual: Disassembly
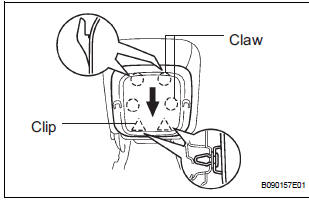
1. REMOVE FRONT SEAT SIDE TABLE LEG COVER (w/ Table)
- Using a screwdriver, disengage the claws and remove the seat side table leg cover.
HINT: Tape the screwdriver tip before use.
2. REMOVE FRONT SEAT SIDE TABLE (w/ Table)
- Remove the 4 nuts and seat side table.
- Remove the 2 clips and seat side table cover.
3. REMOVE OCCUPANT CLASSIFICATION ECU (for Front Passenger Seat)
4. REMOVE VERTICAL SEAT ADJUSTER KNOB (for Driver Seat)
- Using a scraper, disengage the claws and remove
the vertical seat adjuster knob cover.
HINT: Tape the screwdriver tip before use.
- Remove the screw and the vertical seat adjuster knob.
5. REMOVE RECLINING ADJUSTER RELEASE HANDLE LH
- Using a screwdriver, disengage the claws and remove the reclining adjuster release handle.
HINT: Tape the screwdriver tip before use.
6. REMOVE FRONT SEAT CUSHION SHIELD LH
- Remove the screw.
- Using a screwdriver, disengage the claws and remove the cushion shield.
HINT: Tape the screwdriver tip before use.
7. REMOVE FRONT SEAT INNER BELT ASSEMBLY LH
- Disconnect the connectors.
- Remove the nut and inner belt assembly.
8. REMOVE FRONT SEAT CUSHION SHIELD INNER LH
- Remove the screw.
- Using a screwdriver, disengage the claws and remove the cushion shield.
HINT: Tape the screwdriver tip before use.
9. REMOVE FRONT SEAT TRACK COVER LH FRONT OUTER
- Remove the clip, 2 screws and seat track cover front outer.
10. REMOVE FRONT SEAT TRACK COVER LH FRONT INNER
- Remove the clip, 2 screws and seat track cover front inner.
11. REMOVE FRONT SEAT INNER LH ARMREST ASSEMBLY
- Using a screwdriver, remove the armrest cap.
HINT: Tape the screwdriver tip before use.
- Remove the bolt and armrest.
- Remove the 2 washers and 2 spacers.
12. REMOVE SEAT CUSHION COVER WITH PAD
- Disengage the clamps and hooks.
- Disengage the hooks and remove the seat cushion cover with pad.
13. REMOVE SEPARATE TYPE FRONT SEAT CUSHION COVER
- Remove the hog rings and the separate type front seat cushion cover.
14. REMOVE FRONT SEATBACK BOARD LH
- Disengage the clips.
- Remove the seatback board by pulling it out in the arrow mark direction shown in the illustration.
15. REMOVE LUMBAR SUPPORT KNOB LH (for Driver Seat)
- Using a shop rag, remove the snap ring and lumbar support knob.
16. REMOVE FRONT SEAT HEADREST SUPPORT
- Disengage the claw and remove the 2 headrest supports.
17. REMOVE SEATBACK COVER WITH PAD
- with Side airbag: Remove the nut and disengage the separate type front seatback cover bracket.
- Remove the hog rings and disengage the hooks.
- Remove the seatback cover with pad.
18. REMOVE FRONT SEATBACK COVER LH
- Remove the hog rings and the front seatback cover.
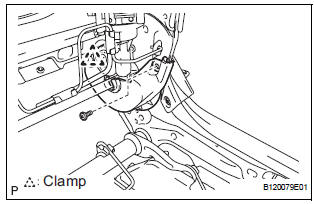
19. REMOVE RECLINING ADJUSTER INSIDE COVER LH
- Disengage the clamp.
- Remove the screw and the reclining adjuster inside cover LH (lower).
20. REMOVE RECLINING ADJUSTER INSIDE COVER RH
HINT: Use the same procedures for the RH side and LH side.
21. REMOVE RECLINING ADJUSTER INSIDE COVER LH
- Remove the screw and the reclining adjuster inside cover LH (upper).
22. REMOVE RECLINING ADJUSTER INSIDE COVER RH
HINT: Use the same procedures for the RH side and LH side.
23. REMOVE FRONT SEAT CUSHION SHIELD LOWER LH
- Remove the screw and the front seat cushion shield lower LH.
24. REMOVE FRONT SEAT CUSHION SHIELD LOWER RH
HINT: Use the same procedures for the RH side and LH side.
25. REMOVE SEAT POSITION AIRBAG SENSOR (for Driver Seat)
 Removal
CAUTION:
Wear safety gloves, because the sharp surfaces of the
seatback frame and seat adjuster may injure your
hand.
Work must be started more than 90 seconds after the
igniti ...
 Reassembly
1. INSTALL SEAT POSITION AIRBAG SENSOR (for Driver Seat)
2. INSTALL FRONT SEAT CUSHION SHIELD LOWER LH
Install the front seat cushion shield lower LH with
the screw.
3. INSTALL FRONT S ...
Other materials:
Inspection
1. INSPECT VANE PUMP SHAFT AND BUSHING IN VANE PUMP FRONT HOUSING
(a) Using a micrometer, measure the outer diameter [a]
of the vane pump shaft with pulley.
(b) Using vernier calipers, measure the inner diameter
[b] of the vane pump front housing bushing.
(c) Calculate the oil clearance ...
Camshaft Position "B" Actuator Circuit / Open
DTC P0013 Camshaft Position "B" Actuator Circuit / Open
(Bank 1)
DTC P0023 Camshaft Position "B" Actuator Circuit / Open
(Bank 2)
DESCRIPTION
The Variable Valve Timing (VVT) system includes the ECM, OCV and VVT
controller. The ECM sends a
target duty-cycle control signal ...
Installation
1. INSTALL FRONT DOOR WINDOW FRAME MOULDING
Remove the tape from the front door window frame
moulding.
Clean the contact surface of the vehicle body with
white gasoline.
Clean the outer circumference of the front door
window frame moulding with white gasoline.
Apply new double-si ...
