Toyota Sienna Service Manual: Disassembly
1. REMOVE RH SEAT REAR SEAT RECLINING COVER
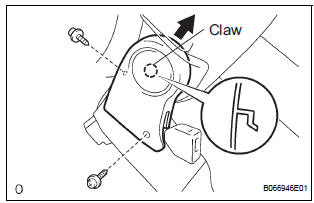
- Remove the 2 screws.
- Remove the RH seat rear seat reclining cover by pulling it out in the arrow mark direction shown in the illustration.
2. REMOVE LH SEAT REAR SEAT RECLINING COVER
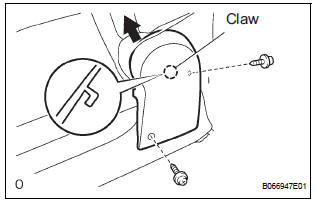
- Remove the 2 screws.
- Remove the LH seat rear seat reclining cover by pulling it out in the arrow mark direction shown in the illustration.
3. REMOVE REAR SEATBACK ASSEMBLY LH
- Disengage the reclining remote control cable.
- Disengage the rear seat lock release strap cable.
- Remove the 4 bolts and rear seatback assembly LH.
4. REMOVE REAR NO. 2 SEAT LAP BELT ASSEMBLY CENTER WITH INNER LH
- Remove the bolt and rear No. 2 seat lap belt assembly center with inner LH.
5. REMOVE NO. 2 REAR SEAT COVER BEZEL
- Remove the 5 screws and cover bezel.
6. REMOVE NO. 2 SEATBACK LOCK CONTROL BEZEL
- Remove the screw and No. 2 seatback lock control bezel.
7. REMOVE NO. 2 SEATBACK COVER LH

- Disengage the claw and remove the 4 headrest supports.
- Remove the hog rings and seatback cover together with the pad.
- Remove the hog rings and No. 2 seatback cover LH.
8. REMOVE REAR SEAT LOCK RELEASE STRAP ASSEMBLY
- Remove the nut and rear seat lock release strap assembly.
9. REMOVE REAR SEATBACK CONNECTING LH WIRE
- Remove the screw and rear seatback connecting LH wire.
10. REMOVE RECLINING RELEASE HANDLE SUBASSEMBLY LH
- Remove the nut and reclining release handle subassembly LH.
11. REMOVE NO. 2 RECLINING ADJUSTER RELEASE HANDLE LH
- Remove the nut and No. 2 reclining adjuster release handle LH.
12. REMOVE REAR SEAT INNER BELT ASSEMBLY LH
- Remove the bolt and rear seat inner belt assembly LH.
13. REMOVE REAR NO. 2 SEAT INNER BELT ASSEMBLY LH
- Remove the bolt and rear No. 2 seat inner belt assembly LH.
14. REMOVE NO. 2 SEAT CUSHION COVER SUBASSEMBLY LH
- Remove the hog rings and cushion cover together with the pad.
- Remove the hog rings and No. 2 seat cushion cover sub-assembly LH.
15. REMOVE LOCUS CABLE LH
- Remove the nut and locus cable LH.
16. REMOVE NO. 2 SEAT CUSHION SPRING ASSEMBLY LH
17. REMOVE REAR SEAT STAY SUB-ASSEMBLY
- Remove the nut and rear seat stay sub-assembly.
 Removal
1. REMOVE REAR SEAT LEG SIDE GARNISH SUBASSEMBLY LH
Disengage the clips and remove the seat leg side
garnish.
2. REMOVE REAR NO. 2 SEAT ASSEMBLY LH
Remove the bolt and locus cab ...
 Reassembly
1. INSTALL REAR SEAT STAY SUB-ASSEMBLY
Install the rear seat stay sub-assembly with the nut.
Torque: 5.5 N*m (56 kgf*cm, 49 in.*lbf)
2. INSTALL NO. 2 SEAT CUSHION SPRING ASSEMBLY
LH
3 ...
Other materials:
Removal
1. REMOVE FRONT WHEELS
2. REMOVE FRONT STABILIZER LINK ASSEMBLY LH
HINT:
(See page SP-26)
3. REMOVE FRONT STABILIZER LINK ASSEMBLY RH
HINT:
Remove the RH side by the same procedures as the LH
side.
4. REMOVE CENTER EXHAUST PIPE ASSEMBLY
HINT:
(See page EX-8)
5. REMOVE NO. 1 FRONT STABILIZ ...
Sound Signal Circuit between Video Terminal and Television Display
DESCRIPTION
This is the sound signal circuit from the video (video adapter) terminal to
the television display assembly.
WIRING DIAGRAM
INSPECTION PROCEDURE
1 CHECK HARNESS AND CONNECTOR (TELEVISION DISPLAY ASSEMBLY - VIDEO
TERMINAL)
Disconnect the connectors from the video (vide ...
Installation
1. INSTALL PARK/NEUTRAL POSITION SWITCH ASSEMBLY
(a) Install the park/neutral position switch to the manual
valve shaft.
(b) Temporarily install the 2 bolts.
(c) Place a new lock plate and tighten the nut.
Torque: 6.9 N*m (70 kgf*cm, 61 in.*lbf)
(d) Temporarily install the control ...
