Toyota Sienna Service Manual: Disassembly
1. REMOVE BACK DOOR GARNISH CENTER
- Using a clip remover, disengage the 5 clips and remove the garnish center.
2. REMOVE BACK DOOR SIDE GARNISH LH
- Using a clip remover, disengage the 3 clips and remove the side garnish.
3. REMOVE BACK DOOR SIDE GARNISH RH
- Using a clip remover, disengage the 3 clips and remove the side garnish.
4. REMOVE BACK DOOR PULL STRAP
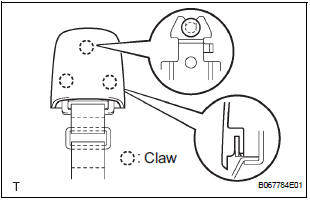
- Using a screwdriver, disengage the claws and
remove the strap cover.
HINT: Tape the screwdriver tip before use.
- Remove the bolt and strap.
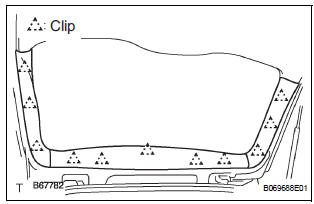
5. REMOVE BACK DOOR TRIM BOARD ASSEMBLY
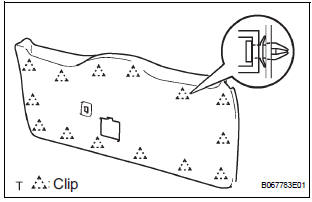
- Using the screwdriver, disengage the 14 clips and
remove the trim board.
HINT: Tape the screwdriver tip before use.
- Remove the service hole cover from the trim board.
6. REMOVE BACK-UP LIGHT ASSEMBLY LH (See page LI-90)
7. REMOVE BACK-UP LIGHT ASSEMBLY RH (See page LI-90)
8. REMOVE BACK DOOR GARNISH SUB-ASSEMBLY OUTSIDE (See page ET-39)
9. REMOVE BACK DOOR LOCK ASSEMBLY
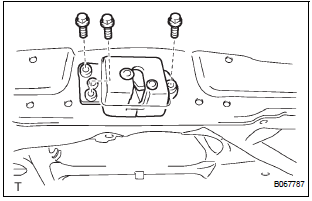
- Disconnect the connector.
- Remove the 3 bolts and lock.
10. REMOVE BACK DOOR BASE STOPPER BRACKET
- Remove the 4 bolts and 2 stopper brackets.
11. REMOVE BACK DOOR STOPPER LOWER
- Remove the 4 bolts and 2 stoppers.
12. REMOVE REAR SPOILER COVER (See page ET-18)
13. REMOVE BACK DOOR STAY SUB-ASSEMBLY LH
14. REMOVE BACK DOOR STAY SUB-ASSEMBLY RH
 Back door
COMPONENTS
...
 Adjustment
HINT:
On the RH side, use the same procedures as on the LH
side.
Since a centering bolt is used as door hinge mounting
bolts on the body side and the door side, the door cannot
be adjusted ...
Other materials:
Installation with LATCH system (second seat)
Fold the seatback while pulling
the lever and move to the rearmost
recline position.
Widen the gap between the seat cushion and seatback slightly.
Type A
Latch the hooks of the lower
straps onto the LATCH
anchors. If the child restraint
has a top tether strap, the ...
Disassembly
HINT:
Overhaul the RH side by the same procedures as these of
the LH side.
1. REMOVE REAR WHEEL
2. SEPARATE REAR DISC BRAKE CALIPER
ASSEMBLY LH
HINT:
Do not disconnect the flexible hose from the brake
caliper.
3. REMOVE REAR DISC
(a) Release the parking brake, and remove the rear
disc.
H ...
Removal
1. PRECAUTION
CAUTION:
Be sure to read "PRECAUTION" thoroughly before
servicing.
2. DISCONNECT CABLE FROM NEGATIVE BATTERY
TERMINAL
CAUTION:
Wait for 90 seconds after disconnecting the cable to
prevent the airbag working.
3. REMOVE INSTRUMENT PANEL FINISH PANEL SUBASSEMBLY LOWER L ...
