Toyota Sienna Service Manual: Door LOCK Position Circuit
DESCRIPTION
This circuit detects the state of the door lock detection sensor and send it to the Multiplex network body ECU.
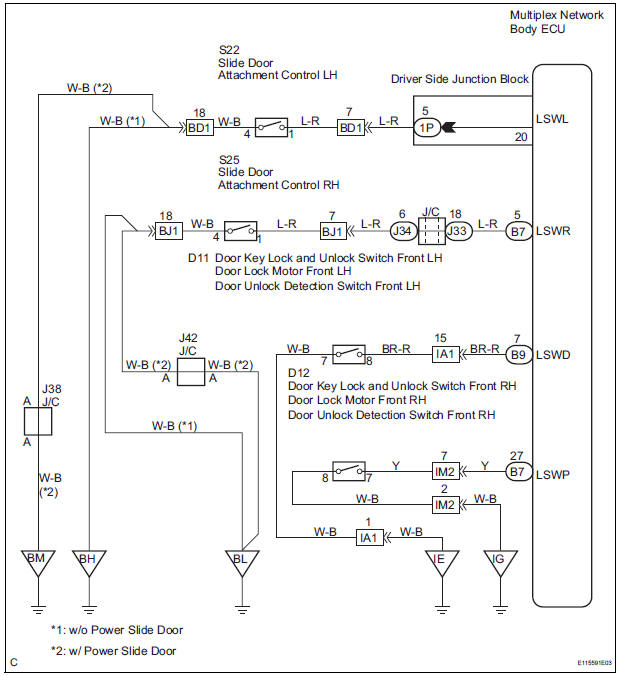
WIRING DIAGRAM
INSPECTION PROCEDURE
1 READ VALUE OF INTELLIGENT TESTER
- Connect the intelligent tester to DLC3.
- Turn the ignition switch ON and push the intelligent tester main switch ON.
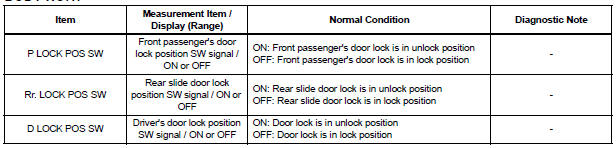
- Select the items below in the DATA LIST, and read the displays on the intelligent tester.
BODY NO.1:
2 CHECK HARNESS AND CONNECTOR
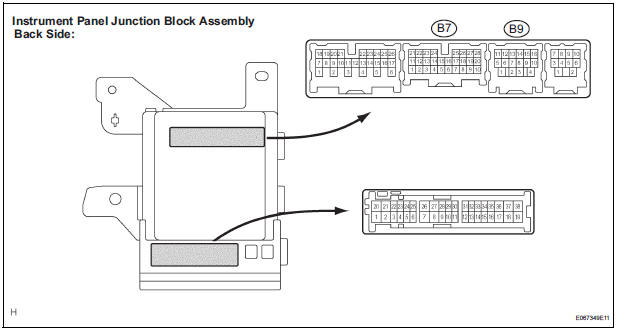
- Disconnect the 1P, B7 and B9 connector from instrument panel junction block assembly.
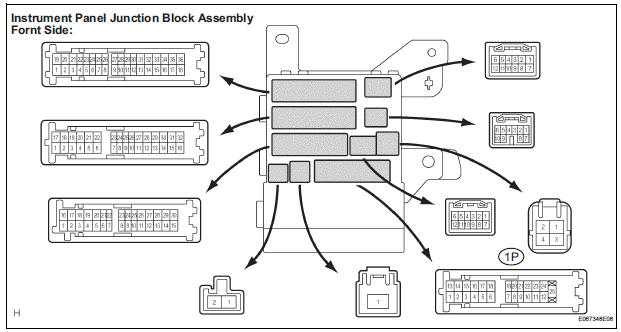
- Check the continuity between each of the terminals of the instrument panel junction block assembly connector side and body ground as shown in the chart below.
Resistance

GO TO POWER DOOR LOCK CONTROL SYSTEM
 Door Courtesy Switch Circuit
DESCRIPTION
The Multiplex network body ECU detects the condition of the door courtesy
switch assembly.
WIRING DIAGRAM
INSPECTION PROCEDURE
1 READ VALUE OF INTELLIGENT TESTER
Connect the ...
 Illumination Circuit
DESCRIPTION
The Multiplex network body ECU controls illumination light as shown in the
chart below.
Room light assembly (Interior light, luggage component light) and
courtesy light wit ...
Other materials:
Rear blower resistor
ON-VEHICLE INSPECTION
1. INSPECT REAR BLOWER MOTOR CONTROLLER
(a) Measure resistance according to the value(s) in the
table below..
Standard resistance
If the resistance is not as specified, replace the rear
blower motor controller.
(b) Inspect the rear blower motor controller.
(1 ...
Inspection
1. INSPECT BRAKE CYLINDER AND PISTON
(a) Check the brake cylinder bore and rear disc brake
piston for rust or scoring.
2. INSPECT PAD LINING THICKNESS
(a) Using a ruler, measure the pad lining thickness.
Standard thickness:
11.0mm (0.433 in.)
Minimum thickness:
1.0 mm (0.039 in.)
3. INS ...
Disassembly
1. REMOVE PROPELLER SHAFT ASSEMBLY
(a) Put matchmarks on both the flanges.
(b) Remove the 4 nuts, bolts and washers.
2. REMOVE INTERMEDIATE SHAFT
(a) Put matchmarks on the propeller shaft subassembly
and universal joint flange.
NOTICE:
Do not use a punch for the marks.
(b) Using a ...
