
Toyota Sienna Service Manual: Driver Side Seat Belt Warning Light does not Operate
DESCRIPTION
When turning the ignition switch to the ON position, the combination meter assembly communicates with the supplemental restraint system by the multiplex communication system. Unless the driver side seat belt is fastened, the combination meter assembly will turn on the seat belt warning light for driver side. If the driver side seat belt is fastened, then the combination meter assembly will turn off the driver side seat belt warning light.
WIRING DIAGRAM
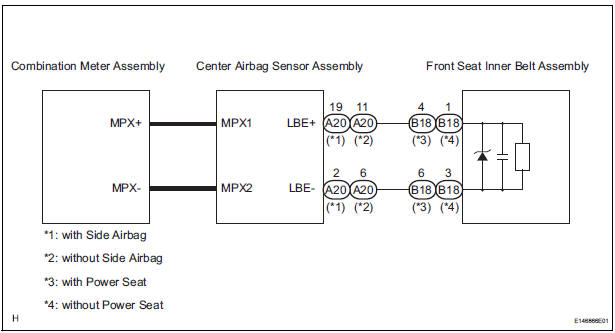
INSPECTION PROCEDURE
1 CHECK MULTIPLEX COMMUNICATION SYSTEM
- Check if the MULTIPLEX communication DTC is output
Result

2 PERFORM ACTIVE TEST BY INTELLIGENT TESTER
- Connect the intelligent tester to the DLC3.
- Turn the ignition switch to the ON position.
- Enter the following menus: DIAGNOSIS / OBD/MOBD / METER / ACTIVE TEST.
- Check the operation by referring to the value(s) in the table below.
METER:

OK: Warning light condition (ON/OFF) can be switched by "ACTIVE TEST".
3 CHECK DTC
- Check if DTC B0126 is output
Result

REPLACE CENTER AIR BAG SENSOR ASSEMBLY
 Engine Coolant Temperature Receiver Gauge Malfunction
DESCRIPTION
The meter CPU receives engine coolant temperature signals from the ECM via
the multiplex
communication lines. The meter CPU displays engine coolant temperature that is
calculated bas ...
 Operating Light Control Rheostat does not Change Light Brightness
DESCRIPTION
The meter CPU receives signals for adjusting illumination on the meter from
this circuit. The meter CPU
detects the illumination level selected by the user according to the position of ...
Other materials:
Problem symptoms table
POWER BACK DOOR SYSTEM
Symptom
Suspected Area
Power back door does not operate when switch* is
pressed (* Switch indicates the satellite switch for
power back door)
ECU-B fuse
Power back door main switch
Satellite switch
Power back door tou ...
Push Switch / Key Unlock Warning Switch Malfunction
DTC B2780 Push Switch / Key Unlock Warning Switch Malfunction
DESCRIPTION
This DTC will be output if the transponder key ECU does not detect that the
unlock warning switch is on
even when the ignition switch is on (Under the normal conditions, the unlock
warning switch is on when
the ignitio ...
All Doors cannot be Locked / Unlocked at Once
DESCRIPTION
The body ECU receives a switch signal from the master switch, the door
control switch, the driver door
key cylinder and the passenger door key cylinder and then drives the door lock
motor.
WIRING DIAGRAM
INSPECTION PROCEDURE
1 INSPECT FUSE (ECU-B)
Remove ECU-B fuse f ...
