Toyota Sienna Service Manual: ECM
COMPONENTS

REMOVAL
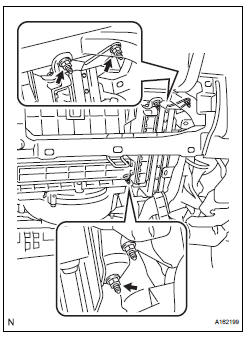
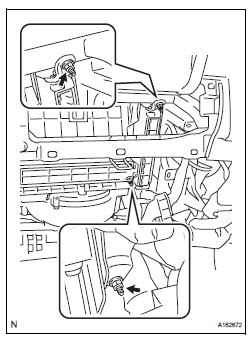
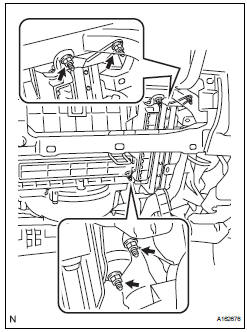
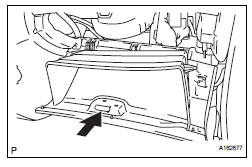
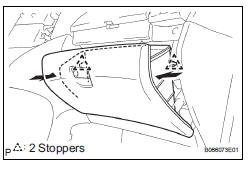
1. REMOVE GLOVE COMPARTMENT DOOR ASSEMBLY
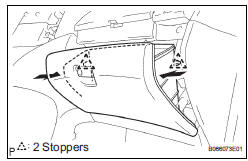
(a) Push the right side wall and then push the left wall to release the stoppers.
(b) Pull the glove compartment door sub-assembly rearward to remove it.
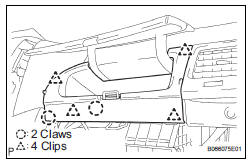
2. REMOVE NO. 2 INSTRUMENT PANEL BOX
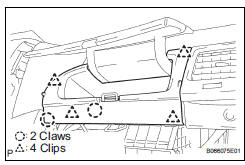
(a) Disengage the 2 claws and 4 clips, and remove the No. 2 instrument panel box.
3. REMOVE ECM
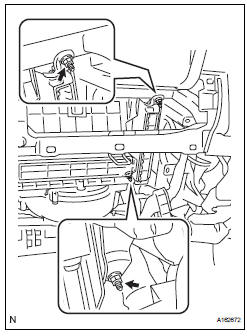
(a) Disconnect the 5 ECM connectors.
(b) Remove the 2 nuts and ECM.
4. REMOVE ECM (with 10 speakers system)
(a) Disconnect the 5 ECM connectors and 2 stereo components amplifier connectors.
(b) Remove the 4 nuts and the ECM with the stereo components amplifier.
INSTALLATION
1. INSTALL ECM
(a) Install the ECM with the 2 nuts.
Torque: 5.5 N*m (56 kgf*cm, 49 in.*lbf) (b) Connect the 5 ECM connectors.
2. INSTALL ECM (with 10 speakers system)
(a) Install the ECM and stereo components amplifier with the 4 nuts.
Torque: 5.5 N*m (56 kgf*cm, 49 in.*lbf) (b) Connect the 5 ECM connectors and 2 stereo components amplifier connectors.
3.INSTALL NO. 2 INSTRUMENT PANEL BOX
(a) Install the No. 2 instrument panel box.
4. INSTALL GLOVE COMPARTMENT DOOR ASSEMBLY
(a) Install the glove compartment door sub-assembly frontward to install it.
(b) Push the right side wall and then push the left wall to install the stoppers.
5. PERFORM REGISTRATION
(a) When replacing the ECM, perform distance control ECU recognition in ECM (See page CC-125).
 Installation
1. INSTALL THROTTLE BODY
(a) Install a new throttle body gasket to the intake air
surge tank.
(b) Install the throttle body with the 4 bolts.
Torque: 10 N*m (102 kgf*cm, 7 ft.*lbf)
...
 Accelerator pedal rod
COMPONENTS
ON-VEHICLE INSPECTION
1. CHECK ACCELERATOR PEDAL ROD
(a) Check the voltage.
(1) Connect the intelligent tester to the DLC3.
(2) Turn the ignition switch to the ON position.
...
Other materials:
Open in Front Pretensioner Squib LH Circuit
DTC B0136/74 Open in Front Pretensioner Squib LH Circuit
DESCRIPTION
The front pretensioner squib LH circuit consists of the center airbag sensor
assembly and the front seat
outer belt assembly LH.
This circuit instructs the SRS to deploy when deployment conditions are met.
DTC B0136/74 i ...
DTC check / clear
1. CHECK DTC
Prepare the intelligent tester.
Connect the intelligent tester to DLC3.
Turn the ignition switch to the ON position and turn
the intelligent tester main switch ON.
Use the intelligent tester to check the DTCs, and
note them down (For operating instructions, see the
int ...
Removal
1. DISCHARGE FUEL SYSTEM PRESSURE
2. REMOVE V-BANK COVER SUB-ASSEMBLY
3. DRAIN ENGINE COOLANT
4. REMOVE WINDSHIELD WIPER MOTOR ASSEMBLY
5. REMOVE FRONT OUTER COWL TOP PANEL SUBASSEMBLY
6. REMOVE AIR CLEANER CAP SUB-ASSEMBLY
7. REMOVE AIR CLEANER CASE SUB-ASSEMBLY
8. REMOVE INTAKE AIR SURGE TA ...
