Toyota Sienna Service Manual: Engine rear oil seal
Components
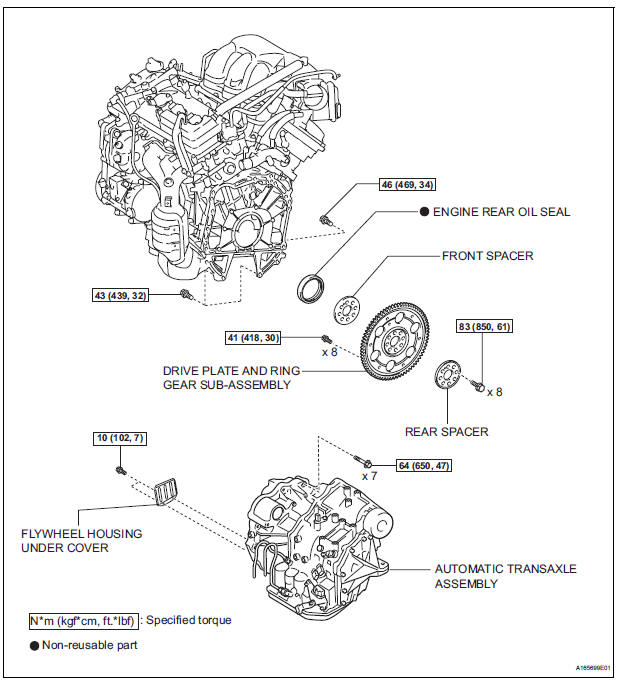
Removal
1. REMOVE AUTOMATIC TRANSAXLE ASSEMBLY (for 2WD)
HINT:
See page AX-163.
2. REMOVE AUTOMATIC TRANSAXLE ASSEMBLY (for 4WD)
HINT: See page AX-167.
3. REMOVE DRIVE PLATE AND RING GEAR SUBASSEMBLY
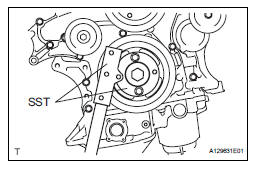
(a) Using SST, hold the crankshaft.
SST 09213-70011 (09213-70020), 09330-00021
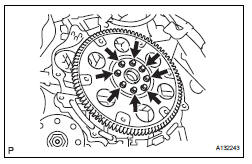
(b) Remove the 8 bolts, front spacer, drive plate and rear spacer.
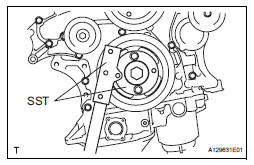
4. REMOVE ENGINE REAR OIL SEAL
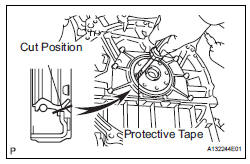
(a) Using a knife, cut off the oil seal lip.
(b) Using a screwdriver, pry out the oil seal.
NOTICE:
Be careful not to damage the crankshaft. Tape the screwdriver tip before use.
INSTALLATION
1. INSTALL ENGINE REAR OIL SEAL
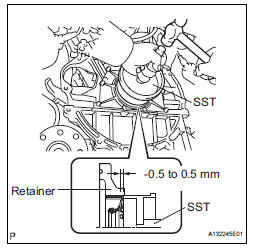
(a) Apply MP grease to a new oil seal lip.
(b) Using SST and a hammer, tap in the oil seal.
SST 09223-15030, 09950-70010 (09951-07150) Oil seal tap in depth: -0.5 to 0.5 mm (-0.020 to 0.020 in.)
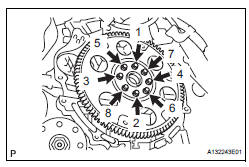
2. INSTALL DRIVE PLATE AND RING GEAR SUBASSEMBLY
(a) Using SST, hold the crankshaft.
SST 09213-70011 (09213-70020), 09330-00021
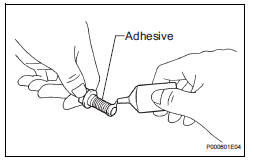
(b) Apply adhesive to 2 or 3 threads of the mounting bolt end.
Adhesive: Part No. 08833-00070, THREE BOND 1324 or equivalent
(1) Install the front spacer, drive plate and rear spacer on the crankshaft.
(2) Install and tighten the 8 mounting bolts uniformly in several steps.
Torque: 83 N*m (850 kgf*cm, 61 ft.*lbf)
3. INSTALL AUTOMATIC TRANSAXLE ASSEMBLY (for 2WD)
HINT:
See page AX-166.
4. INSTALL AUTOMATIC TRANSAXLE ASSEMBLY (for 4WD)
HINT:
See page AX-167.
 Engine front oil seal
COMPONENTS
REMOVAL
1. REMOVE FRONT WHEEL RH
2. REMOVE FRONT FENDER APRON SEAL RH (See
page EM-26)
3. REMOVE V-RIBBED BELT (See page EM-6)
4. REMOVE CRANKSHAFT PULLEY
(a) Using SST, loos ...
 Engine assembly
Components
REMOVAL
1. DISCHARGE FUEL SYSTEM PRESSURE (See page
FU-13)
2. DISCHARGE REFRIGERANT FROM
REFRIGERATION SYSTEM (See page AC-172)
3. REMO ...
Other materials:
Removal
1. REMOVE INSTRUMENT CLUSTER NO.1 FINISH PANEL CENTER
2. REMOVE INSTRUMENT CLUSTER NO.2 FINISH
PANEL CENTER
3. REMOVE INSTRUMENT CLUSTER FINISH PANEL GARNISH
4. REMOVE NAVIGATION RECEIVER ASSEMBLY WITH BRACKET
Remove the 4 screws.
Disconnect the connector and remove the
n ...
Power seat switch
Inspection
1. INSPECT FRONT POWER SEAT SWITCH
Inspect the driver side power seat switch.
Measure the resistance according to the
value(s) in the table below.
Standard resistance:
Slide switch
Front vertical switch
Lifter switch
Reclining switch
If the res ...
Inspection
1. INSPECT FRONT SPEED SENSOR
(a) Make sure that there is no looseness at the
connector lock part and connecting part of the
connector.
(b) Disconnect the speed sensor connector.
(c) Measure the resistance between terminals 1 and 2
of the speed sensor connector.
OK:
Resistance:
0.92 ...
