Toyota Sienna Service Manual: Front seat frame with adjuster
Inspection
1. INSPECT FRONT SEAT ADJUSTER SUB-ASSEMBLY LH
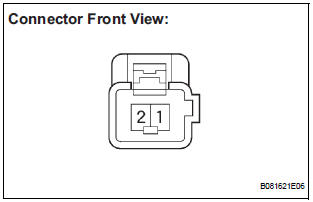
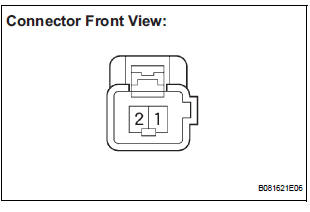
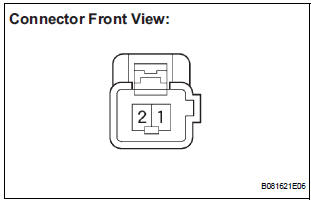
- Check operation of the seat frame (slide motor).
- Check if the seat frame moves smoothly when the battery is connected to the slide motor connector terminals.
OK
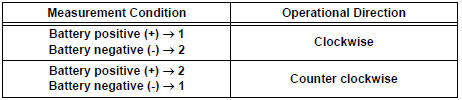
If the result is not as specified, replace the seat frame with adjuster.
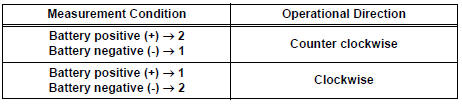
- Check operation of the seat frame (front vertical motor).
- Check if the seat frame moves smoothly when the battery is connected to the front vertical motor connector terminals.
OK
If the result is not as specified, replace the seat frame with adjuster.
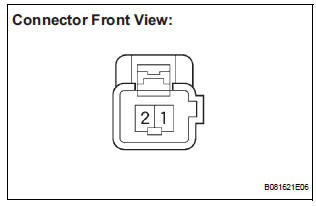
- Check operation of the seat frame (lifter motor).
- Check if the seat frame moves smoothly when the battery is connected to the lifter motor connector terminals.
OK
If the result is not as specified, replace the seat frame with adjuster.
- Check operation of the seat frame (reclining motor).
- Check if the seat frame moves smoothly when the battery is connected to the reclining motor connector terminals.
OK
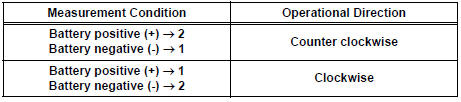
If the result is not as specified, replace the seat frame with adjuster.
2. INSPECT FRONT SEAT ADJUSTER SUB-ASSEMBLY RH
- Check operation of the seat frame (slide motor).
- Check if the seat frame moves smoothly when the battery is connected to the slide motor connector terminals.
OK
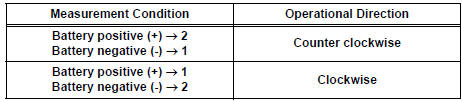
If the result is not as specified, replace the seat frame with adjuster.
- Check operation of the seat frame (reclining motor).
- Check if the seat frame moves smoothly when the battery is connected to the reclining motor connector terminals.
OK
If the result is not as specified, replace the seat frame with adjuster.
 Power seat switch
Inspection
1. INSPECT FRONT POWER SEAT SWITCH
Inspect the driver side power seat switch.
Measure the resistance according to the
value(s) in the table below.
Standard resista ...
 Front power seat lumbar switch
Inspection
1. INSPECT FRONT POWER SEAT LUMBAR SWITCH
Measure the resistance according to the value(s) in
the table below.
Standard resistance
If the result is not as specified ...
Other materials:
Installation
1. Install speed sensor (nc sensor)
(a) Coat the O-ring with ATF.
(b) Install the speed sensor with the bolt.
Torque: 11 N*m (115 kgf*cm, 8 ft.*lbf)
HINT:
Make sure to install the same manufacturer's
sensor.
(c) Connect the speed sensor connector.
2. INSTALL SPEED SENSOR (NT SENSOR)
...
Reassembly
1. INSTALL RACK STEERING PISTON RING
(a) Coat a new O-ring with power steering fluid and
install it onto the power steering rack.
(b) Expand a new rack steering piston ring with your
fingers.
NOTICE:
Be careful not to over expand the rack steering
piston ring.
(c) Coat a new rack steer ...
SM Solenoid Circuit
DTC C1225/25 SM Solenoid Circuit
DESCRIPTION
This solenoid turns on when receiving signals the ECU and controls the
pressure acting on the wheel
cylinders to control the braking force.
WIRING DIAGRAM
Refer to DTCs C0226/21, C0236/22, C0246/23 and C0256/24 (See page BC-105).
INSPECTION PR ...
