Toyota Sienna Service Manual: Hood
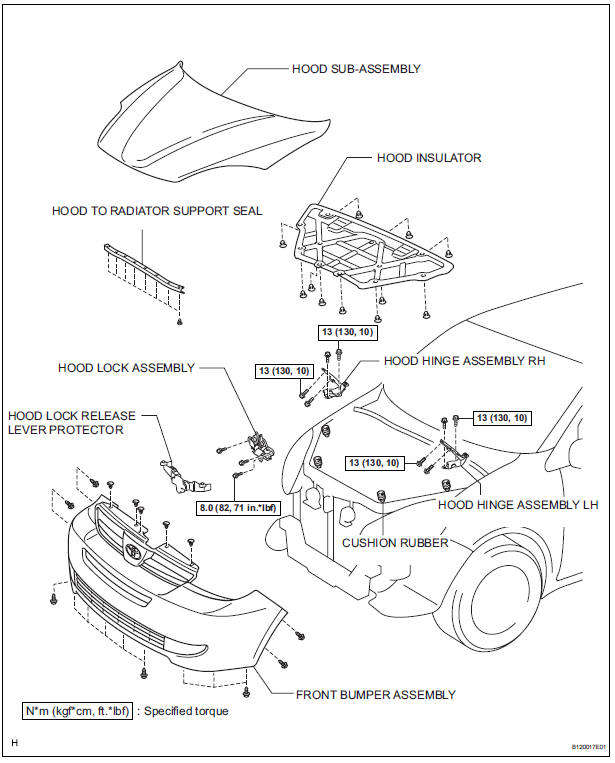
COMPONENTS
Adjustment
HINT: Since a centering bolt is used as a hood hinge mounting bolt and hood lock mounting bolt, the hood and hood lock can not be adjusted with them on. Substitute a bolt with a washer for the centering bolt.
1. INSPECT HOOD SUB-ASSEMBLY
- Check that the clearance is within the standard range.
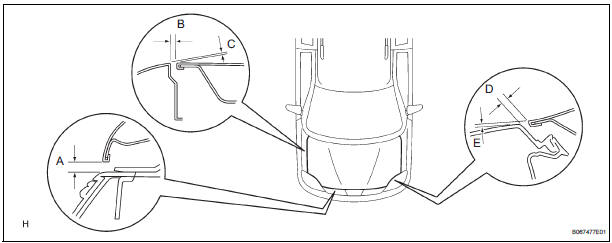
Standard

2. ADJUST HOOD SUB-ASSEMBLY
- Horizontally adjust the hood.
- Loosen the 4 hood hinge mounting bolts on the hood side.
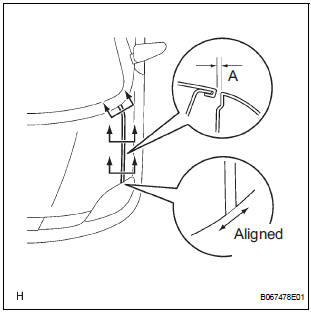
- Adjust the clearance by moving the hood, so
that it will be in the standard range.
Standard (A): 4.0 +- 1.5 mm (0.157 +- 0.059 in.)
- Tighten the hood side hinge bolts after the
adjustment.
Torque: 13 N*m (130 kgf*cm, 10 ft.*lbf)
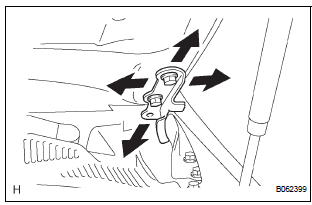
- Adjust the height of the hood front end using the cushion rubber.
- Adjust the cushion rubber so that the hood and the fender will be aligned.
HINT: The cushion rubber goes up and down when turned.
- Adjust the hood lock.
- Remove the front bumper cover (See page ET- 3).
- Using a screwdriver, disengage the 4 claws and remove the hood lock release lever protector.
HINT: Tape the screwdriver tip before use.
NOTICE: Removing the protector damages the clips inside the protector. Therefore, the use of a new protector is necessary for installation.
- Loosen the 3 hood lock mounting bolts.
- Adjust the striker position by moving the hood lock, so that the striker can enter smoothly.
- Tighten the hood lock bolts after the
adjustment.
Torque: 8.0 N*m (82 kgf*cm, 71 in.*lbf)
 Power Back Door Warning Buzzer does not Sound
DESCRIPTION
The power back door system uses a warning buzzer built into the
back door, which has 3 ways of
sounding that are used differently according to the situations:
When all the f ...
 Front door
COMPONENTS
...
Other materials:
Сamshaft timing oil control valve assembly
COMPONENTS
ON-VEHICLE INSPECTION
1. INSPECT CAMSHAFT TIMING CONTROL VALVE ASSEMBLY
(a) Connect the intelligent tester to the DLC3.
(b) Turn the ignition switch to the ON position.
(c) Start the engine and warm it up.
(d) Select the intelligent tester from the ACTIVE TEST
...
Diagnosis system
1. CHECK DLC3
The ECU uses ISO 15765-4 for communication.
The terminal arrangement of the DLC3 complies
with SAE J1962 and meets the ISO 15765-4 format.
NOTICE:
*: Before measuring the resistance, leave the
vehicle as is for at least 1 minute and do not
operate the ignition s ...
System description
1. GENERAL DESCRIPTION
The power seat control system is equipped with the
following function:
The front seats are equipped with electric
adjuster slide, reclining, lifter, front vertical and
lumbar support adjustment functions.
The power seat control system (w ...
