Toyota Sienna Service Manual: Illumination Circuit
DESCRIPTION
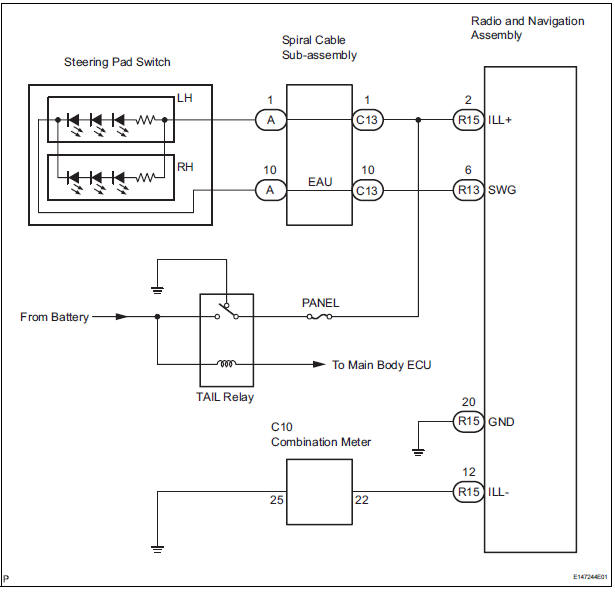
Power is supplied to the radio and navigation assembly and steering pad switch illumination when the light control switch is in the TAIL or HEAD position.
WIRING DIAGRAM
INSPECTION PROCEDURE
NOTICE: The vehicle is equipped with an SRS (Supplemental Restraint System) such as the airbags. Before servicing (including removal or installation of parts), be sure to read the precautionary notice for the Supplemental Restraint System
1 CHECK ILLUMINATION
- Check if the illumination for the radio and navigation assembly, steering pad switch, glove box or others (Hazard switch, cigarette lighter, etc.) comes on when the light control switch is turned to the HEAD or TAIL position.
Result

2 CHECK HARNESS AND CONNECTOR (BATTERY - SPIRAL CABLE SUB-ASSEMBLY)

- Disconnect the spiral cable sub-assembly connector.
- Measure the voltage according to the value(s) in the table below.
Standard voltage

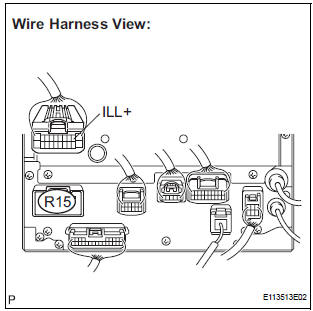
3 CHECK STEERING PAD SWITCH ASSEMBLY
- Disconnect the steering pad switch assembly connector.
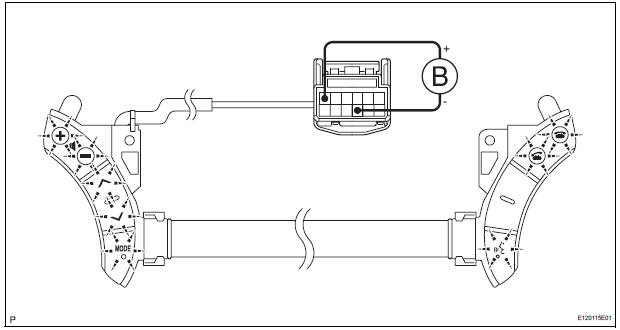
- Disconnect the steering pad switch connector.
- Connect the positive (+) lead to terminal ILL+ and the negative (-) lead to terminal EAU of the steering pad switch connector.
- Check if the illumination for the steering pad switch comes on.

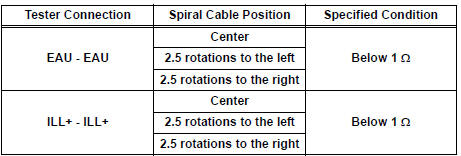
4 INSPECT SPIRAL CABLE SUB-ASSEMBLY
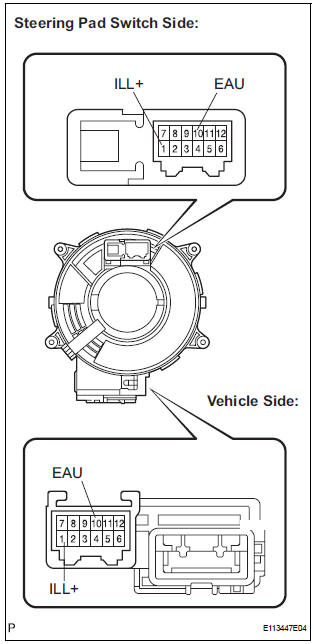
- Disconnect the steering pad switch and spiral cable subassembly connectors.
- Measure the resistance according to the value(s) in the table below.
Standard resistance
NOTICE: The spiral cable is an important part of the SRS airbag system. Incorrect removal or installation of the spiral cable may prevent the airbag from deploying. Be sure to read the page shown in the brackets
5 CHECK HARNESS AND CONNECTOR (SPIRAL CABLE SUB-ASSEMBLY - RADIO AND NAVIGATION ASSEMBLY)

- Disconnect the connectors from the radio and navigation assembly and spiral cable sub-assembly.
- Measure the resistance according to the value(s) in the table below.
Standard resistance

REPLACE RADIO AND NAVIGATION ASSEMBLY
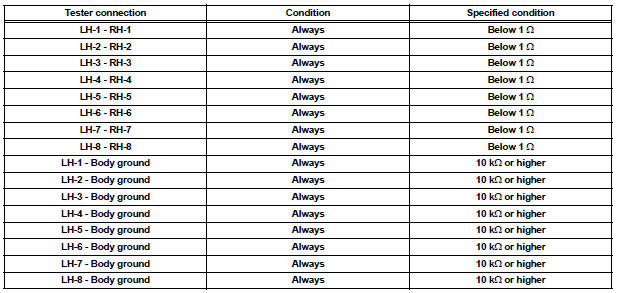
6 INSPECT STEERING PAD SWITCH CABLE
- Disconnect the steering pad switch LH and the steering pad switch RH.
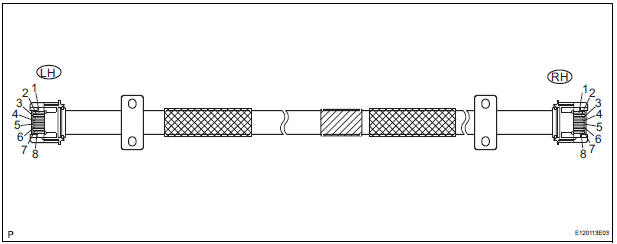
- Measure the resistance according to the value(s) in the table below
Standard resistance
REPLACE STEERING PAD SWITCH RH
7 CHECK HARNESS AND CONNECTOR (BATTERY - RADIO AND NAVIGATION ASSEMBLY)
- Disconnect the radio and navigation assembly connector R15.
- Measure the voltage according to the value(s) in the table below.
Standard voltage

8 CHECK HARNESS AND CONNECTOR (RADIO AND NAVIGATION ASSEMBLY - COMBINATION METER)
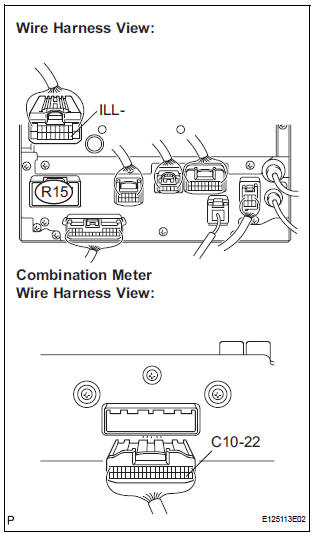
- Disconnect the radio and navigation assembly and combination meter connectors.
- Measure the resistance according to the value(s) in the table below.
Standard voltage

PROCEED TO NEXT CIRCUIT INSPECTION SHOWN IN PROBLEM SYMPTOMS TABLE
 Steering Pad Switch Circuit
DESCRIPTION
This circuit sends an operation signal from the steering pad switch to the
radio receiver.
If there is an open in the circuit, the navigation system cannot be operated
using the st ...
 Parking Brake Switch Circuit
DESCRIPTION
This circuit is from the parking brake switch to the radio and navigation
assembly.
WIRING DIAGRAM
INSPECTION PROCEDURE
1 CHECK BRAKE WARNING LIGHT
Check that the brake warni ...
Other materials:
Taillight Relay Circuit
DESCRIPTION
The Multiplex network body ECU controls TAIL relay when signal is received
from headlight dimmer
switch assembly.
WIRING DIAGRAM
INSPECTION PROCEDURE
1 PERFORM ACTIVE TEST BY INTELLIGENT TESTER
Connect the intelligent tester to DLC3.
Turn the ignition switch ON and ...
How to proceed with troubleshooting
The intelligent tester can be used at steps 3, 7, 10, and 13.
1 VEHICLE BROUGHT TO WORKSHOP
2 CUSTOMER PROBLEM ANALYSIS
(a) Interview the customer to confirm the trouble.
3 DTC CHECK/CLEAR AND FREEZE FRAME DATA
4 PROBLEM SYMPTOM CONFIRMATION
5 PROBLEM SYMPTOM SIMULATION
6 SYMPTOM SI ...
Lost Communication with Radar Sensor
DTC U1102 Lost Communication with Radar Sensor
DESCRIPTION
The laser sensor and distance control ECU transmit the data for general
vehicle control and diagnosis
function along the communication line. The distance control ECU determines the
curve radius information
based on signals from the s ...
