Toyota Sienna Service Manual: Illumination for Panel Switch does not Come on with Tail Switch ON
INSPECTION PROCEDURE
1 CHECK VEHICLE SIGNAL (DISPLAY CHECK MODE)
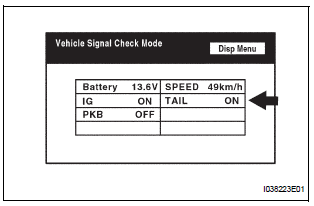
- Enter the "Display Check" mode (Vehicle Signal Check Mode).
- Check that the display changes between ON and OFF according to the light control switch operation.
OK

HINT: This display is updated once per second. As a result, it is normal for the display to lag behind the actual change in the switch
REPLACE RADIO AND NAVIGATION ASSEMBLY
 Radio Broadcast cannot be Received or Poor Reception
INSPECTION PROCEDURE
1 CHECK RADIO AND NAVIGATION ASSEMBLY
Check the radio's automatic station search function.
Check the radio's automatic station search function
by activating it.
OK ...
 Display does not Dim when Light Control Switch is Turned ON
INSPECTION PROCEDURE
1 CHECK IMAGE QUALITY SETTING
Enter the display adjustment screen by pressing the
"DISPLAY" switch.
Turn the light control switch to the TAIL position ...
Other materials:
Camshaft Position "B" Actuator Circuit
DESCRIPTION
The Variable Valve Timing (VVT) system includes the ECM, OCV and VVT
controller. The ECM sends a
target duty-cycle control signal to the OCV. This control signal regulates the
oil pressure supplied to the
VVT controller. Camshaft timing control is performed according to engine ...
Installation
HINT:
Install the RH side by same procedure as the LH side.
1. INSTALL REAR SPEED SENSOR
(a) Install the speed sensor rear LH with the bolt.
Torque: 8.0 N*m (82 kgf*cm, 71 in.*lbf)
NOTICE:
Keep the tip of the speed sensor rear LH clean.
(b) Install the sensor harness clamps with the b ...
Audio terminal
COMPONENTS
REMOVAL
1. REMOVE INSTRUMENT CLUSTER CENTER NO. 2 FINISH PANEL
Using a moulding remover, disengage the 3 clips.
Disconnect the connector and remove the
instrument cluster center No. 2 finish panel.
2. REMOVE STEREO JACK ADAPTER ASSEMBLY
Disenga ...
