Toyota Sienna Service Manual: Inspection
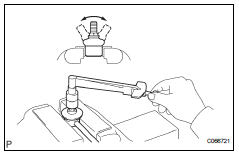
1. INSPECT FRONT STABILIZER LINK ASSEMBLY LH
(a) As shown in the illustration, flip the ball joint stud back and forth 5 times, before installing the nut.
(b) Using a torque wrench, turn the nut continuously at a rate of 2 to 4 seconds per 1 turn and take the torque reading on the 5th turn.

Turning torque: 0.05 to 1.96 N*m (0.5 to 20 kgf*cm, 0.4 to 17.4 in.*lbf)
 Removal
1. REMOVE FRONT WHEELS
2. REMOVE FRONT STABILIZER LINK ASSEMBLY LH
HINT:
(See page SP-26)
3. REMOVE FRONT STABILIZER LINK ASSEMBLY RH
HINT:
Remove the RH side by the same procedures as the LH
s ...
 Installation
1. INSTALL FRONT STABILIZER BAR
2. INSTALL NO. 1 FRONT STABILIZER BAR BUSHING
(a) Install the 2 front stabilizer bar bush No.1 to the
stabilizer bar front.
NOTICE:
Install the bushings with t ...
Other materials:
Dtc check / clear
1. DTC CHECK (NORMAL MODE)
NOTICE:
When the diagnostic system is switched from the
normal mode to the check mode, all the DTCs and
freeze frame data recorded in the normal mode will
be erased. So before switching modes, always check
the DTCs and freeze frame data, and note the ...
Removal
1. REMOVE NO. 1 REAR SEAT OUTER BELT
ASSEMBLY (for 8-Passenger)
HINT:
Refer to the instructions for disassembly of the rear No .1
seat assembly (for center seat).
Remove the rear seatback board.
Remove the rear seat shoulder belt cover.
Remove the 2 bolts, 2 nuts and No. 1 re ...
Problem symptoms table
Use the table below to find the cause of the problem. The
numbers indicate the priority of the likely cause of the
problem. Check each part in order. If necessary, replace
these parts.
Front A/C:
Rear A/C:
...
