Toyota Sienna Service Manual: Inspection
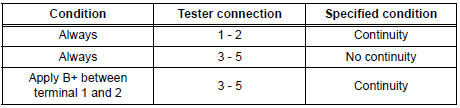
1. INSPECT INVERTER MAIN SWITCH
- Inspect the continuity between terminal at the each switch position shown in the chart.

If continuity is not as specified, replace the main switch assembly.
- Inspect the bulb state when connecting the battery to each terminal
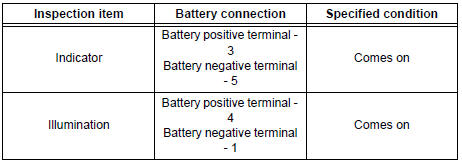
If operation is not as specified, check the faulty bulb.
- Inspect continuity of the bulb by connecting the
tester as shown in the illustration.
If continuity exists, replace the main switch assembly.
If no continuity exists, replace the bulb.
2. INSPECT INVERTER RELAY
- Inspect continuity between terminal at the each switch position shown in the chart.
If continuity is not as specified, replace the point socket relay.
Installation
1. INSTALL VOLTAGE INVERTER ASSEMBLY
- Install the voltage inverter assembly with the 2 bolts.
Torque: 5.4 N*m (55 kgf*cm, 47 in.*lbf)
NOTICE: Tighten the bolts in order shown in the illustration to in the voltage inverter assembly.
2. INSTALL QUARTER TRIM FRONT PANEL ASSEMBLY LH
3. INSTALL BACK DOOR SCUFF PLATE
4. INSTALL BACK DOOR WEATHERSTRIP
5. INSTALL REAR DOOR WEATHERSTRIP LH
6. INSTALL REAR DOOR SCUFF PLATE LH
 Removal
1. REMOVE REAR DOOR SCUFF PLATE LH
2. REMOVE REAR DOOR WEATHERSTRIP LH
3. REMOVE BACK DOOR WEATHERSTRIP
4. REMOVE BACK DOOR SCUFF PLATE
5. REMOVE QUARTER TRIM FRONT PANEL ASSEMBLY LH
6. REMOVE VO ...
 Video terminal
COMPONENTS
REMOVAL
1. REMOVE REAR DOOR SCUFF PLATE LH
2. REMOVE REAR DOOR WEATHERSTRIP LH
3. REMOVE BACK DOOR WEATHERSTRIP
4. REMOVE BACK DOOR SCUFF PLATE
5. REMOVE QUARTER TRIM FRONT PANE ...
Other materials:
Installation
HINT:
Use the same procedures for the RH side and LH side.
The procedures listed below are for the LH side.
1. INSTALL CURTAIN SHIELD AIRBAG ASSEMBLY LH
Install the curtain shield airbag assembly LH with
the 13 bolts in the order shown in the illustration.
Tor ...
Power slide door touch sensor
INSPECTION
1. INSPECT POWER SLIDE DOOR TOUCH SENSOR LH
Check the resistance of the sensor.
Resistance
If the result is not as specified, replace the sensor.
2. INSPECT POWER SLIDE DOOR TOUCH SENSOR RH
Check the resistance of the sensor.
Resistance
If the result is not a ...
Removal
1. REMOVE V-BANK COVER SUB-ASSEMBLY (See
page EM-28)
2. REMOVE NO. 1 ENGINE UNDER COVER (See page
EM-26)
3. DRAIN ENGINE COOLANT (See page CO-6)
4. REMOVE NO. 2 AIR CLEANER INLET (See page EM-
28)
5. REMOVE BATTERY (See page EM-26)
6. REMOVE FRONT BUMPER ASSEMBLY (See page
ET-3)
7. REMOVE ...
