Toyota Sienna Service Manual: Inspection
1. INSPECT OUTER REAR VIEW MIRROR ASSEMBLY LH (w/o Memory)
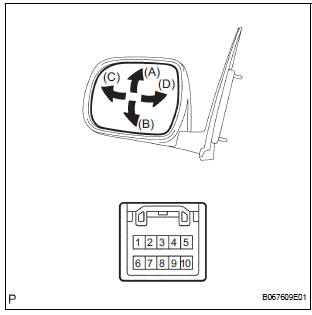
- Disconnect the mirror connector.
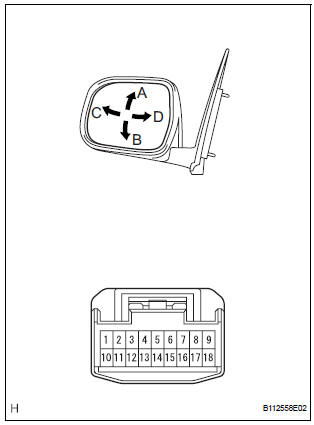
- Check operation of the outer mirror.
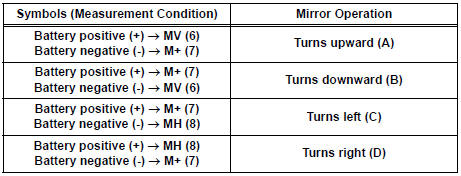
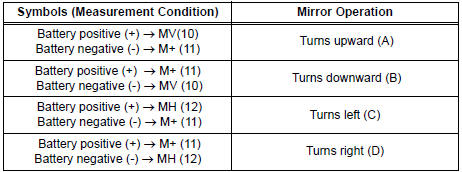
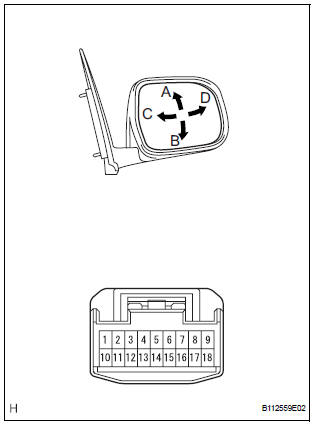
- Apply battery voltage and inspect operation of the mirror face, as shown in the table and illustration.
Standard (LH)
If the result is not as specified, replace the mirror assembly.
2. INSPECT OUTER REAR VIEW MIRROR ASSEMBLY RH (w/o Memory)
- Disconnect the mirror connector.
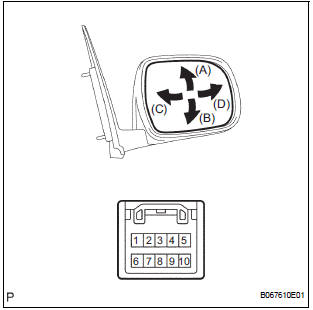
- Check operation of the outer mirror.
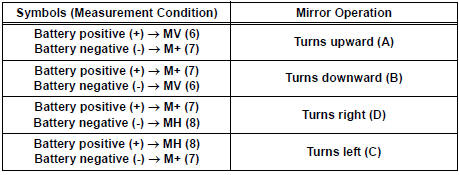
- Apply battery voltage and inspect operation of the mirror face, as shown in the table and illustration.
Standard (RH)
If the result is not as specified, replace the mirror assembly.
3. INSPECT OUTER REAR VIEW MIRROR ASSEMBLY LH (w/ Memory)
- Disconnect the mirror connector.
- Check operation of the outer mirror.
- Apply battery voltage and inspect operation of the mirror face, as shown in the table and illustration.
Standard (LH)
If the result is not as specified, replace the mirror assembly.
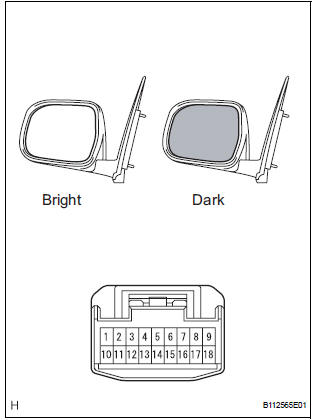
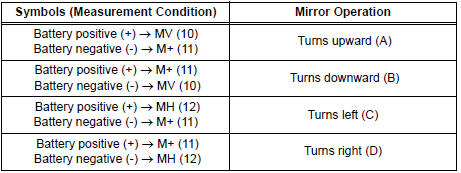
- Check operation of the EC mirror.
- Apply battery voltage and inspect operation of the mirror face, as shown in the table and illustration.
Standard (LH)

If the result is not as specified, replace the mirror assembly.
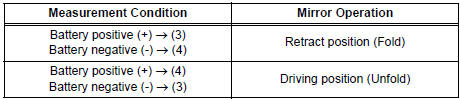
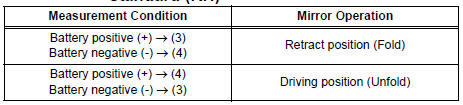
- Check of the retract function.
- Apply battery voltage and inspect operation of the mirror, as shown in the table and illustration.
Standard (LH)
If the result is not as specified, replace the mirror assembly.
4. INSPECT OUTER REAR VIEW MIRROR ASSEMBLY RH (w/ Memory)
- Disconnect the mirror connector.
- Check operation of the outer mirror.
- Apply battery voltage and inspect operation of the mirror face, as shown in the table and illustration.
Standard (RH)
If the result is not as specified, replace the mirror assembly.
- Check operation of the EC mirror.
- Apply battery voltage and inspect operation of the mirror face, as shown in the table and illustration.
Standard (RH)

If the result is not as specified, replace the mirror assembly.
- Check of the retract function.
- Apply battery voltage and inspect operation of the mirror, as shown in the table and illustration.
Standard (RH)
If the result is not as specified, replace the mirror assembly.
 Removal
HINT:
On the RH side, use the same procedures as on the LH side.
1. REMOVE FRONT DOOR SERVICE HOLE COVER LH
Remove the front lower frame bracket garnish LH.
Remove the front door i ...
 Installation
1. INSTALL OUTER REAR VIEW MIRROR ASSEMBLY LH
Install the mirror with the 3 nuts.
Torque: 8.0 N*m (82 kgf*cm, 71 in.*lbf)
Connect the connector.
...
Other materials:
Hood
COMPONENTS
Adjustment
HINT:
Since a centering bolt is used as a hood hinge mounting bolt
and hood lock mounting bolt, the hood and hood lock can not
be adjusted with them on. Substitute a bolt with a washer for
the centering bolt.
1. INSPECT HOOD SUB-ASSEMBLY
Check that the clearance is ...
Removal
1. REMOVE ENGINE AND TRANSAXLE
HINT:
(See page EM-26)
2. REMOVE AUTOMATIC TRANSMISSION WITH
TRANSFER
HINT:
(See page AX-164)
3. REMOVE TRANSFER ASSEMBLY
HINT:
(See page TF-8)
4. REMOVE CTR DIFFERENTIAL LOCK SLEEVE
HINT:
(See page TF-13)
5. REMOVE TRANSFER CASE OIL SEAL
(a) Using SS ...
TRAC OFF Indicator Light Remains ON
DESCRIPTION
The skid control ECU is connected to the combination meter via CAN and
multiplex communications.
When the traction OFF switch is turned on, the TRAC OFF indicator light will
come on (for 2WD model).
WIRING DIAGRAM
INSPECTION PROCEDURE
NOTICE:
When replacing the brake actu ...
