Toyota Sienna Service Manual: Inspection
1. INSPECT FUEL INJECTOR ASSEMBLYV
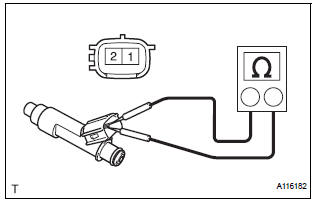
(A) inspect the injector resistance.
(1) Using an ohmmeter, measure the resistance between the terminals.
Standard resistance

If the resistance is not as specified, replace the injector.
(b) Inspect the injection volume.
| CAUTION:
This test involves high-pressure fuel and
electricity. Take every precaution regarding the
safe handling of both fuel and electricity.
Perform this test in a safe area, and avoid any sparks or flames. Do not smoke. |
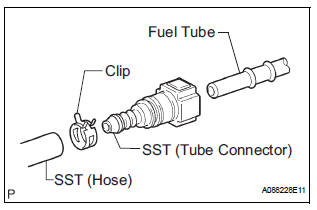
(1) Install the fuel tube connector to SST (hose), then connect the tube connector to the fuel pipe (vehicle side).
SST 09268-31011 (09268-41500, 90467- 13001, 95336-08070)
(2) Install the O-ring to the fuel injector subassembly.
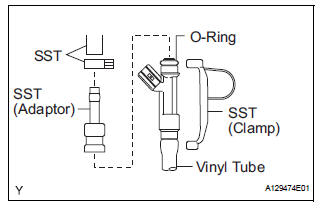
(3) Connect SST (adaptor and hose) to the injector, and hold the injector and union with SST (clamp).
SST 09268-31011 (90467-13001, 95336- 08070), 09268-41140, 09268-41400
(4) Put the injector into the graduated cylinder.
| CAUTION: Install a suitable vinyl tube onto the injector to contain gasoline spray. |
(5) Operate the fuel pump (See page FU-7).
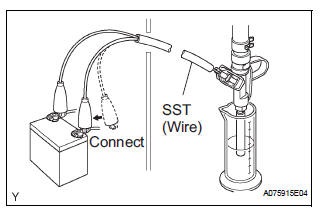
(6) Connect SST (wire) to the injector and the battery for 15 seconds, and measure the injection volume with the graduated cylinder.
Test each injector 2 or 3 times.
SST 09842-30080
Volume: 84 to 100 cm3 (5.1 to 6.0 cu in.) in 15 seconds
Difference between each injector: 16 cm3 (0.98 cu in.) or less
If the injection volume is not as specified, replace the injector.
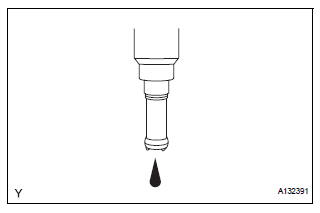
(c) Check for leakage.
(1) In the condition above, disconnect the tester probes of SST (wire) from the battery and check for fuel leakage from the injector.
Fuel drop: 1 drop or less in 16 minutes
 Removal
1. DISCHARGE FUEL SYSTEM PRESSURE
HINT:
See page FU-1.
2. DISCONNECT CABLE FROM NEGATIVE BATTERY
TERMINAL
3. REMOVE NO. 1 ENGINE UNDER COVER
4. DRAIN ENGINE COOLANT (See page CO-6)
5. REMOVE FR ...
 Installation
1. INSTALL FUEL INJECTOR ASSEMBLY
(a) Apply a light coat of spindle oil or gasoline to new Orings,
and install them to each injector.
(b) Apply a light coat of spindle oil or gasoline where ...
Other materials:
Changing the rear setting
Adjusting the temperature setting
Press the “REAR” button (indicator and rear temperature on the
display on).
Turn the “REAR TEMP” dial clockwise to increase the temperature
and counterclockwise to decrease the temperature.
The air conditioning system switches between individual ...
Disposal
HINT:
When scrapping a vehicle equipped with the SRS or
disposing of the steering pad, be sure to deploy the airbag
first in accordance with the procedure described below. If any
abnormality occurs with airbag deployment, contact the
SERVICE DEPT. of TOYOTA MOTOR SALES, U.S.A., INC.
CAUTION:
...
Stop Light Switch Circuit Malfunction
DTC P0571 Stop Light Switch Circuit Malfunction
DESCRIPTION
The ECM receives the brake demand signal from the distance control ECU and
transmits it to the skid
control ECU (brake actuator assembly).
The skid control ECU (brake actuator assembly) receives a signal from the ECM
and operates ...
