Toyota Sienna Service Manual: Inspection
1. Inspect no. 3 Intake air control valve assembly
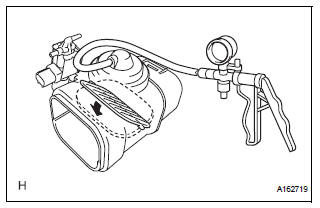
(A) inspect actuator operation.
(1) With 26.7 Kpa (200 mm hg, 7.9 In. Hg) of vacuum applied to the actuator, check that the actuator rod moves.
(2) One minute after applying the vacuum, check that the actuator rod does not return.
(3) If the operation is not as specified, replace the no. 3 Intake air control valve.
Installation
1. INSTALL NO. 3 INTAKE AIR CONTROL VALVE ASSEMBLY
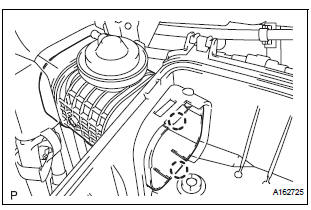
(a) Engage the 2 claws and install the No. 3 intake air control valve assembly.
2. INSTALL AIR CLEANER CAP SUB-ASSEMBLY
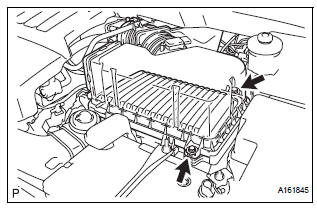
(a) Install the air cleaner filter element, and air cleaner cap sub-assembly with the 2 bolts.
Torque: 5.0 N*m (50 kgf*cm, 44 in.*lbf)
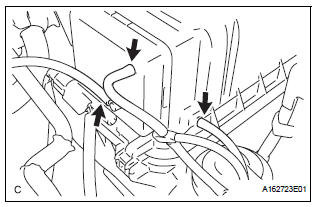
(b) Connect the 3 vacuum hoses.
(c) Tighten the bolt, connect the 2 connectors, and install the 2 vacuum hoses.
3. INSTALL NO. 2 AIR CLEANER INLET (See page EM- 60)
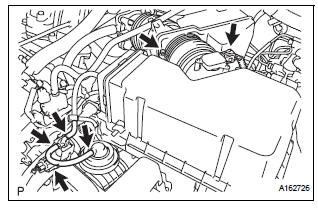
 Removal
1. Remove no. 2 Air cleaner inlet (see page em-
28)
2. Remove air cleaner cap sub-assembly
(a) Disconnect the 3 vacuum hoses.
(b) Loosen the bolt, disconnect the 2 connectors, and
remove ...
 Vacuum tank
On-vehicle inspection
1. Inspect air cleaner cap sub-assembly
(A) check that air flows from port b to port a.
(B) apply 60 kpa (450 mm hg, 18 in. Hg) of vacuum to
port b. Check that there is ...
Other materials:
Slide door lock
INSPECTION
1. INSPECT SLIDE DOOR LOCK REMOTE CONTROL SUB-ASSEMBLY LH
Inspect the resistance of the switch.
Resistance
If the result is not as specified, replace the control
assembly.
2. INSPECT SLIDE DOOR LOCK REMOTE CONTROL SUB-ASSEMBLY RH
Inspect the resistance of the swit ...
Diagnosis system
1. CHECK DLC3
The ECU uses ISO 15765-4 for communication.
The terminal arrangement of the DLC3 complies
with SAE J1962 and meets the ISO 15765-4 format.
NOTICE:
*: Before measuring the resistance, leave the
vehicle as is for at least 1 minute and do not
operate the ignition s ...
Installation
1. INSTALL LOWER BALL JOINT ASSEMBLY FRONT LH
(a) Install the lower ball joint assembly front LH and
tighten the nut.
Torque: 123 N*m (1,250 kgf*cm, 91 ft.*lbf)
(b) Install a new cotter pin.
NOTICE:
If the holes for the cotter pin are not aligned,
tighten the nut further up to 60°.
2. INS ...
