Toyota Sienna Service Manual: Installation
1. INSTALL NO. 1 REAR DIFFERENTIAL SUPPORT
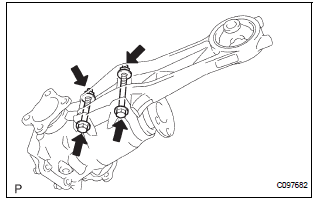
(a) Install the No. 1 rear differential support to the rear differential carrier assembly with the 2 bolts and 2 nuts.
Torque: 85 N*m (867 kgf*cm, 63 ft.*lbf)
HINT: Hold the bolt and tighten the nut.
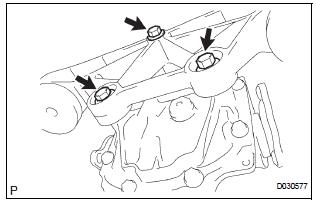
2. INSTALL REAR DIFFERENTIAL DYNAMIC DAMPER

(a) Install the rear differential dynamic damper to the No. 1 rear differential support with the 2 bolts.
Torque: 20 N*m (204 kgf*cm, 15 ft.*lbf)
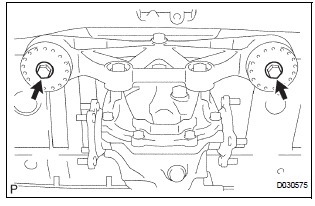
3. INSTALL REAR DIFFERENTIAL SUPPORT ASSEMBLY
(a) Install the rear differential support assembly to rear differential carrier assembly with the 3 bolts.
Torque: 100 N*m (1,020 kgf*cm, 74 ft.*lbf)
4. INSTALL REAR DIFFERENTIAL CARRIER ASSEMBLY
(a) Jack up the rear differential carrier assembly.
(b) Install the rear differential carrier assembly with the 2 bolts.
Torque: 106 N*m (1,081 kgf*cm, 78 ft.*lbf)
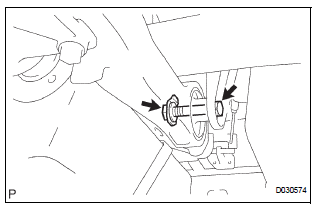
(c) Connect the No. 1 rear differential support with the bolt and nut.
Torque: 95 N*m (969 kgf*cm, 70 ft.*lbf)
HINT: Tighten the bolt.
5. INSTALL REAR DRIVE SHAFT ASSEMBLY LH
HINT: Install procedure of RH side is the same as that of LH side. (See page DS-26)
6. INSTALL REAR AXLE SHAFT NUT LH
HINT: Install procedure of RH side is the same as that of LH side. (See page DS-26)
7. INSTALL REAR SPEED SENSOR LH
HINT: Install procedure of RH side is the same as that of LH side. (See page DS-26)
8. INSTALL PROPELLER WITH CENTER BEARING SHAFT ASSEMBLY (See page PR-9)
9. FULLY TIGHTEN PROPELLER WITH CENTER BEARING SHAFT ASSEMBLY (See page PR-10)
10. INSTALL REAR DIFFERENTIAL DRAIN PLUG
(a) Using a hexagon wrench (10 mm), install the drain plug with a new gasket.
Torque: 49 N*m (500 kgf*cm, 36 ft.*lbf)
11. ADD DIFFERENTIAL OIL
(a) Fill the rear differential carrier assembly with hypoid gear oil.
12. INSPECT DIFFERENTIAL OIL
HINT: (See page DF-3)
13. INSTALL REAR DIFFERENTIAL FILLER PLUG
(a) Using a hexagon wrench (10 mm), install the filler plug with a new gasket.
Torque: 49 N*m (500 kgf*cm, 36 ft.*lbf)
14. INSTALL REAR WHEEL Torque: 103 N*m (1,050 kgf*cm, 76 ft.*lbf)
15. INSTALL EXHAUST PIPE ASSEMBLY
HINT: (See page EX-10)
16. INSPECT FOR EXHAUST GAS LEAK
HINT: (See page EX-12)
17. INSPECT AND ADJUST REAR WHEEL ALIGNMENT
HINT: (See page SP-4)
18. INSPECT ABS SPEED SENSOR SIGNAL
HINT: (See page BC-3)
 Removal
1. Remove rear wheel
2. Remove exhaust pipe assembly
Hint:
(see page ex-8)
3. Remove propeller with center bearing
shaft assembly
Hint:
(see page pr-3)
4. REMOVE REAR DIFFERENTIAL FILLER PLUG
...
 Rear differential carrier
COMPONENTS
...
Other materials:
Road test
1. PROBLEM SYMPTOM CONFIRMATION
Inspect the SET function.
Turn the cruise control main switch on.
Drive at the required speed between 40 km/h
(25 mph) and 200 km/h (125 mph).
Push the cruise control main switch to -
(COAST)/SET.
After releasing t ...
Inspection
1. INSPECT VANE PUMP SHAFT AND BUSHING IN VANE PUMP FRONT HOUSING
(a) Using a micrometer, measure the outer diameter [a]
of the vane pump shaft with pulley.
(b) Using vernier calipers, measure the inner diameter
[b] of the vane pump front housing bushing.
(c) Calculate the oil clearance ...
Reassembly
1. INSTALL REAR DRIVE SHAFT OUTBOARD JOINT BOOT
HINT:
Before install the boot, wrap the spline of the outboard
joint shaft with vinyl tape to prevent the boot from
bearing damaged.
(a) Install new outboard joint boot, 2 outboard joint boot
clamps, 2 inboard joint boot clamps and inboard
j ...
