Toyota Sienna Service Manual: Installation
1. INSTALL STABILIZER BAR FRONT
2. INSTALL FRONT STABILIZER BAR BUSH NO.1
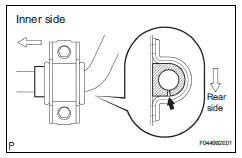
(a) Install the front stabilizer bar bush No. 1.
HINT: Install the bushing to the outer side of the bushing stopper on the stabilizer bar as shown in the illustration.
4. INSTALL RACK & PINION POWER STEERING GEAR ASSEMBLY
HINT: (See page PS-21)
5. CONNECT PRESSURE FEED TUBE ASSEMBLY
HINT: (See page PS-21) SST 09023-12701
6. INSTALL TIE ROD ASSEMBLY LH
HINT: (See page AH-4)
7. INSTALL TIE ROD ASSEMBLY RH
HINT: Install the RH side by the same procedures as the LH side.
8. INSTALL FRONT STABILIZER BRACKET NO.1 LH
(a) Install the front stabilizer bracket No.1 LH with the 2 bolts.
Torque: 17 N*m (173 kgf*cm, 12 ft.*lbf)
HINT: If the ball joint turns together with the nut, use a hexagon (6 mm) wrench to hold the stud.
11. INSTALL FRONT STABILIZER LINK ASSEMBLY RH
HINT: Install the RH side by the same procedures as the LH side.
12. INSTALL FRONT WHEELS
Torque: 103 N*m (1,050 kgf*cm, 76 ft.*lbf)
13. INSPECT CENTER FRONT WHEEL
14. INSPECT STEERING WHEEL CENTER POINT
15. ADD POWER STEERING FLUID
16. BLEED POWER STEERING FLUID
HINT: (See page SP-26)
17. CHECK POWER STEERING FLUID LEAKAGE
18. INSPECT AND ADJUST FRONT WHEEL ALIGNMENT
HINT: (See page SP-4)
 Inspection
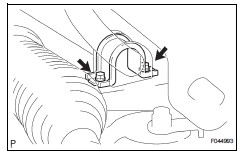
1. INSPECT FRONT STABILIZER LINK ASSEMBLY LH
(a) As shown in the illustration, flip the ball joint stud
back and forth 5 times, before installing the nut.
(b) Using a torque wrench, turn the ...
 Front stabilizer bar (for 4wd)
COMPONENTS
...
Other materials:
If your vehicle has to
be stopped in an
emergency
Only in an emergency, such as if it becomes impossible to stop
the vehicle in the normal way, stop the vehicle using the following
procedure:
Steadily step on the brake pedal with both feet and firmly depress it.
Do not pump the brake pedal repeatedly as this will increase the effort
requi ...
Power back door warning buzzer
INSPECTION
1. POWER BACK DOOR WARNING BUZZER
Check the resistance of the buzzer.
Resistance
If the result is not as specified, replace the buzzer.
NOTICE:
The circuit that causes the buzzer to sounds
is built into the back door ECU, not around
the buzzer.
Directly applying ...
Initialization procedure
(a) Make sure that the ignition switch is off.
(b) Connect the intelligent tester to the DLC3.
(c) Turn the ignition switch to the ON position.
(d) Select "TIREPRESS" by following the prompts
displayed on the intelligent tester.
(e) Press the tire pressure warning reset sw ...
