Toyota Sienna Service Manual: Installation
1. INSTALL BRAKE ACTUATOR
NOTICE: Do not remove the hole plugs before connecting the brake tubes. New actuators are filled with brake fluid.
(a) Install the brake actuator assembly with the 2 nuts.
Torque: 5.4 N*m (55 kgf*cm, 48 in.*lbf)
2. INSTALL BRAKE ACTUATOR WITH BRACKET
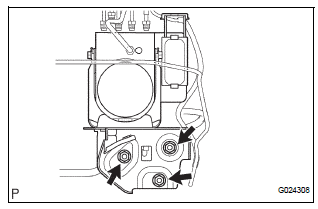
(a) Install the actuator with bracket with the 3 bolts.
Torque: 20 N*m (199 kgf*cm, 14 ft.*lbf)
NOTICE: Be careful not to damage the brake tubes and wire harness.
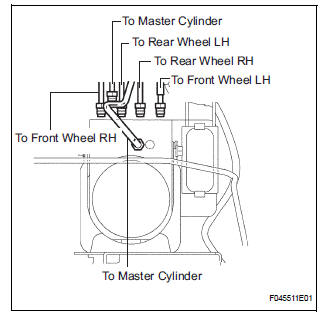
(b) Using SST, connect each brake tube to correct positions of the actuator with bracket, as shown in the illustration.
Torque: 15 N*m (155 kgf*cm, 11 ft.*lbf)
(c) Connect the brake actuator connector.
3. INSTALL AIR CLEANER ASSEMBLY WITH HOSE
4. FILL RESERVOIR WITH BRAKE FLUID (See page BR- 3)
5. BLEED BRAKE MASTER CYLINDER SUBASSEMBLY (See page BR-3)
6. BLEED BRAKE LINE (See page BR-4)
7. BLEED BRAKE ACTUATOR (See page BR-4)
8. CHECK BRAKE FLUID LEAKAGE
9. CHECK FLUID LEVEL IN RESERVOIR (See page BR- 7)
10. CONNECT BATTERY NEGATIVE TERMINAL
11. PERFORM INITIALIZATION
12. PERFORM YAW RATE SENSOR ZERO POINT CALIBRATION
HINT: See page BC-70.
13. CHECK BRAKE ACTUATOR WITH INTELLIGENT TESTER
HINT: See page BC-178.
 Removal
1. DRAIN BRAKE FLUID
NOTICE:
Wash brake fluid off immediately if it adheres to any
painted surface.
2. DISCONNECT BATTERY NEGATIVE TERMINAL
3. REMOVE AIR CLEANER ASSEMBLY WITH HOSE
4. REMOVE BRA ...
 Brake actuator (w/o vsc)
Components
...
Other materials:
Short to GND in Side Squib LH Circuit
DTC B0117/45 Short to GND in Side Squib LH Circuit
DESCRIPTION
The side squib LH circuit consists of the center airbag sensor assembly and
the front seat side airbag
assembly LH.
This circuit instructs the SRS to deploy when deployment conditions are met.
DTC B0117/45 is recorded when a s ...
Installation
1. INSTALL HEATED OXYGEN SENSOR (for Bank 2
Sensor 2) (See page EC-39)
2. INSTALL FRONT EXHAUST PIPE ASSEMBLY
(a) Install a new gasket to the front exhaust pipe
assembly.
(b) Install the front exhaust pipe assembly with the 2
nuts.
Torque: 62 N*m (632 kgf*cm, 46 ft.*lbf)
3. V
V(A) ins ...
Removal
CAUTION:
Wear safety gloves, because the sharp surfaces of the
seatback frame and seat adjuster may injure your
hand.
Work must be started more than 90 seconds after the
ignition switch is turned to the LOCK position and the
negative (-) terminal cable is disconnected from ...
