Toyota Sienna Service Manual: Installation
1. INSTALL HEADLIGHT ASSEMBLY
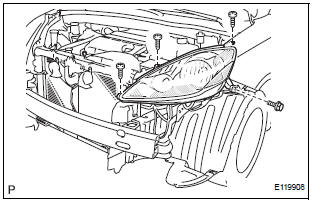
- Connect the connectors.
- Install the headlight assembly with the bolt and 3 screws.
2. INSTALL FRONT BUMPER ASSEMBLY
3. CONNECT CABLE TO NEGATIVE BATTERY TERMINAL
4. VEHICLE PREPARATION FOR HEADLIGHT AIMING
5. PREPARATION FOR HEADLIGHT AIMING (Using a tester)
6. PREPARATION FOR HEADLIGHT AIMING (Using a screen)
7. HEADLIGHT AIMING INSPECTION
8. HEADLIGHT AIMING ADJUSTMENT
9. VEHICLE PREPARATION FOR FOG LIGHT AIMING
10. PREPARATION FOR FOG LIGHT AIMING
11. FOG LIGHT AIMING INSPECTION
12. FOG LIGHT AIMING ADJUSTMENT
 Reassembly
1. INSTALL LIGHT CONTROL ECU (DISCHARGE HEADLIGHT)
Install a new headlight leveling motor base packing.
Install the headlight leveling motor assembly as
shown in the illustrati ...
 Repair
1. INSTALL HEADLIGHT PROTECTOR RETAINER UPPER
HINT:
If the installation area of the headlight assembly is
damaged, use the supply bracket for low-cost repair.
Ensure that the headli ...
Other materials:
Rear Blower Motor Circuit
DESCRIPTION
Power to the rear blower motor is supplied from the battery via the RR A/C
relay.
The rear blower motor speed level varies between 0 and 31 based on the voltage
difference measured
between the terminals of the motor.
The voltage difference measured between the terminals of th ...
Data list / active test
1. USING INTELLIGENT TESTER
Connect the intelligent tester to the DLC3.
Monitor the ECU data by following the prompts on
the tester screen.
HINT:
The intelligent tester has a "Snapshot" function
which records the monitored data. Refer to the
intelligent tester ope ...
Basic inspection
When a malfunction is not confirmed by the DTC check,
troubleshooting should be carried out in all circuits
considered to be possible causes of the problem. In many
cases, by carrying out the basic engine check shown in the
following flowchart, the location of the problem can be found
quickly a ...
