Toyota Sienna Service Manual: Installation
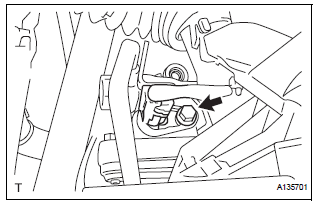
1. INSTALL VVT SENSOR (for Bank 2 Exhaust Side)

- Install the VVT sensor with the bolt.
Torque: 10 N*m (102 kgf*cm, 7 ft.*lbf)
- Connect the VVT sensor connector.
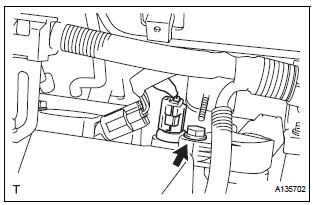
2. INSTALL VVT SENSOR (for Bank 2 Intake Side)
- Install the VVT sensor with the bolt.
Torque: 10 N*m (102 kgf*cm, 7 ft.*lbf)
- Connect the VVT sensor connector.
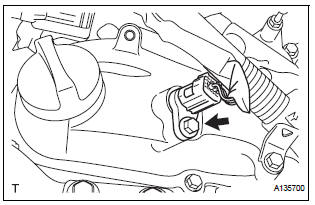
3. INSTALL VVT SENSOR (for Bank 1 Exhaust Side)
- Install the VVT sensor with the bolt.
Torque: 10 N*m (102 kgf*cm, 7 ft.*lbf)
- Connect the VVT sensor connector.
4. INSTALL VVT SENSOR (for Bank 1 Intake Side)
- Install the VVT sensor with the bolt.
Torque: 10 N*m (102 kgf*cm, 7 ft.*lbf)
- Connect the VVT sensor connector.
5. INSTALL INTAKE AIR SURGE TANK ASSEMBLY
6. INSTALL AIR CLEANER CASE SUB-ASSEMBLY
7. INSTALL AIR CLEANER CAP SUB-ASSEMBLY
8. INSTALL NO. 1 AIR CLEANER INLET
9. INSTALL NO. 2 AIR CLEANER INLET
10. ADD ENGINE COOLANT
11. INSPECT FOR ENGINE COOLANT LEAK
12. INSPECT FOR ENGINE OIL LEAK
13. INSTALL V-BANK COVER SUB-ASSEMBLY
14. INSTALL FRONT OUTER COWL TOP PANEL SUBASSEMBLY
15. INSTALL WINDSHIELD WIPER MOTOR ASSEMBLY
 Removal
1. REMOVE WINDSHIELD WIPER MOTOR ASSEMBLY
2. REMOVE FRONT OUTER COWL TOP PANEL SUBASSEMBLY
3. DRAIN ENGINE COOLANT
4. REMOVE V-BANK COVER SUB-ASSEMBLY
5. REMOVE NO. 2 AIR CLEANER INLET
6. REMOVE ...
 Crankshaft position sensor
COMPONENTS
...
Other materials:
DTC check / clear
1. CHECK DTC
Connect the intelligent tester to the Controller Area
Network Vehicle Interface Module (CAN VIM). Then
connect the CAN VIM to the DLC3.
Turn the ignition switch on.
Turn the tester ON.
Enter the following menu items: DIAGNOSIS / OBD/
MOBD / IM ...
On-vehicle inspection
1. INSPECT REAR AXLE HUB BEARING BACKLASH
(a) Using a dial gauge, check for backlash near the
center of the axle hub.
Maximum:
0.05 mm (0.0020 in.)
If backlash exceeds the maximum, replace the axle
hub assembly.
NOTICE:
Ensure that the dial gauge is set at right angles
to the measuremen ...
Personal/interior
lights
Front
Turns the light on/off
Rear
Turns the light on/off
When the personal/interior light main switch is in the off position, the
rear personal lights will not turn on even if the switch is on.
Type A
Type B
...
