Toyota Sienna Service Manual: Installation
1. INSTALL 3 POINT TYPE NO. 2 REAR SEAT BELT ASSEMBLY
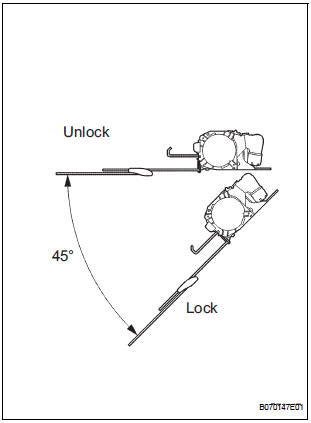
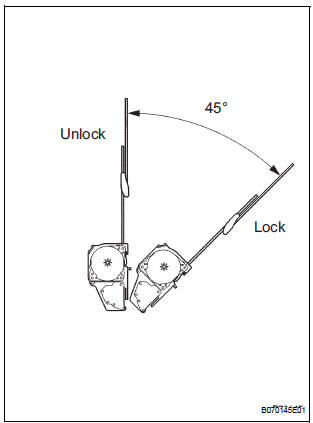
- Check the degree of tilt when the belt begins to lock the ELR.
- Check that the belt does not lock within 15 of
tilt in all directions but that the belt locks with
over 45 of tilt, when gently moving the
retractor.
If operation is not as specified, replace the 3 point type No. 2 rear seat belt assembly.
- Install the 3 point type No. 2 rear seat belt assembly
with the 3 bolts and 2 nuts.
Torque: 42 N*m (430 kgf*cm, 31 ft.*lbf)
- Check the ELR lock.
NOTICE: The check should be performed with the assembly installed.
- Check that the belt locks when pulling out the
belt quickly when the belt is installed.
If operation is not as specified, replace the 3 point type No. 2 rear seat belt assembly.
- Check the fastening function of the child restraint system.
NOTICE: The check should be performed with the assembly installed.
- Check that the belt cannot be pulled out any more but can be rewound after the belt is fully pulled out.
- Check that the belt can be pulled out and
rewound after the belt is fully rewound.
If operation is not as specified, replace the 3 point type No. 2 rear seat belt assembly.
- Install the roof headlining.
HINT: Refer to the instructions for installation of the roof headlining (4).
2. INSTALL NO. 1 REAR SEAT OUTER BELT ASSEMBLY (for 8-Passenger)
HINT: Refer to the instructions for reassembly of the rear No .1 seat assembly (for center seat).
- Check the degree of tilt when the belt begins to lock the ELR.
- Check that the belt does not lock within 15 of
tilt in all directions but that the belt locks with
over 45 of tilt, when gently moving the
retractor.
If operation is not as specified, replace the No.
1 rear seat outer belt assembly.
- Install the No. 1 rear seat outer belt assembly with
the 2 bolts and 2 nuts.
Torque: 42 N*m (430 kgf*cm, 31 ft.*lbf)
- Check the ELR lock.
NOTICE: The check should be performed with the assembly installed.
- Check that the belt locks when pulling out the belt quickly when the belt is installed.
HINT: The seat belt does not lock when the pull out amount of the belt is 955 mm (37.60 in.) or less.
If operation is not as specified, replace the No.
1 rear seat outer belt assembly.
- Check the fastening function of the child restraint system.
NOTICE: The check should be performed with the assembly installed.
- Check that the belt cannot be pulled out any more but can be rewound after it is fully pulled out.
- Check that the belt can be pulled out and
rewound after the belt is fully rewound.
If operation is not as specified, replace the No.
1 rear seat outer belt assembly.
- Install the rear seat shoulder belt cover.
- Install the rear seatback board.
 Removal
1. REMOVE NO. 1 REAR SEAT OUTER BELT
ASSEMBLY (for 8-Passenger)
HINT:
Refer to the instructions for disassembly of the rear No .1
seat assembly (for center seat).
Remove the rear seatback boar ...
 Seat
Seat
...
Other materials:
Disassembly
1. REMOVE INDICATOR LIGHT WIRE SUB-ASSEMBLY
(a) Remove the indicator light wire sub assembly from
the position indicator light guide.
2. REMOVE POSITION INDICATOR LIGHT BULB
(a) Remove the shift position indicator light bulb from
the indicator light wire sub-assembly
3. REMOVE POSITION IND ...
Oxygen (A/F) Sensor Signal Stuck
DTC P2195 Oxygen (A/F) Sensor Signal Stuck Lean (Bank 1
Sensor 1)
DTC P2196 Oxygen (A/F) Sensor Signal Stuck Rich (Bank 1
Sensor 1)
DTC P2197 Oxygen (A/F) Sensor Signal Stuck Lean (Bank 2
Sensor 1)
DTC P2198 Oxygen (A/F) Sensor Signal Stuck Rich (Bank 2
Sensor 1)
HINT:
Although the ...
Using the radio
Radio operation
Select “AM” or “FM” on the audio source selection screen to
begin listening to the radio.
Audio control screen
Pressing the “AUDIO” button displays the audio control screen from
any screens of the selected source.
Audio source selection screen
appears
Pre ...
