Toyota Sienna Service Manual: Installation
1. INSTALL REAR NO. 2 SEAT ASSEMBLY LH
- Place the rear No. 2 seat assembly LH in the cabin.
NOTICE: Be careful not to damage the body.
- Install the rear No. 2 seat assembly LH with the 2
bolts.
Torque: 29 N*m (296 kgf*cm, 21 ft.*lbf)
- Install the locus cable with the bolt.
Torque: 29 N*m (296 kgf*cm, 21 ft.*lbf)
- Install the 2 headrests.
HINT: Check that the seat leg locks.
2. INSTALL REAR SEAT LEG SIDE GARNISH SUBASSEMBLY LH
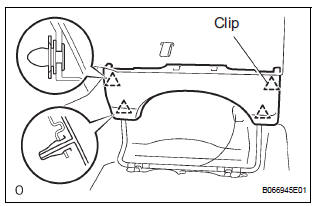
- Engage the clips to install the rear seat leg side garnish sub-assembly.
 Reassembly
1. INSTALL REAR SEAT STAY SUB-ASSEMBLY
Install the rear seat stay sub-assembly with the nut.
Torque: 5.5 N*m (56 kgf*cm, 49 in.*lbf)
2. INSTALL NO. 2 SEAT CUSHION SPRING ASSEMBLY
LH
3 ...
 Rear no. 2 Seat assembly (for Manual Seat Type RH Side)
COMPONENTS
...
Other materials:
Disassembly
1. INSPECT PACK CLEARANCE OF REVERSE CLUTCH
HINT:
(See page AX-249)
2. INSPECT PACK CLEARANCE OF DIRECT CLUTCH
AND OVERDRIVE CLUTCH
HINT:
(See page AX-249)
3. REMOVE DIRECT MULTIPLE DISC CLUTCH DISC
(a) Using a screwdriver, remove the snap ring from the
intermediate shaft.
(b) Remo ...
Removal
1. DISCONNECT CABLE FROM NEGATIVE BATTERY
TERMINALV
Caution:
wait at least 90 seconds after disconnecting the
cable from the negative (-) battery terminal to
prevent airbag and seat belt pretensioner activation.
2. Remove air fuel ratio sensor (for bank 2
sensor 1)
(a) ...
Knock Sensor Circuit Low Input/ Knock Sensor Circuit High Input
DTC P0327 Knock Sensor 1 Circuit Low Input (Bank 1 or
Single Sensor)
DTC P0328 Knock Sensor 1 Circuit High Input (Bank 1 or
Single Sensor)
DTC P0332 Knock Sensor 2 Circuit Low Input (Bank 2)
DTC P0333 Knock Sensor 2 Circuit High Input (Bank 2)
DESCRIPTION
A flat type knock sensor (non-resona ...
