Toyota Sienna Service Manual: Installation
1. INSTALL OUTSIDE MOULDING
- Using a heat light, heat the mounting surface of the
vehicle body between 40 to 60 C (104 to 140 F).
NOTICE: Do not heat the body excessively.
- Remove the tape from the vehicle body.
- Wipe off the stains with cleaner.
- Clean the outside moulding (if reusing the outside moulding)
- Using a heat light, heat the outside moulding between 20 to 30 C (68 to 86 F).
NOTICE: Do not heat the outside moulding excessively.
- Remove the tape from the outside moulding.
- Wipe off the stains with cleaner.
- Apply new tape to the outside moulding as shown in the illustration.
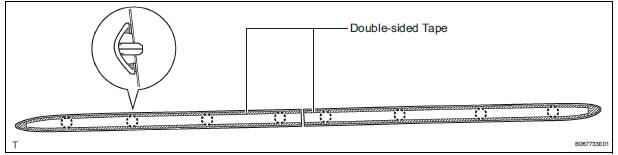
- Match the reference pins on the outside moulding with the reference holes on the vehicle body.
- Using a heat light, heat the vehicle body and outside moulding.
Heating temperature:

NOTICE: Do not heat the body and outside moulding excessively.
- Release the peeling paper from the face of the outside moulding and attach the outside moulding securely to the vehicle body.
NOTICE: Be careful that dirt or foreign objects do not stick to adhesive part when releasing the peeling paper.
- Push the outside moulding to the body.
 Removal
1. REMOVE OUTSIDE MOULDING
Put protective tape around the outside moulding.
Using a heat light, heat the moulding between 40 to
60 C (104 to 140 F).
NOTICE:
Do not heat the moulding ex ...
 Front door window frame moulding
COMPONENTS
...
Other materials:
The Rear Cross Traffic Alert function
The Rear Cross Traffic Alert functions when your vehicle is in reverse.
It can detect other vehicles approaching from the right or left rear of
the vehicle. It uses radar sensors to alert the driver of the other vehicle’s
existence through flashing the outside rear view mirror indicators
and ...
Removal
1. REMOVE NO. 1 ENGINE UNDER COVER (See page
EM-26)
2. REMOVE EXHAUST PIPE ASSEMBLY
for 2WD:(See page EX-2)
for 4WD:(See page EX-8)
3. DRAIN ENGINE COOLANT (See page CO-6)
4. DRAIN ENGINE OIL (See page LU-4)
5. REMOVE NO. 2 MANIFOLD STAY (See page EM-39)
6. REMOVE NO. 2 EXHAUST MANIFOLD HEAT ...
Removal
1. REMOVE FRONT WHEELS
2. REMOVE FRONT STABILIZER LINK ASSEMBLY LH
(a) Remove the 2 nuts and front stabilizer link assembly
LH.
HINT:
If the ball joint turns together with the nut, use a
hexagon (6 mm) wrench to hold the stud.
3. REMOVE FRONT STABILIZER LINK ASSEMBLY RH
HINT:
Remove the ...
