Toyota Sienna Service Manual: Installation
1. INSTALL CHARCOAL CANISTER ASSEMBLY
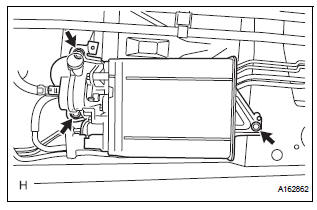
(a) Install the 3 bolts and charcoal canister.
Torque: 29 N*m (296 kgf*cm, 21 ft.*lbf) (b) Connect the purge line hose to the charcoal canister.
(c) Connect the wire harness clamp.
(d) Connect the vapor pressure sensor connector.
(e) Connect the charcoal canister filter sub-assembly to the charcoal canister.
(f) Connect the fuel tank vent hose to the charcoal canister.
2. INSTALL CHARCOAL CANISTER PROTECTOR
(a) Install the 6 bolts and charcoal canister protector.
Torque: 5.0 N*m (51 kgf*cm, 44 in.*lbf)
 Inspection
1. INSPECT CHARCOAL CANISTER ASSEMBLY
(a) Visually check the charcoal canister for cracks or
damage.
If cracks or damage are found, replace the charcoal
canister assembly.
(b) Check cha ...
 Vacuum switching valve
Components
...
Other materials:
Position Sensor Circuit
DESCRIPTION
When SET and 1 or 2 are pressed, the position sensor detects the mirror
position and sends the signal to
the outer mirror control ECU. Then when position 1 or 2 is pressed, the outer
mirror control ECU drives
the mirror motor based on the memorized sensor positions.
HINT:
The ...
TC and CG Terminal Circuit
DESCRIPTION
Connecting terminals TC and CG of the DLC3 causes the system to enter the
self-diagnostic mode. If a
malfunction is present, DTCs will be output.
HINT:
When a particular warning light remains blinking, a ground short in the wiring
of terminal TC of the DLC3
or an internal grou ...
GPS Receiver Error
DTC 58-11 GPS Receiver Error
DTC 80-11 GPS Receiver Error
DESCRIPTION
DTC No.
DTC Detection Condition
Trouble Area
58-11
RTC, ROM, and RAM of the GPS receiver and
TCXO error
GPS receiver is failed
Radio and navigation assembly ...
