Toyota Sienna Service Manual: Installation
1. INSTALL STARTER ASSEMBLY
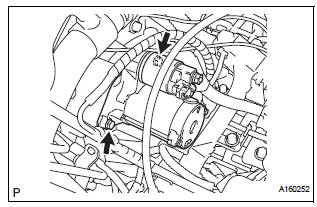
(a) Install the starter with the 2 bolts.
Torque: 37 N*m (380 kgf*cm, 26 ft.*lbf) for bolt
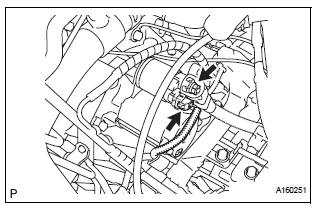
(b) Connect the starter connector.
(c) Install the terminal nut and cover the nut with the cap.
Torque: 9.8 N*m (100 kgf*cm, 7 ft.*lbf) for nut
2. INSTALL NO. 1 AIR CLEANER INLET
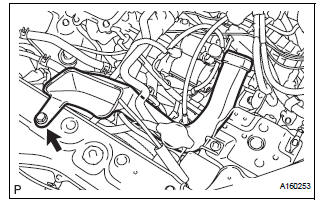
(a) Install the No. 1 air cleaner inlet with the bolt.
Torque: 5.0 N*m (51 kgf*cm, 44 in.*lbf)
3. INSTALL AIR CLEANER BRACKET
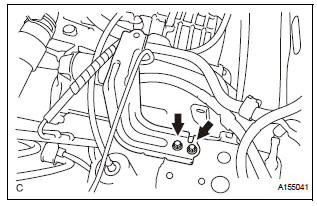
(a) Remove the 2 bolts and air cleaner bracket.
Torque: 7.8 N*m (80 kgf*cm, 69 in.*lbf)
4. INSTALL AIR CLEANER CASE SUB-ASSEMBLY (See page EM-59) 5. INSTALL AIR CLEANER FILTER ELEMENT (See page EM-59) 6. INSTALL AIR CLEANER CAP SUB-ASSEMBLY (See page FU-20) 7. INSTALL NO. 2 AIR CLEANER INLET (See page EM- 60) 8. INSTALL BATTERY (See page EM-59)
 Reassembly
1. INSTALL PLANETARY GEAR
(a) Apply grease to the planetary gears and pin parts of
the planetary shaft.
(b) Install the 3 planetary gears.
2. INSTALL STARTER ARMATURE ASSEMBLY
(a) Apply ...
 Starter relay
On-vehicle inspection
1. Inspect starter relay
(a) Using an ohmmeter, measure the resistance
between each terminal.
Standard resistance
If the result is not as specified, replace the starter ...
Other materials:
Removal
1. REMOVE REAR WHEEL
2. REMOVE EXHAUST PIPE ASSEMBLY
HINT:
Perform this procedure only when removing the RH side.
(See page EX-8)
3. REMOVE REAR SPEED SENSOR LH
HINT:
(See page DS-21)
4. REMOVE REAR AXLE SHAFT NUT LH
HINT:
(See page DS-21)
5. REMOVE REAR DRIVE SHAFT ASSEMBLY LH
HINT:
...
Reassembly
1. INSTALL CENTER CLUSTER MODULE KNOB NO.6
(for Automatic Air Conditioning System)
2. INSTALL CENTER CLUSTER MODULE KNOB NO.5
(for Automatic Air Conditioning System)
3. INSTALL CLOCK ORNAMENT
4. INSTALL PRINTED WIRE INTEGRATION BOARD
SUB-ASSEMBLY (for Automatic Air Conditioning
System)
5. IN ...
Customize parameters
HINT:
The following items can be customized.
NOTICE:
After confirming whether the items requested by the
customer are applicable or not for customization,
perform customizing operations.
Be sure to record the current settings before
customization.
When troubleshooti ...
