Toyota Sienna Service Manual: Installation
1. INSTALL PARK/NEUTRAL POSITION SWITCH ASSEMBLY
(a) Install the park/neutral position switch to the manual valve shaft.
(b) Temporarily install the 2 bolts.
(c) Place a new lock plate and tighten the nut.
Torque: 6.9 N*m (70 kgf*cm, 61 in.*lbf) (d) Temporarily install the control shaft lever.
(e) Turn the lever counterclockwise until it stops, then turn it clockwise 2 notches.
(f) Remove the control shaft lever.
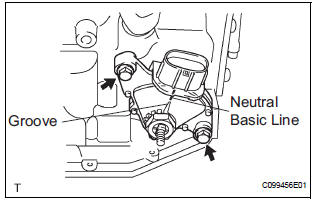
(g) Align the groove with the neutral basic line.
(h) Hold the switch in position and tighten the 2 bolts.
Torque: 5.4 N*m (55 kgf*cm, 48 in.*lbf)
(i) Using a screwdriver, bend the tabs of the lock plate.
(j) Install the control shaft lever, washer and the nut.
Torque: 13 N*m (130 kgf*cm, 9 ft.*lbf)
(k) Connect the park/neutral position switch connector
2. CONNECT TRANSMISSION CONTROL CABLE ASSEMBLY
(a) Connect the control cable to the control shaft lever with the nut.
Torque: 13 N*m (133 kgf*cm, 10 ft.*lbf)
(b) Install the control cable with a new clip to the bracket.
3. ADJUST PARK/NEUTRAL POSITION SWITCH ASSEMBLY (See page AX-127)
4. INSPECT PARK/NEUTRAL POSITION SWITCH ASSEMBLY OPERATION (See page AX-126)
5. INSPECT SHIFT LEVER POSITION (See page AX-148)
6. ADJUST SHIFT LEVER POSITION (See page AX-149)
7. INSTALL AIR CLEANER ASSEMBLY
HINT: (See page EM-44)
8. INSTALL BATTERY
 Inspection
1. INSPECT PARK/NEUTRAL POSITION SWITCH ASSEMBLY OPERATION
(a) Apply the parking brake and turn the ignition switch
to the ON position.
(b) Depress the brake pedal and check that the engine
star ...
Other materials:
Removal
1. REMOVE EXHAUST PIPE ASSEMBLY
(a) Remove exhaust pipe assembly (See page EX-8).
2. REMOVE PROPELLER W/CENTER BEARING SHAFT ASSEMBLY
(a) Depress the brake pedal and hold it down.
(b) Using a hexagon wrench (6 mm), loosen the cross
groove joint set bolts a half turn.
HINT:
Place a cloth ...
Removal
1. REMOVE BATTERY (See page EM-26)
2. REMOVE NO. 2 AIR CLEANER INLET (See page EM-
28)
3. REMOVE AIR CLEANER CAP SUB-ASSEMBLY (See
page FU-13)
4. REMOVE AIR CLEANER FILTER ELEMENT (See page
EM-28)
5. REMOVE AIR CLEANER CASE SUB-ASSEMBLY (See
page EM-28)
6. REMOVE AIR CLEANER BRACKET
(a ...
Positioning a floor jack
When using a floor jack, follow the instructions in the manual
provided with the jack and perform the operation safely.
When raising your vehicle with a floor jack, position the jack correctly.
Improper placement may damage your vehicle or cause
injury.
Front
Rear
2WD ...
