Toyota Sienna Service Manual: Installation
1. INSTALL TRANSFER EXTENSION HOUSING TYPE T OIL SEAL
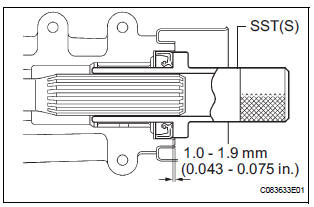
(a) Using SST(s), install anew transfer extension housing type T oil seal to he transfer extension housing sub-assembly at the position show in the illustration.
SST 09325-20010
NOTICE: Do not install the oil seal obliquely.
(b) Apply small amount of MP grease to the oil seal lip.
2. TEMPORARILY TIGHTEN PROPELLER WITH CENTER BEARING SHAFT ASSEMBLY
HINT: (See page PR-9)
3. FULLY TIGHTEN PROPELLER WITH CENTER BEARING SHAFT ASSEMBLY
HINT: (See page PR-9)
4. INSTALL FRONT EXHAUST PIPE ASSEMBLY
HINT: (See page EX-10)
5. INSTALL TRANSFER DRAIN PLUG
(a) Install the transfer drain plug with anew drain gasket.
Torque: 49 N*m (50 kgf*cm, 36 ft.*lbf)
6. INSTALL TRANSFER CASE NO.1 PLUG
(a) Add oil up to 0 to 5 mm (0 to 0.20 in.) below the lower side of the plug hole.
Oil amount: 0.9 L (0.95 US qts, 0.71 lmp.qts)
NOTICE: When supplying oil, pour do it slowly.
(b) Install the transfer case No. 1 plug with a new gasket No. 1.
Torque: 49 N*m (500 kgf*cm, 36 ft.*lbf)
7. CHECK FOR EXHAUST GAS LEAK
 Removal
1. REMOVE TRANSFER CASE NO.1 PLUG (See page
TF-8)
2. REMOVE TRANSFER DRAIN PLUG
(a) Remove the transfer drain plug, drain gasket and
bleed transfer oil.
3. REMOVE EXHAUST PIPE ASSEMBLY
HINT:
(S ...
 Propeller shaft
...
Other materials:
Steering Angle Sensor Zero Point Malfunction
DTC C1290/66 Steering Angle Sensor Zero Point Malfunction
DESCRIPTION
The skid control ECU acquires steering angle sensor zero point every time the
ignition switch is turned to
the ON position and the vehicle is driven at 35 km/h (22 mph) or more for
approximately 5 seconds. The
ECU also sto ...
Removal
1. DISCONNECT CABLE FROM NEGATIVE BATTERY
TERMINAL
2. REMOVE REAR NO. 2 SEAT LEG SIDE GARNISH SUB-ASSEMBLY
Disengage the 9 clips and remove the rear No. 2
seat leg side garnish sub-assembly.
Remove the 9 clips from the rear No. 2 seat leg side
garnish sub-assembly.
3. ...
Reassembly
1. INSTALL INPUT SHAFT OIL SEAL RING
(a) Compress a new input shaft oil seal ring from both
sides to reduce dimension A.
Dimension A:
5 mm (0.197 in.)
(b) Coat the oil seal ring with ATF and install it to the
input shaft.
NOTICE:
Do not expand the end gap of the oil seal ring
too much. ...
