
Toyota Sienna 2010-2026 Owners Manual: Installation with LATCH system (second seat)
- Fold the seatback while pulling the lever and move to the rearmost recline position.
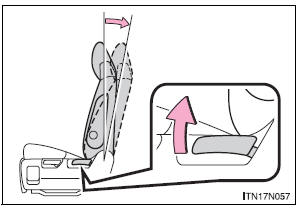
- Widen the gap between the seat cushion and seatback slightly.
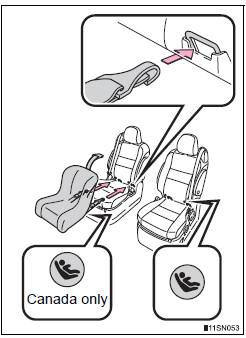
- Type A
- Latch the hooks of the lower
straps onto the LATCH
anchors. If the child restraint
has a top tether strap, the top
tether strap should be latched
onto the top tether strap anchor.
For owners in Canada: The symbol on a child restraint system indicates the presence of a lower connector system.
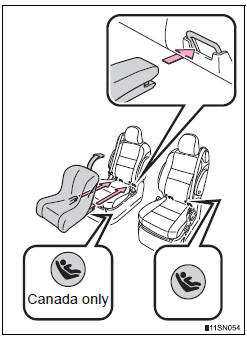
- Type B
- Latch the buckles onto the
LATCH anchors. If the child
restraint has a top tether strap,
the top tether strap should be
latched onto the top tether strap
anchor.
For owners in Canada: The symbol on a child restraint system indicates the presence of a lower connector system.
 Installing child restraints
Follow the child restraint system manufacturer’s instructions.
Firmly secure child restraints to the rear seats using the LATCH
anchors or a seat belt. Attach the top tether strap whe ...
 Installation with LATCH system (third seat)
Manual seat
Fold the seatback while pulling
the strap. Return the seatback
and secure it at the 1st lock
position (most upright position).
Adjust the seatback to the
11th lock p ...
Other materials:
Rear Speed Sensor RH Circuit
DESCRIPTION
Refer to DTCs C0200/31, C0205/32, C1235/35, and C1236/36 (See page BC-17).
DTCs C1273/73 to C1278/78 can be deleted when the speed sensor sends a vehicle
speed signal or the
Test Mode ends. DTCs C1273/73 to C1278/78 are output only in the Test Mode.
HINT:
DTC C0210/33 ...
Turning on the high beam headlights
With the headlights on, push
the lever away from you to turn
on the high beams.
When the light switch is in
position, the Automatic High Beam
system will be activated.
Pull the lever toward you to the
center position to turn the high
beams off.
Pull the lever toward you and ...
ABS Warning Light Remains ON
DESCRIPTION
If any of the following is detected, the ABS warning light remains on.
The skid control ECU connectors are disconnected from the skid control
ECU.
There is a malfunction in the skid control ECU internal circuit.
There is an open in the harness between the combination meter an ...
