Toyota Sienna Service Manual: License plate light assembly
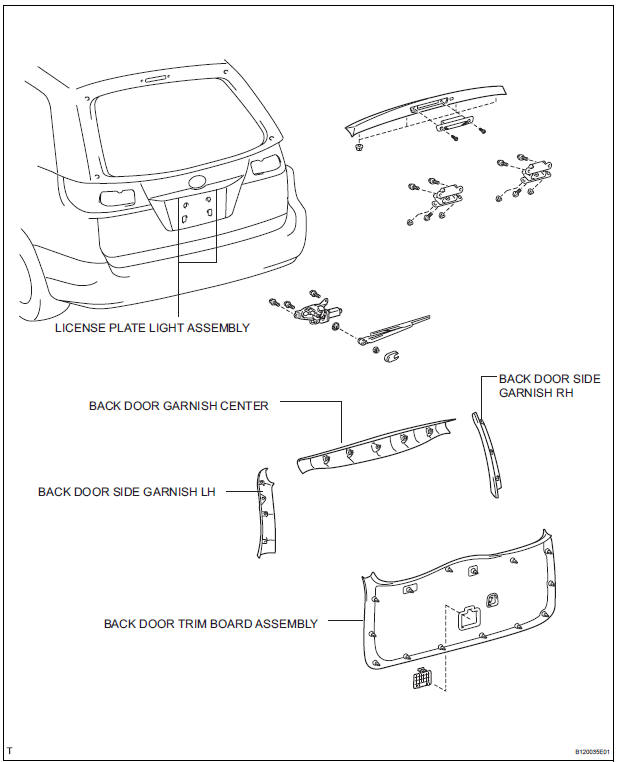
COMPONENTS
REMOVAL
1. REMOVE BACK DOOR GARNISH CENTER
2. REMOVE BACK DOOR SIDE GARNISH LH
3. REMOVE BACK DOOR SIDE GARNISH RH
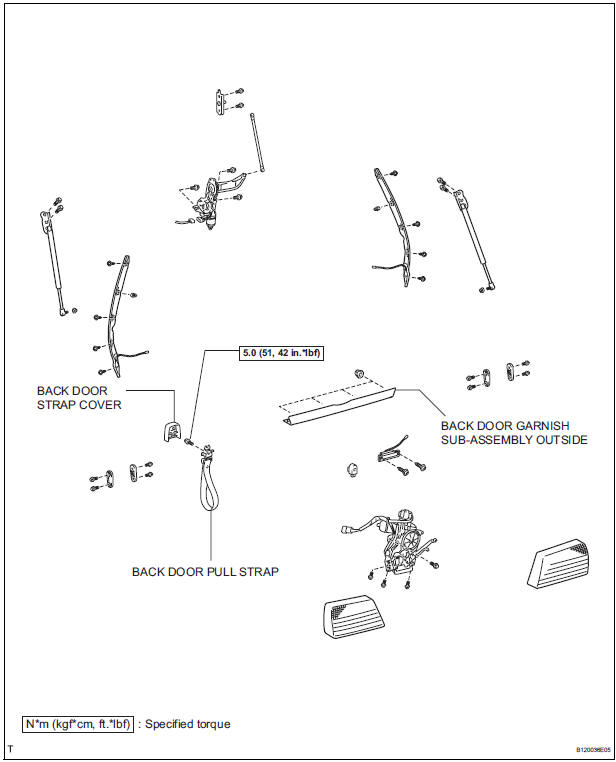
4. REMOVE BACK DOOR STRAP COVER
5. REMOVE BACK DOOR PULL STRAP
6. REMOVE BACK DOOR TRIM BOARD ASSEMBLY
7. REMOVE BACK DOOR GARNISH SUB-ASSEMBLY OUTSIDE
8. REMOVE LICENSE PLATE LIGHT ASSEMBLY
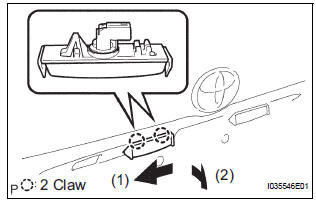
- Release the 2 claw fittings and disconnect the license plate light assembly.
- Disconnect the connector and remove the license plate light assembly.
DISASSEMBLY
1. REMOVE LICENSE PLATE LIGHT LENS GASKET
2. REMOVE LICENSE PLATE LIGHT BULB
- Remove the license plate light bulb and the license plate light socket plug.
- Remove the license plate light bulb from the license plate light socket plug.
3. REMOVE LICENSE PLATE LIGHT SOCKET PLUG
4. REMOVE LICENSE PLATE LIGHT LENS
REASSEMBLY
1. INSTALL LICENSE PLATE LIGHT LENS
2. INSTALL LICENSE PLATE LIGHT SOCKET PLUG
3. INSTALL LICENSE PLATE LIGHT BULB
4. INSTALL LICENSE PLATE LIGHT LENS GASKET
INSTALLATION
1. INSTALL LICENSE PLATE LIGHT ASSEMBLY
2. INSTALL BACK DOOR GARNISH SUB-ASSEMBLY OUTSIDE
3. INSTALL BACK DOOR TRIM BOARD ASSEMBLY
4. INSTALL BACK DOOR PULL STRAP
5. INSTALL BACK DOOR STRAP COVER
6. INSTALL BACK DOOR SIDE GARNISH RH
7. INSTALL BACK DOOR SIDE GARNISH LH
8. INSTALL BACK DOOR GARNISH CENTER
 Back-up light assembly
COMPONENTS
REMOVAL
1. REMOVE BACK DOOR GARNISH CENTER
2. REMOVE BACK DOOR SIDE GARNISH LH
3. REMOVE BACK DOOR SIDE GARNISH RH
4. REMOVE BACK DOOR STRAP COVER SUBASSEMBLY
5. REMOVE BACK D ...
 High mounted stop light assembly
COMPONENTS
REMOVAL
1. REMOVE BACK DOOR GARNISH CENTER (w/ Rear Spoiler)
2. REMOVE REAR SPOILER COVER (w/ Rear Spoiler)
3. REMOVE CENTER STOP LIGHT ASSEMBLY
w/o Rear spoiler:
...
Other materials:
DTC check / clear
1. CHECK DTC
Prepare the intelligent tester.
Connect the intelligent tester to DLC3.
Turn the ignition switch to the ON position and turn
the intelligent tester main switch ON.
Use the intelligent tester to check the DTCs, and
note them down (For operating instructions, see the
int ...
Disassembly
1. SEPARATE REAR DRIVE SHAFT INBOARD JOINT BOOT CLAMP
(a) Using a screwdriver, remove the 2 rear drive shaft
inboard joint boot clamps as shown in the
illustration.
2. SEPARATE REAR DRIVE SHAFT INBOARD JOINT
BOOT
(a) Separate the rear drive shaft inboard joint boot from
the inboard joint ...
Meter Illumination does not Dim at Night
DESCRIPTION
Confirm that the vehicle is equipped with the optitron meter, then
check this circuit.
The combination meter assembly receives a auto dimmer signal from
the body ECU by the multiplex
communication line.
WIRING DIAGRAM
INSPECTION PROCEDURE
1 CHECK MULTIP ...
