Toyota Sienna Service Manual: Light Control Switch Circuit
DESCRIPTION
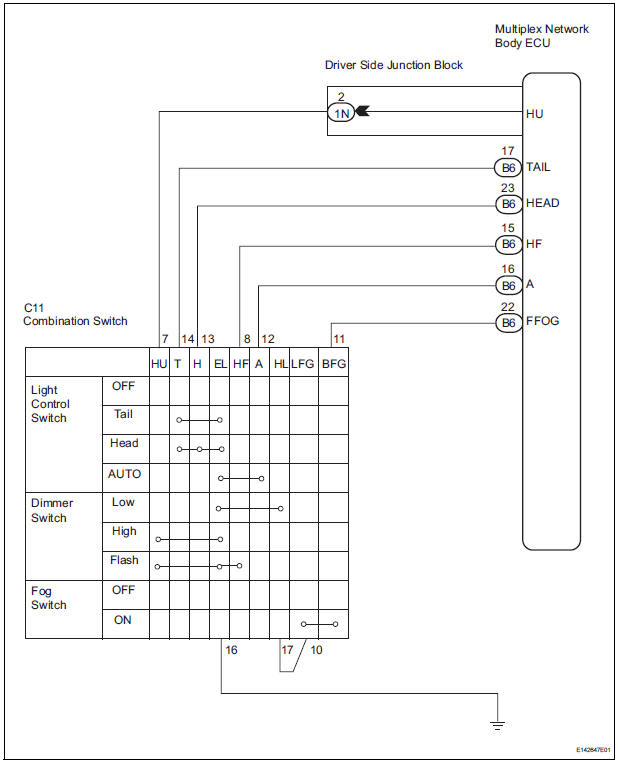
This circuit detects the state of the headlight dimmer switch.
WIRING DIAGRAM
INSPECTION PROCEDURE
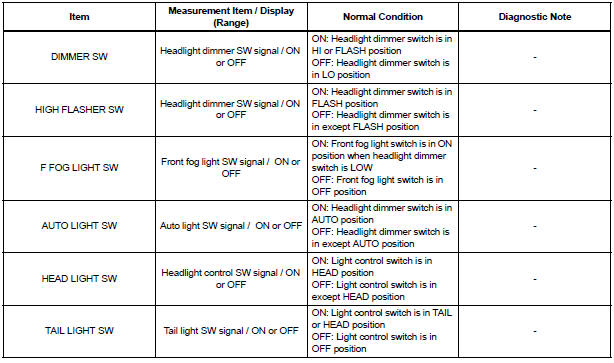
1 READ VALUE OF INTELLIGENT TESTER
- Connect the intelligent tester to DLC3.
- Turn the ignition switch ON and push the intelligent tester main switch ON.
- Select the items below in the DATA LIST, and read the displays on the intelligent tester
BODY NO.1:
2 INSPECT HEADLIGHT DIMMER SWITCH ASSEMBLY
- Inspect headlight dimmer switch assembly
3 INSPECT INSTRUMENT PANEL JUNCTION BLOCK ASSEMBLY
- Remove the instrument panel junction block assembly.
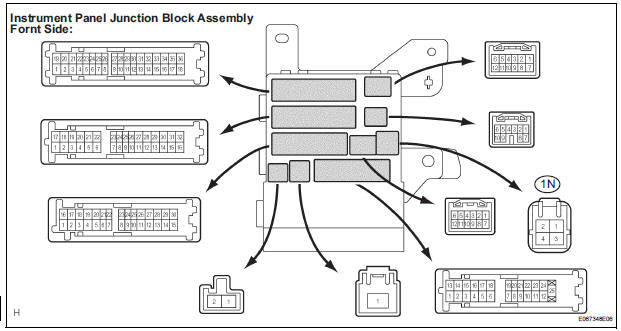
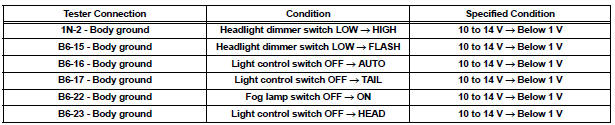
- Measure voltage between the each of terminals as shown in the chart below.
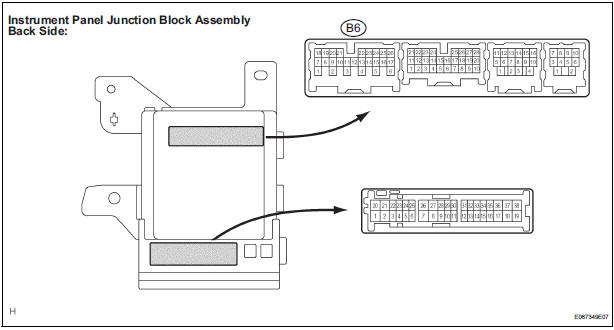
Voltage
PROCEED TO NEXT CIRCUIT INSPECTION SHOWN IN PROBLEM SYMPTOMS TABLE
 Front Fog Light Circuit
DESCRIPTION
The Multiplex network body ECU controls FOG relay when signal is received
from headlight dimmer
switch assembly.
WIRING DIAGRAM
INSPECTION PROCEDURE
1 PERFORM ACTIVE TEST BY INT ...
 Automatic Light Control Sensor Circuit
DESCRIPTION
The Multiplex network body ECU receives the signal from the automatic light
control sensor.
HINT:
DTC code is output when malfunction of automatic light control sensor or open or
...
Other materials:
Data list / active test
1. READ DATA LIST
HINT:
Using the DATA LIST displayed on the intelligent tester,
you can read the value of the switch, sensor, actuator,
etc. without parts removal. Reading the DATA LIST as
the first step in troubleshooting is one way to shorten the
labor time.
Connect the intelligen ...
No Communication in Immobiliser System
DTC B2796 No Communication in Immobiliser System
DTC B2798 Communication Malfunction No. 2
DESCRIPTION
These codes are stored in the memory when a key that does not have a
transponder chip is inserted or if
communication between the key and transponder key ECU is impossible.
DTC No ...
Removal
1. REMOVE NO. 1 REAR SEAT OUTER BELT
ASSEMBLY (for 8-Passenger)
HINT:
Refer to the instructions for disassembly of the rear No .1 seat assembly (for
center seat).
Remove the rear seatback board.
Remove the rear seat shoulder belt cover.
Remove the 2 bolts, 2 nuts and N ...
