Toyota Sienna Service Manual: Lubrication system
On-vehicle inspection
1. CHECK ENGINE OIL LEVEL
(a) Warm up the engine, stop it and wait 5 minutes. The oil level should be between the dipstick's low level mark and full level mark.
If the engine oil level is low, check for leakage and add oil up to the full level mark.
| NOTICE: Do not add engine oil above the full level mark. |
2. CHECK ENGINE OIL
(a) Check the engine oil for deterioration, water contamination, discoloring or thinning.
If the oil is bad, replace the engine oil and engine oil filter.
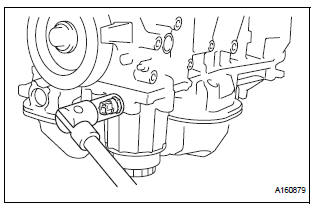
3. CHECK OIL PRESSURE
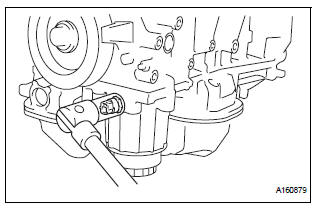
(a) Disconnect the oil pressure switch connector.
(b) Using a 24 mm deep socket wrench, remove the oil pressure switch.
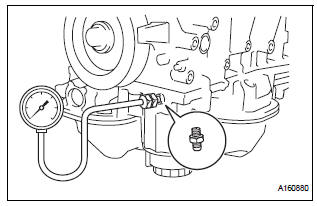
(c) Install the oil pressure gauge with adapter.
(d) Warm up the engine.
(e) Check the oil pressure.
Standard oil pressure 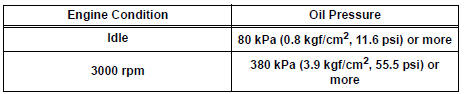
If the oil pressure is not as specified, check the oil pump (See page LU-13).
(f) Remove the oil pressure gauge.
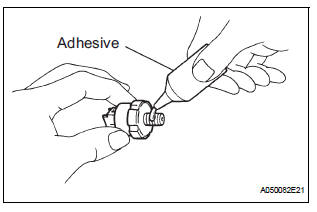
(g) Apply adhesive to 2 or 3 threads of the oil pressure switch.
Adhesive: Toyota Genuine Adhesive 1344, Three Bond 1344 or equivalent
(h) Using a 24 mm deep socket wrench, install the oil pressure switch.
Torque: 15 N*m (153 kgf*cm, 11 ft.*lbf)
| NOTICE: Do not start the engine within 1 hour after installation. |
(i) Connect the oil pressure switch connector.
(j) Check for engine oil leaks.

 Oil and oil filter
COMPONENTS
REPLACEMENT
CAUTION:
Prolonged and repeated contact with engine oil will
result in the removal of natural oils from the skin,
leading to dryness, irritation and derma ...
Other materials:
Installation
HINT:
Use the same procedures for the RH side and LH side.
The procedures listed below are for the LH side.
1. INSTALL SIDE AIRBAG SENSOR LH
Check that the ignition switch is off.
Check that the battery negative (-) terminal is
disconnected.
CAUTION:
Afte ...
Diagnostic trouble code chart
If a trouble code is displayed during the DTC check, check
the circuit listed for that code. For details of each code, turn
the page mentioned below the "DTC No" in the DTC chart.
the "DTC No" in the DTC chart.
1. TRANSPONDER KEY ECU DIAGNOSTIC TROUBLE
CODE CHART
TRANSPON ...
Under hood
GENERAL MAINTENANCE
1. GENERAL NOTES
Maintenance requirements very depending on the
country.
Check the maintenance schedule in the owner's
manual supplement.
Following the maintenance schedule is mandatory.
Determine the appropriate time to service the vehicle
using either miles dri ...
