Toyota Sienna 2010-2026 Owners Manual: Manual headlight leveling dial (vehicles with discharge headlights)
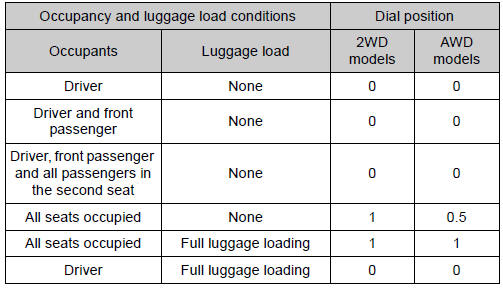
The level of the headlight aim can be adjusted according to the number of passengers and the loading condition of the vehicle.

- Raises the level of the headlights
- Lowers the level of the headlights
Guide to dial settings
Daytime running light system (if equipped)
- Bulb type: To make your vehicle more visible to other drivers during
daytime
driving, the daytime running lights turn on automatically whenever the
engine is started and the parking brake is released with the headlight
switch
off or in the “AUTO” position. (illuminate dimmer than the headlights)
Daytime
running lights are not designed for use at night.
For the U.S.A.: Daytime running lights can be turned off by operating the headlight switch.
LED type: To make your vehicle more visible to other drivers during daytime driving, the daytime running lights turn on automatically whenever the engine is started and the parking brake is released with the headlight switch off. Daytime running lights are not designed for use at night.
For the U.S.A.: Daytime running lights can be turned off by operating the headlight switch.
- Compared to turning on the headlights, the daytime running light system offers greater durability and consumes less electricity, so it can help improve fuel economy.
Headlight control sensor
The sensor may not function properly if an object is placed on the sensor, or anything that blocks the sensor is affixed to the windshield.
Doing so interferes with the sensor detecting the level of ambient light and may cause the automatic headlight system to malfunction.
Automatic light off system
- Vehicles without a smart key system
- When the headlights are on: The headlights and tail lights turn off 30
seconds
after a door is opened and closed if the engine switch is turned to the
“ACC” or “LOCK” position. (The lights turn off immediately if
 on the
key is pressed after all the doors are locked.) - When only the tail lights are on: The tail lights turn off automatically
if the
engine switch is turned to the “ACC” or “LOCK” position and the driver’s
door is opened.
To turn the lights on again, turn the engine switch to the “ON” position, or turn the light switch off once and then back to the
 or
or
 .
.
- Vehicles with a smart key system
- When the headlights are on: The headlights and tail lights turn off 30
seconds
after a door is opened and closed if the engine switch is turned to
ACCESSORY mode or turned off. (The lights turn off immediately if
on the key is pressed after all the doors are locked.) - When only the tail lights are on: The tail lights turn off automatically
if the
engine switch is turned to ACCESSORY mode or turned off and the driver’s
door is opened.
To turn the lights on again, turn the engine switch to IGNITION ON mode, or turn the light switch off and then back to
or
 .
.
Light reminder buzzer
- Vehicles without a smart key system A buzzer sounds when the engine switch is turned to the “LOCK” position, the key is removed and the driver’s door is opened while the lights are turned on.
- Vehicles with a smart key system A buzzer sounds when the engine switch is turned off and the driver’s door is opened while the lights are turned on.
Customization
Settings (e.g. light sensor sensitivity) can be changed.
(Customizable features: )
| NOTICE To prevent battery discharge Do not leave the lights on longer than necessary when the engine is not running. |
 Turning on the high beam headlights
With the headlights on, push
the lever away from you to turn
on the high beams.
When the light switch is in
position, the Automatic High Beam
system will be activated.
Pull the lev ...
 Automatic High Beam
The Automatic High Beam uses an in-vehicle camera sensor to
assess the brightness of streetlights, the lights of oncoming and
preceding vehicles, etc., and automatically turns high beam on
or off a ...
Other materials:
Absence of Registration Unit/ No Response for Connection Check/ Last Mode
Error/ No Response Against ON / OFF Command/ Mode Status Error/ Slave Reset
DTC 01-D5 Absence of Registration Unit
DTC 01-D8 No Response for Connection Check
DTC 01-D9 Last Mode Error
DTC 01-DA No Response Against ON / OFF Command
DTC 01-DB Mode Status Error
DTC 01-DE Slave Reset
DESCRIPTION
HINT:
*1: Even if no fault is present, this trouble code may b ...
Mass or Volume Air Flow Circuit
DESCRIPTION
The Mass Air Flow (MAF) meter is a sensor that measures the amount of air
flowing through the throttle
valve. The ECM uses this information to determine the fuel injection time and to
provide appropriate airfuel
ratio. Inside the MAF meter, there is a heated platinum wire whic ...
Front wheel alignment
Adjustment
NOTICE:
For vehicles equipped with VSC, if wheel alignment has
been adjusted, and if suspension or underbody
components have been removed/installed or replaced, be
sure to perform the following initialization procedure in
order for the system to function normally:
1. Disconnect the ...
